Stunning Crochet Maxi Dress Pattern | 6 Sizes
Dreaming of a breezy, effortless beach look this summer? Then, this flattering, floor-length crochet maxi dress may be for you. The pattern is fun and has instructions for six ladies’ sizes, ranging from XS to 2XL.
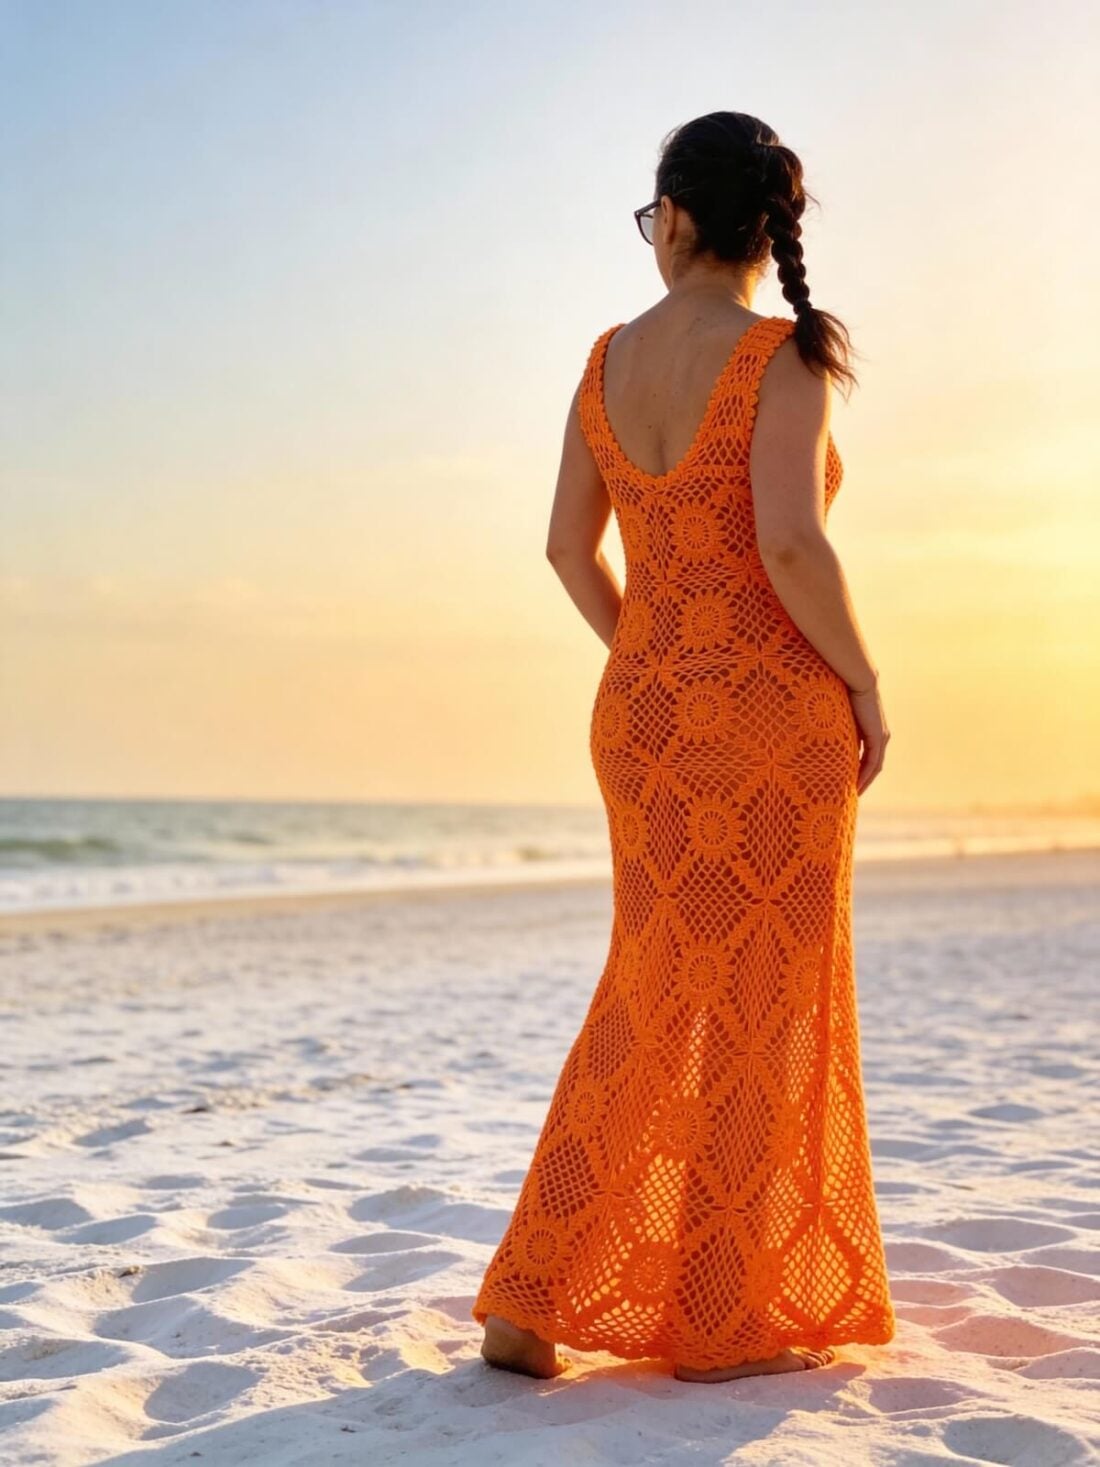
Below is a photo of me on a sunny beach wearing a beautiful sample of this long dress I made.
This website is reader-supported and contains affiliate links. As an Amazon Associate, I earn from qualifying purchases. Find my affiliate disclosure here.
Whether relaxing by the waves or going to a sunset dinner with sandy toes, this dress is sure to turn heads—and best of all, it’s handmade by you. I’m so excited to finally release this pattern for my readers to enjoy.
Why You’ll Love it:
- It’s surprisingly easy (made of squares that use basic stitches) and is a join-as-you-go crochet maxi dress. This means zero sewing required… Hooray!.
- It’s unique—no one else at the beach will wear the same dress.
- It has a shape—not a boring/boxed square dress; the motifs start small and are gradually increased from top down to create body contour.
- It’s light, breezy, and just the right amount of sexy.
Before we dive into the pattern, I would like to mention that I’ve grown a love for lightweight yarns and lacy crochet stitches. You may like to check my clothing and accessories categories that I have been growing (so many ideas, but so little time… sigh!). Those are being filled with many crochet patterns created with these characteristics.
I also have a couple of helpful resources that you may like to check before you begin working on this long dress pattern: How to Create a Slip Knot and How to do the Invisible Finish in Crochet.
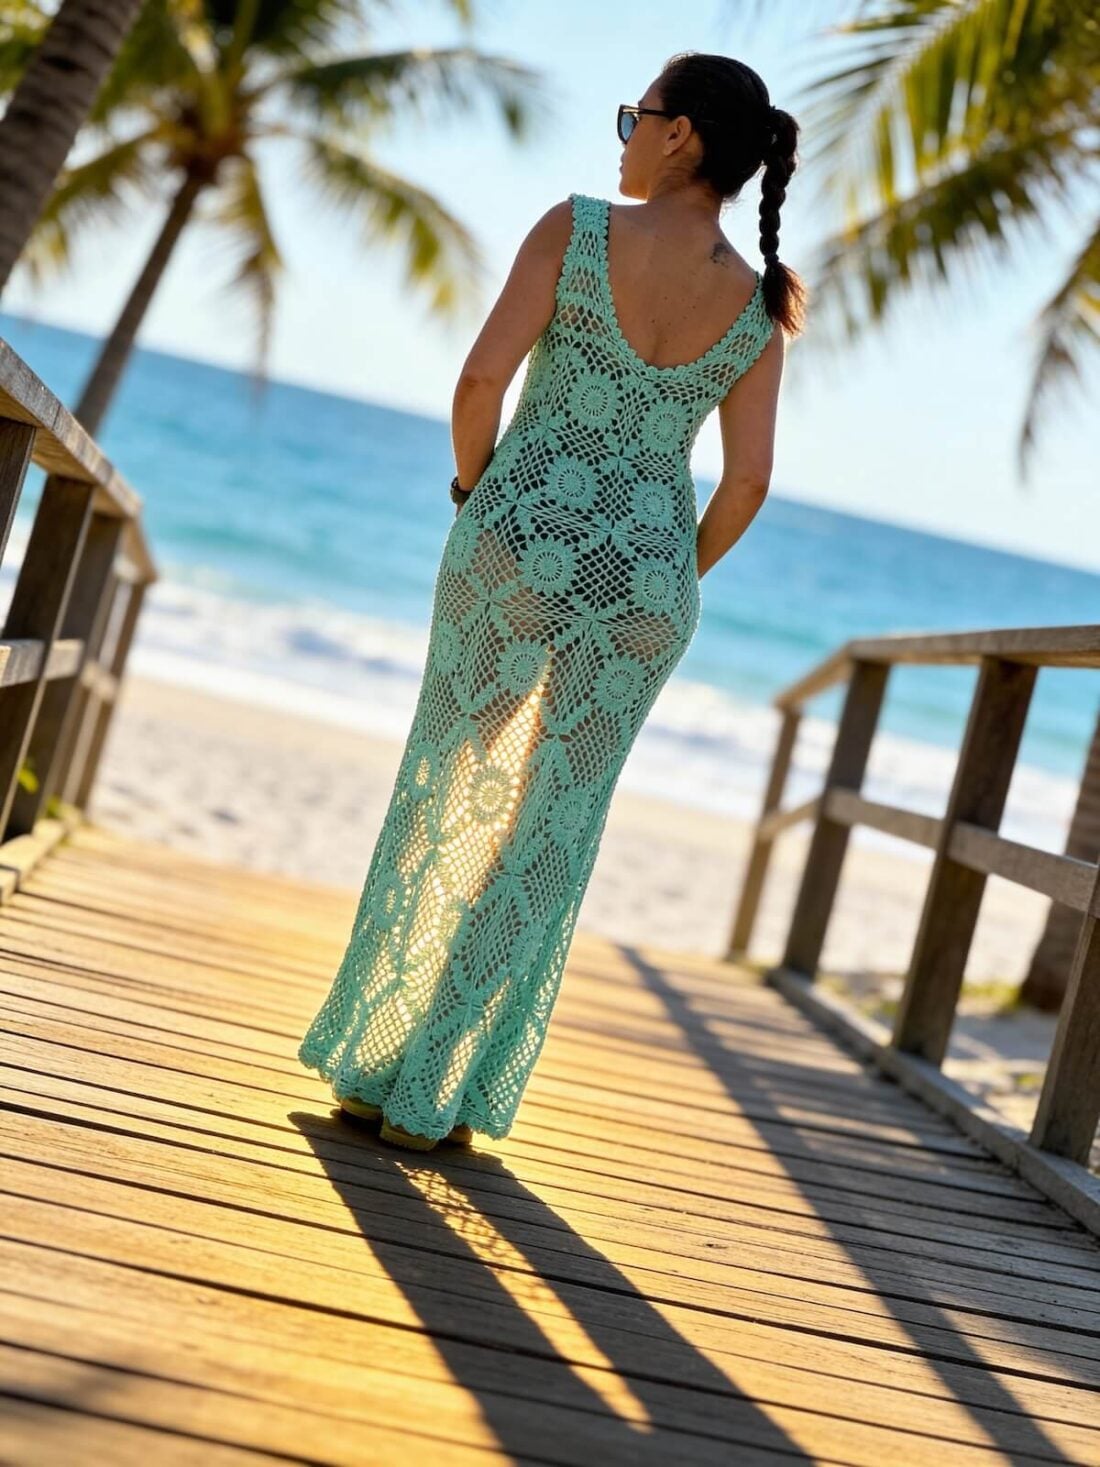
This is me again at my yard on a sunny spring day, wearing a blue version of this crochet summer dress:


Explore More Patterns


Floor-Length Crochet Dress Pattern
The design consists of individual squares joined as you go, starting from the top (bust) down.
We make the dress fitted by gradually increasing the squares by one round, starting at the third row of squares. Once the main body of the dress is done, we crochet the shoulder straps and hem, and add finishing touches, like the edging around the neckline and armholes.
And this is also a perfect maxi dress pattern for those who are not fans of sewing. We are left with only two tails from each square to weave in at the end.

What You’ll Need:
- Crochet hook: a 2.75 mm (US C) hook or the proper size needed to achieve gauge.
- Yarn: Light Worsted (3) weight yarn. The brand and amount used are listed below.
- Tapestry needle: The lacy nature of the stitch and the lightweight yarn work better with a small-eyed needle.
- Stitch markers: These are not crucial, but it’s good to have them around to mark stitch counts and placements.
- A pair of small yarn scissors.
- A flexible measuring tape.
The Yarn Specifics:
I created the pictured crochet maxi dress with 24/7 DK (3) cotton yarn by Lion Brand in Colorway Fresh Mint. Here is a table with the approximate amount needed for each size:

Yarn Recommendations and Substitutions:
I recommend natural fibers for this crochet maxi dress, such as cotton, bamboo, and rayon. A good quality cotton/acrylic blend works, too. Here are other DK yarns that will make good substitutions:
- Truboo Yarn by Lion Brand – this yarn content is 100% rayon from bamboo. It’s so sleek and soft, and it has a dreamy palette.
- Cotton Bamboo Yarn by Lion Brand – the fiber content in this one is 52% cotton and 48% rayon from bamboo.
- Coboo Yarn by Lion Brand – 51% Cotton and 49% Rayon from Bamboo. Another one with a beautiful selection of colors.
- Premier Yarns Cotton Sprout DK is another great option.
Pattern Abbreviations (US Terms):
- ch(s): chain(s)
- dc: double crochet
- dc2tog: double crochet two together
- dc3tog: double crochet three together
- FO: fasten-off or finish-off
- Rnd: round
- rep: repeat
- sc: single crochet
- sk: skip
- sl st: slip stitch
- sp: space (normally created with chains) st(s): stitch(es)
- [ ]: Numbers within brackets are stitch count.
- Asterisks are used to indicate which instructions are repeated.
Stitch Tension
Gauge is essential to ensure your crochet maxi dress fits perfectly—don’t skip this step! Checking your stitch tension is simple: just crochet one square following the pattern instructions, then measure it to make sure it matches the gauge. This quick step can save you hours of work and ensure a beautiful, well-fitting finish.
A 6-round square should measure approximately 5” (12.5 cm) before washing. The best way to measure the gauge is to lay the square flat, not stretched.

All About Sizes
This crochet maxi dress pattern includes instructions for six sizes, from XS to 2XL, and was designed to fit closely for a better, more flattering look. If your size falls in the middle, choosing the smaller size is recommended for the best fit.
For reference, the pictured model is 5’6″ (167 cm) tall with a 42″ (106 cm) hip and 36″ (91.5 cm) bust circumference, wearing size S. She would typically wear a size M, but preferred this dress one size smaller for negative ease.
The measurements shown in the size chart below were taken before blocking and washing.

Pattern Notes
- This crochet maxi dress pattern uses US crochet terminology.
- Skill Level: Intermediate. Experienced in reading written patterns, interpreting charts and schematics, and understanding basic crochet garment construction are essential skills.
- Print the pattern and highlight all the numbers pertaining to your size with a pen to make it easier to work on.
- The pattern was written as follows: XS (S, M, L, XL, 2XL). For example, “Crochet 42 (49, 56, 63, 70, 77) squares,” whereas 42 is for size XS, 49 for size S, 56 for size M, 63 for size L, 70 for size XL, and 77 for size 2XL. When only one number is given, it applies to all sizes.
- Use stitch markers to keep track of stitch count and rows.
- I’ve used The Craft Yarn Council’s Standard Women’s Body Measurement/Sizing resources as a reference to design this crochet maxi dress pattern.


Purchase a PDF Download
- Inexpensive
- Ad-free
- Print-friendly
About Exclusive Content: When you create a Grow.me account you can bookmark your favorite content in one place. With one FREE account you can have not only mine, but many other creators’ content saved in one place.
When you come to my blog and see the button “Unlock Exclusive Content”, go ahead and create an account or simply click the login button and sign-in with an existing Grow account. It’s a secure, free feature and you can unsubscribe at any time. Everything you bookmark with the “heart” in a page that uses Grow.me will show up under “Grow Bookmarks” in your account.
Please note that Grow.me is a third-party app for Exclusive Content, and I have no control over their user policies. Neither will I be able to assist with account creation and/or password resetting. For information on how to troubleshoot login and password resetting, go to “Resources” on the Grow.me website’s top menu.
Maxi Dress Instructions
Step 1: Crocheting the Squares
Use these written instructions or the stitch diagram below. Remember to join the squares as you go. Refer to the “joining method” below to learn how to do it.
Ch 5 and sl st to form a ring, then ch 2 (doesn’t count as a st).
Rnd 1: dc 16 in the ring, sl st to first dc to join. [16]
Rnd 2: ch 4 (counts as dc and a ch 1 sp), (dc, ch1) around, sl st to join. [16 dc, 16 ch 1 sp]
Rnd 3: ch 3 (counts as a dc), dc 2 into the same ch 1 sp as ch 3, (dc 3 in next ch 1 sp) around, sl st to initial ch 3 to join. [48]
Rnd 4: {ch 3 plus dc2tog (ch 3 counts as a dc of 3 dc3tog)}, ch 5, (dc3tog, ch 5) around, sl st to the top of the first dc3tog.
Rnd 5: sl st in the next 3 chs (these don’t count as sts), ch 4 (counts as a ch 1 sp for the first corner), dc 3 into the same ch 5 sp. *(Ch 5, sc in the next ch 5 sp) 3x, ch 5, (dc 3, ch 1, dc 3) in the next ch 5 sp, rep from the asterisk 2 more times. (Ch 5, sc in the next ch 5 sp) 3x, ch 5, dc 3 into the ch 5 sp where you started this round to complete the first corner, sl st to initial ch 4 sp to join.
Rnd6: ch 4 (counts as a ch 1 sp for the first corner), dc 3 into the same ch 1 sp, *(ch 5, sc in the next ch 5 sp) to next corner, ch 5, (dc 3, ch 1, dc 3) into the next corner ch 1 sp, rep from the asterisk 2 more times, (ch 5, sc in the next ch 5 sp) to the next corner, ch 5, dc 3 into the ch 5 sp where you started this round to complete the first corner, sl st to initial ch 4 sp to join.
Repeat round# 6 instructions to create the larger squares (as many as needed for your size). Refer to the “assembling the dress” section below.

Determining How Many Squares Are Needed
Use the size chart to find out what size fits you better, then refer to this diagram to determine how many squares are needed for your crochet maxi dress size.

Step 2: Learning the Joining Method
This crochet maxi dress pattern uses the “join-as-you-go” method, starting at the second square. These instructions apply to all sizes.
Things to keep in mind:
- The very first square is the only one we crochet in its entirety.
- We need to cut the yarn at the end of every square and start a new one.
- Beginning at the second square, we’ll join to create a ring of squares that goes around the bust. Then, keep joining the squares as you go to form a tube.


Joining Same-Size Squares
Per the notes section, this crochet maxi dress was designed with a negative to a close fit. To create shape, I incorporated smaller squares around the bust and gradually increased the square size by one round as I moved down to the skirt.
To join the same size squares: (ch 2 and sc) in zig-zag, joining with the ch sp in the opposite square.


Joining Larger to Smaller Squares
We use the same method as the same-size ones, but omit ch 2 at the beginning and end of the joining row.


Step 3: Crocheting the base for the straps
This is the next step after the body of the crochet maxi dress is created. Attach the yarn to any stitch along the top edge of the dress, then crochet two rounds to form the base for the straps and neckline.
Round 1: (ch 5, sc in next sp including the sp between the corners of the squares) around, sl st to join.
Round 2: sl st in next 2 chs, (ch 3, dc ) in the current ch 5 sp to make first dc cluster, (3-dc cluster in next ch 5 sp) around. Cut the yarn, and fasten off.
Determine placement for the shoulder straps:
Now, with the crochet maxi dress right-side out, mark the spots to indicate the armhole bottom. Place a stitch marker, and attach the yarn at one of those marked stitches to crochet the first strap.
Tip: Squeeze the top opening of the dress to mark the center of the armhole, ensuring symmetry. If the top row has an odd number of squares, achieving precise center alignment is impossible, but try to center it as closely as possible.

Step 4: Creating the Shoulder Straps
Start with either shoulder side. It doesn’t matter which to crochet first because they are all identical. We are crocheting two for the front and two for the back (one at a time), then we join them on the top of the shoulders.
Strap #1: Front/Back
Attach the yarn to one of the sts in the far end where you marked the bottom of the armhole.
Row 1: (ch 5, sc in next sp between the 3-dc cluster) 8 (9, 10, 12, 13, 14) times, turn.
Tip: If you counted the ch 5 spaces correctly in the previous row, you don’t need to worry about the stitch count to finish the remaining rows.
Row 2-3: sl st in the next two chains, (ch 5, sc in the next ch 5 sp) to last, turn.
Row 4: sl st in the next two chains, (ch 3, dc 2) in the first ch 5 sp, 3-dc cluster in next ch 5 sp to last, turn. Ch 3 counts as a dc st here and throughout the strap sections.
Row 5: (ch 5, sc in next sp between the 3-dc cluster) until one 3-dc cluster rem, ch 5, sk 2 dc sts, sc in the last st, turn.
Row 6-7: sl st in the next two chains, (ch 5, sc in the next ch 5 sp) to last, turn.
Row 8-11: Repeat the instructions in rows 4-7. Row 12: Repeat the instructions in row 4, ch 3 turn.
When done with the last row of sts, in the next step, join with sl sts or sc sts on the shoulders.
Row 13-15 (16, 18, 19, 20, 21): dc across. You can add or remove rows in this step to adjust the height of the straps. Cut the yarn and fasten off.

Strap #2: Front/Back
Skip 2 (3, 4, 3, 4, 5) 3-dc clusters in the center (back and front). Then, attach the yarn to the space between the next two 3-dc clusters. Use the instructions for strap #1 in the previous step.
Once the last row of sts in the last two straps are finished, sl st into the sts in the last row of the opposite strap to join on the shoulder, making the seam on the wrong side of the dress. Cut the yarn and fasten off.

Step 5: Neckline & Armhole Edge
The edging on this crochet maxi dress will be created with an easy scallop stitch. Start by attaching the yarn to any stitch along the edge, wherever you want to start. Use the instructions below for all three: the neckline and both armhole edgings.
(Ch 4, dc 2 into the 4th ch from the hook, sc in next ch sp or side st) around the edge. Sl st to finish. Cut the yarn and fasten off.


Step 6: Hem
Start by attaching the yarn to any st on the bottom edge of the dress.
Round 1: (ch 5, sc in next sp including the sp between the corners of the squares) around, sl st to join.
Round 2: sl st in next 3 chs, (ch 5, sc in next sp) around, sl st to join.
Round 3: sl st in next 3 chs, *(dc 3, picot st, dc 3) in next ch 5 sp, sc in next ch 5 sp, rep from the asterisk to last, (dc 3, picot st, dc 3) into the last sc st, sl st to join. FO. Cut the yarn. Weave in all the leftover ends.
Length Tip: The Length of this crochet maxi dress can be adjusted by adding or subtracting rows of squares. If you are tall and only need to add a few inches, you can include plain rounds of mesh sts (refer to round 2 instructions for the hem).
Your flattering, floor-length dress is now completed. I hope you enjoyed crafting this dress and created a beautiful piece to wear this summer.

FAQ
Can I use a different yarn weight?
It depends! Changing the yarn weight (thickness) is only advised if gauge can be achieved with said yarn (see the “stitch tension” section) or for those crocheters who are comfortable adjusting the size on their own.
Can a beginner crochet this dress?
Maybe! The squares use basic stitches, so no problem there. Once the squares’ joining method is figured out, this crochet maxi dress will be relatively quick and straightforward to crochet. However, it is a highly visual pattern, so understanding the written instructions, charts, and schematics is crucial.
Can I adjust the length?
Certainly! Length can be adjusted by adding or subtracting rows of squares or adding extra rounds in the hem if it’s only a few inches.
Is the bust size easy to adjust?
The circumference around the bust can be adjusted by changing the number of squares. I have done the legwork of figuring out how many squares are needed for sizes XS to 2XL for this crochet maxi dress pattern. However, larger sizes can be created simply by adding one extra square to each row of squares when assembling the dress.
Can I add more flare to the skirt?
Absolutely! It’s easy to add more flare to the skirt. To achieve that, we can simply keep increasing the squares by one round for each row of squares down to the hem. However, you’ll need to plan for using extra yarn if that’s the case.
More Crochet Patterns for Summer
- Crochet Summer Dresses Pattern Roundup
- Beach Conver-Ups Pattern Roundup
- Drop-Shoulder Oversized Crochet Tee Pattern
- Daisy Girl Sundress Crochet Pattern
- Crochet Bralettes Pattern Roundup
- Butterfly Crochet Tops Pattern Roundup
- Crochet Triangle Head Scarf Pattern
- Granny Square Bucket Hat Free Pattern

What to do next
- Comment on this post: I always read comments and reply to all questions posted on the blog, and I love it when you stop by to say hello.
- Share your project: if you make this or any of my other patterns, tag me on Instagram or Facebook, or use the hashtag #zamiguzmakers. I love seeing what you make.
- Pin it now: Are you not ready to make it yet? You can use the above image to pin it to your crochet boards or follow me on Pinterest for more.
- Join The Makers community: Join my community group on Facebook and be the first to know about pattern releases and other crochet-related content.
Would you rather bookmark this blog post for later? You can create a free Grow.me account and use the “heart” on the left-hand side of your screen to save it. It’s easy to have your internet favorites bookmarked in one place.


This is absolutely beautiful!!! Thank you for making it available and sharing your vision with the rest of us!
Hi Rose,
Thank you and you’re very welcome! So glad to hear you love the Maxi dress pattern.
Maggie