
The crochet invisible finish, also known as the invisible fasten-off technique, is used to neatly complete crochet projects with open edges. As a general guideline, you can substitute a slip stitch with the invisible finish whenever a pattern calls for a slip stitch to join.
This website is reader-supported and contains affiliate links. As an Amazon Associate, I earn from qualifying purchases. Find my affiliate disclosure here.

I discovered the invisible finish years after learning to crochet, when I believed I knew everything about it. It’s one of those small details you learn and wonder, “Why didn’t I think of this before?” It truly makes a difference.
Believe it or not, this technique works for all crochet projects, even squares and lace stitches. So, let’s jump right in and learn how to create an invisible finish—it’s super easy and will take your crochet to the next level!


Crochet Invisible Finish
For this tutorial, I’ll demonstrate how to create the invisible fasten-off using single crochet stitches. However, the concept remains the same if you’re applying this technique with other stitches.
Materials
- Yarn – the pictured sample was created with worsted weight (4) cotton yarn
- Crochet Hook – a hook size 3.5 mm (US E) was used in this tutorial.
- Tapestry Needle
Instructions:
Step 1
Finish the last stitch of your project without joining it with a slip stitch. To secure your work, cut the yarn, leaving a tail of approximately 5 to 8 inches (13 to 20 cm).

Step 2
Use a crochet hook to pull the tail through the last stitch to prevent it from unraveling. Then, tread the yarn tail onto a big-eyed yarn needle.

Step 3
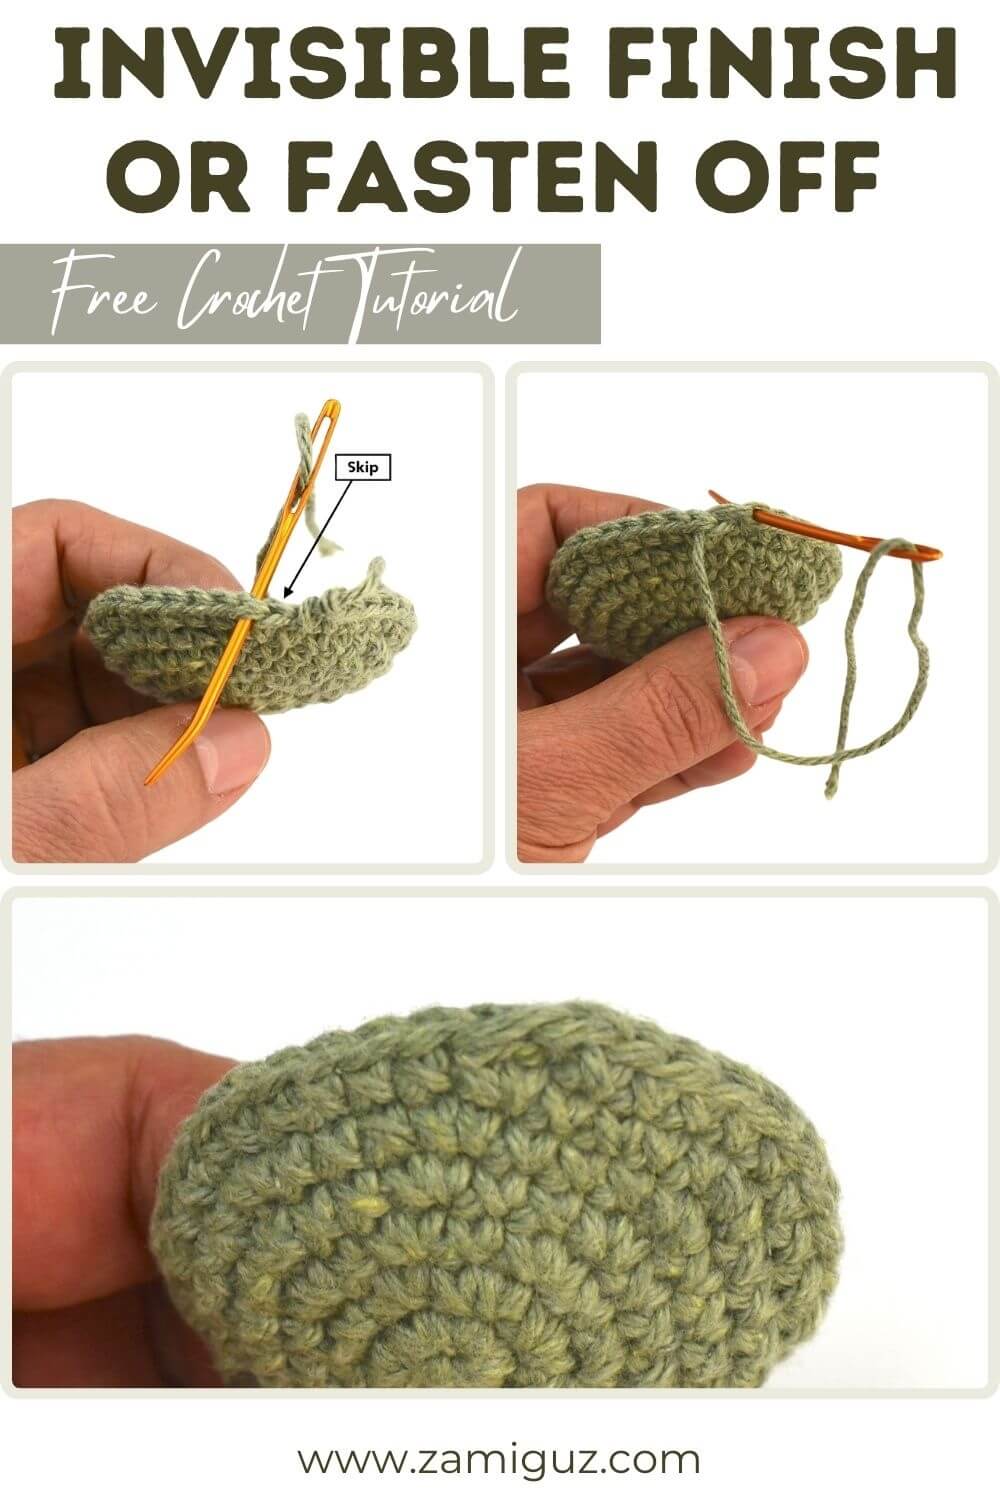
Skip the next stitch and insert the needle from the back to the front of your work, passing it through both loops of the next stitch.

Step 4
Return to the stitch from which the tail emerges. Then, insert the needle into that stitch, drawing it to the back of the work underneath the layer of stitches along the edge. Adjust this last loop to even up the stitch with the others as best you can.


Step 5
To complete the process, weave in the ends at the back of the work, ensuring it looks as neat as possible. Tying a knot is not necessary if you weave it back and forth at least twice.

It’s simple and straightforward, isn’t it? I hope you found these instructions helpful and that the crochet invisible finish will be part of your creative journey.
FAQ
Why should you use the crochet invisible finish?
Because it prevents bumps and imperfections created by slip stitches on your work, giving the finishing of open edges a seamless and neat look.
Can you create the invisible finish with a hook?
Technically, yes. It’s possible to create it with the crochet hook. However, depending on your tension, it may be a little tricky. You’d probably still need a tapestry needle to weave in the ends afterwards.
What can you use the crochet invisible finish for?
This technique is particularly useful for Amigurumi, but it can also be used for other projects, such as granny squares, doilies, blankets, and even openwork stitches.
Explore More Crochet Techniques
- How to Crochet a Perfect Circle
- How to Crochet Ball of Any Size
- How to Crochet an Invisible Decrease
- How to Crochet a Slip Knot
- Crochet Chainless Foundation
- How to Create a Crochet Magic Circle
Final Thoughts
To sum it up, the crochet invisible finish is an effortless and quick way to put a seamless final look in your projects. You simply drop your crochet hook at the end of the project and weave in the yarn tail with a tapestry needle to carefully hide imperfections. What else can you do next?
Pin, Share, and Comment:
- Check my Etsy and Ravelry pattern shops if you like ad-free PDF downloads at a very low cost.
- Comment on this post: I always read comments and reply to all questions posted on the blog, and I love it when you stop by to say hello.
- Share your project: if you make this or any of my other patterns, tag me on Instagram or Facebook, or use the hashtag #zamiguzmakers. I love seeing what you make.
- Pin it now: Are you not ready to make it yet? You can use the above image to Pin it to your crochet boards, or follow me on Pinterest for more.
- Join The Makers community: Join my community group on Facebook and be the first to know about pattern releases and other crochet-related content.


Crochet Invisible Finish Step-by-Step
The crochet invisible finish will take your crochet skills to the next level. This technique will make your finished projects look seamless and neat.
Materials
- Yarn
Tools
- Crochet hook, tapestry needle, scissors
Instructions
- Finish the last stitch of your project without joining it with a slip stitch. To secure your work, cut the yarn, leaving a tail of approximately 5 to 8 inches (13 to 20 cm).

- Use a crochet hook to pull the tail through the last stitch to prevent it from unraveling. Then, tread the yarn tail onto a big-eyed yarn needle.
- Skip the next stitch and insert the needle from the back to the front of your work, passing it through both loops of the next stitch.
- Return to the stitch from which the tail emerges. Then, insert the needle into that stitch, drawing it to the back of the work underneath the layer of stitches along the edge.
- To complete the process, weave in the ends at the back of the work, ensuring it looks as neat as possible. Tying a knot is not necessary if you weave it back and forth at least twice.


Notes
- The pictured sample was created with worsted weight (4) yarn.
- Hook size 3.5 mm (US E).
- This technique can be used mainly with Amigurumi. However, it's possible to do the invisible finish with any other projects.
Recommended Products
This blog post contains affiliate links. As an Amazon Associate and member of other affiliate programs, I earn from qualifying purchases.


I feel like maybe I’m doing this wrong as I end up with one less stitch than I should. Does that make sense?
Hi Amee,
It does make sense, I think I know what you mean. Are you skiping the first stitch only when you do the invisible finish?