Cute Daisy Crochet Girl Dress | 8 Sizes
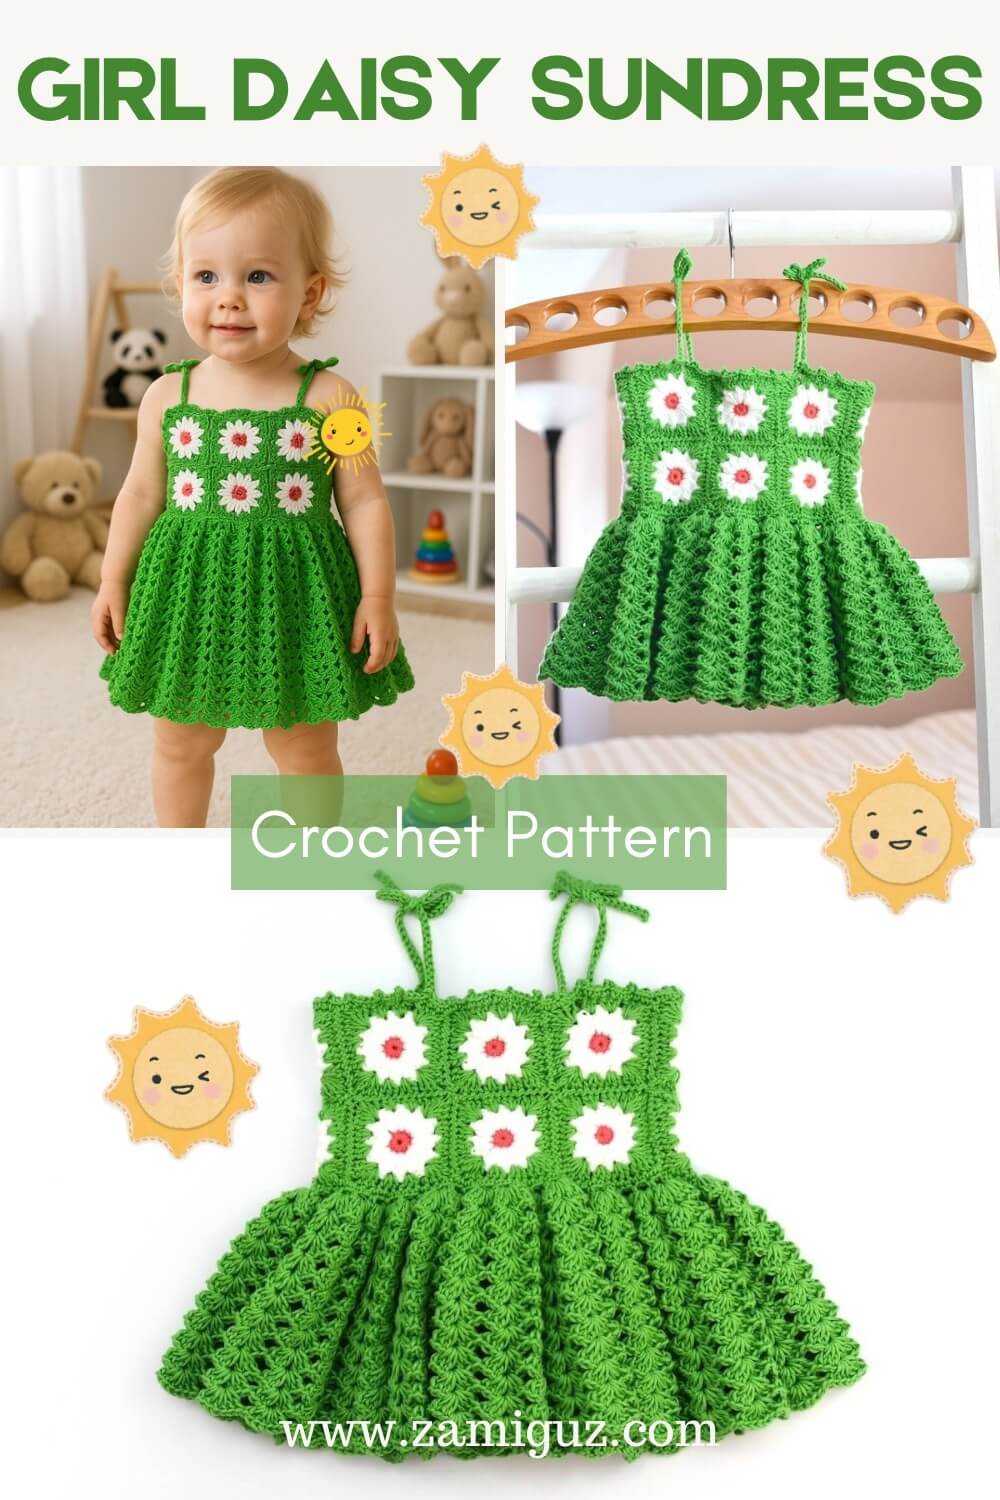
Hello, crochet friends! Today, I am excited to share an adorable, free crochet girl dress pattern. This boho-style dress features a bodice made with daisy squares and a full, flared skirt. The easy-to-follow instructions cover eight different sizes for kids.

This website is reader-supported and contains affiliate links. As an Amazon Associate, I earn from qualifying purchases. Find my affiliate disclosure here.
This pattern uses simple stitches and shaping, making it perfect for beginners. However, experienced crocheters will also find plenty of opportunities to adjust and personalize the design. I had tons of fun creating this cute dress. I hope you love it.
While you’re here, you might also want to check out my baby crochet pattern roundup, which includes over 80 projects, and my Amigurumi category for more ideas for kids.
Read through the pattern notes below, prepare your supplies, and let’s get started!
Crochet Girl Dress Design Highlights
Let’s discuss the details of the dress’s design and construction! This is a beautiful tie-back sundress for girls, available in sizes ranging from 3 months to 10 years.
It is crocheted from the top down, starting with the bodice. The shoulder straps and back string are created last. And the best part? It has room for adjustments. I have included many step-by-step photos and tips throughout the pattern to help you adjust the bodice and skirt length as needed.
The finished dress will have a close fit that can be adjusted with a tie-back string. However, for the best sizing result, crochet a gauge swatch and follow the instructions in the stitch tension section below.

Explore More Patterns


Crochet Girl Dress Pattern
This pattern uses standard US crochet terms.
Skill Level: Intermediate.
Materials:
- Fine (#2) yarn in three colors (more on the yarn below).
- 3.25 mm (US D) crochet hook or other size needed to meet gauge.
- Scissors
- Tapestry needle
- Stitch markers
- Scissors
- Flexible measuring tape

Yarn specifics:
Use fine (#2)/sport-weight yarn to make this crochet girl dress. The pictured dress was made with Cotton Fair by Premier Yarns in light peach, white, and leaf green.
Approximate amount per size:

Pattern Notes:
- The pattern was written as follows: 3-6mo (9-12mo, 18mo, 2y, 4y, 6y, 8y, 10y) – the pictured dress is 3mo size. See the size chart below.
- Measurements shown in the size chart were taken without washing or blocking the finished dress.
- To make the instructions easy to follow, print them out and highlight the numbers pertaining to the size you’re making with a pen.
- Although not required, stitch markers help track stitch count and rows.
Stitch Tension:
Gauge is crucial to make a crochet girl dress that fits right. Please do not skip the swatch.
It’s easy to check the stitch tension. Simply crochet one square using the pattern instructions and measure it. You should change the hook size if it’s off by 2/8 of an inch (0.5 cm) or higher.
1 Square = 2 ¼ inches x 2 ¼ inches (5.72 x 5.72 cm) before washing/blocking.

Abbreviations (US Terms):
- C1: Color 1 (pictured is bright peach)
- C2: Color 2 (pictured is white)
- C1: Color 3 (pictured is leaf green)
- ch (chs): chain (chains)
- dc cluster st: double crochet cluster stitch or four double crochet stitches together.
- dc: double crochet
- FO: fasten off
- mc: magic circle
- Rnd: Round
- rep: repeat
- RS: right side
- sc: single crochet
- sk: skip
- sp: space(s)
- sl st: slip stitch
- st(s): stitch(es)
- yo: yarn over
- *: repeat/work instructions after asterisk as indicated in the pattern
- ( ): repeat instructions in parenthesis as indicated
- [ ]: the numbers shown in or next to brackets are stitch count.
Finished Dress Size Table:

Helpful Resources:

Purchase a PDF Download
- Inexpensive (costs less than a coffee)
- Ad-free
- Print-friendly
About Exclusive Content: When you create a Grow.me account you can bookmark your favorite content in one place. With one FREE account you can have not only mine, but many other creators’ content saved in one place.
When you come to my blog and see the button “Unlock Exclusive Content”, go ahead and create an account or simply click the login button and sign-in with an existing Grow account. It’s a secure, free feature and you can unsubscribe at any time. Everything you bookmark with the “heart” in a page that uses Grow.me will show up under “Grow Bookmarks” in your account.
Please note that Grow.me is a third-party app for Exclusive Content, and I have no control over their user policies. Neither will I be able to assist with account creation and/or password resetting. For information on how to troubleshoot login and password resetting, go to “Resources” on the Grow.me website’s top menu.

Instructions
Start the crochet girl dress here. First, we create the squares and set them aside. Then, sew them together to make the bodice, leaving the back open. Next, you crochet the waistline and skirt. And finally, the shoulder and back straps.
Step 1: Creating the daisy squares
Make 14 (16, 16, 18, 20, 30, 33, 36) squares. Depending on the size, the bodice of this Crochet Girl Dress will feature two or three rows of squares (more on the bodice below).
Start this daisy square dress pattern by creating all the squares and sewing them together to form the bodice.
Rnd1: 12 sc in a mc with C1, sl st to join. Cut the yarn. FO. As an alternative to the mc, you can ch 2 and place the sc 12 sts in the 2nd ch from the hook.
Rnd2: Attach C2 – ch 3 (counts as the first dc st for the first dc cluster), then complete the 1st dc cluster, ch 1 (dc cluster st, ch 1) 11 more times, sl st to the first cluster to join. Cut the yarn. FO. [12 dc clusters]
Crocheting a 4-dc cluster: *yarn over, insert the hook in the stitch, yarn over, pull up a loop, yarn over, pull through two*. Repeat the instructions between the asterisks three more times, then yarn over and pull through all five loops on the hook to complete the cluster.

Rnd3: Attach C3 to any of the ch 1 sp, (ch 4, dc 3) in that same sp, 3 hdc in each of the next 2 ch 1 sp, *(dc 3, ch 1, dc 3) in the next ch 1 sp, 3 hdc in each of the next 2 ch 1 sp. Rep from the asterisk two more times, dc 3 in the same sp as the initial ch 4, then sl st into the top of the ch 3 to join.
Finish up by cutting the yarn and leaving a 15-20” tail to sew the squares together later.

Step 2: Putting the bodice together
Sew the squares together to form a rectangle for the bodice, leaving the ends unsewn for the back strap. We are creating 2 (2, 2, 2, 2, 3, 3, 3) rows of squares, with 7 (8, 8, 9, 10, 10, 11, 12) squares per row.
Any joining method can be used for the squares in this girl’s dress pattern. However, I recommend the whipstitch hand-sewing method because it creates a clean and delicate finish.
Whipstitch explanation:
- Thread the needle with the yarn tail from one of the squares.
- Then, pair two squares, the wrong side with the wrong side.
- Next, insert the needle under two “v” loops of the first stitch in the bottom square, from the right to the wrong side.
- Bring it back from the wrong to the right side under the two “v” loops of the corresponding stitch in the top square.
- Repeat the previous steps with all stitches until all sides needed to form the band are sewn. It doesn’t matter in which order the squares are sewn.


Bodice adjustment tip: You can use a single row of squares if you want a high-waisted dress, which is also super cute. In this case, more rows will be needed at the bottom of the skirt.
Step 3: Waistline and skirt
Attach the yarn (C3) to the right side of the corners of the bodice band you sewed together in the previous step. From here, we will crochet in the round.
Rnd1: sc 7 sts per square, totaling 98 (112, 112, 126, 140, 140, 154, 168) sc, then ch 14 (14, 16, 16, 16, 16, 16, 16) at the end of the band and sl st to the first sc st to join and create a loop.
Pro Tip: the chains at the back will provide room to add more stitches that add extra size to the chest circumference of this crochet girl dress. They also anchor the straps’ ends and help cinch the skirt to the bodice when the dress is on.

Rnd2: (ch 3, sk 1 st, sc in next st) across. This is the base for the skirt stitches.

Waistline round 2
Note: initial ch-4 does not count as a dc st in every round from here.
Rnd3: sl st in the first ch of the first ch 3 sp, (ch 4, dc 3) in first ch 3 sp, (dc 3, ch 1, dc 3) in every ch 3 sp across, dc 3 in the first ch 3 sp to complete the first shell st, sl st to join.
Rnd4-11 (13, 16, 19, 22, 25, 27, 29): (ch 4, dc 3) in first ch 1 sp, (dc 3, ch 1, dc 3) in every ch 1 sp across, dc 3 in the first ch 1 sp to complete the first fan st, sl st to join.
Pro Tip: Add or subtract rows here to adjust the length of the dress.

Step 4: Crochet Girl Dress bodice top row
This is a single row of sc and picot sts. Start by attaching the yarn (C3) to the corner of the square (at the back opening).
Then, picot st in the first sc st, *sc in the next 3 sts, picot st in the 3rd sc st, rep from the asterisk to the other back corner. Cut the yarn. FO.
Creating a picot st: chain 3, slip stitch in the third chain from the hook.


Step 5: Making the shoulder straps
These are shoulder tie straps. We are making four of them: two for the front and two for the back.
- Choose any of the four spots and attach the yarn (C3) to one of the dc or hdc sts in the top row about 2.5 inches (2.5, 2.5, 3, 3, 3.5, 4, 4) from the underarm edge for the front straps, and another half to one-inch inwards for the back straps
- Then, ch 41 (47, 53, 60, 65, 70, 75, 80) and sl st into the back bump of the second ch and every ch across. Anchor the last sl st in another st at the edge of the top row to secure it well. Cut the yarn. FO.
- Repeat these steps with the remaining straps.


Step 6: Crocheting the back-tie string
There is no exact way to create the back string crisscross on the back of this crochet girl dress. To make it like the photo, we’ll need a 30-40-inch string of 166 (166, 166, 166, 214, 214) chains. Then, sl st into the back bump of the second ch and every ch across. Cut the yarn. FO.
Place the tie-back string using the traditional shoelace crisscross method, starting at the top and working down the waist. Use the spaces between the granny stitches in the back of this crochet girl dress. The ends of the strings will go in and then out in the back center chain sts (see the 2nd photo below).


Step 7: Finishing the crochet girl dress
Finish this cute Daisy Crochet Girl’s Dress by neatly weaving in the yarn ends. I hope your little princess rocks her style with this outfit.
Not ready to make it yet? You can use the image below to pin it for later.

More Clothing and Accessories Patterns
- Easy Bear Ear Hooded Crochet Cowl
- Beach Cover-Up Crochet Patterns
- Lace Summer Top Crochet Pattern
- Crochet Hexagon Sweater Pattern Roundup
- Moss Stitch Crochet Hexagon Pattern
- Cute Crochet Bralette Patterns
What do do next
- Comment on this post: I always read comments and reply to all questions posted on the blog, and I love it when you stop by to say hello.
- Share your project: if you make this or any of my other patterns, tag me on Instagram or Facebook, or use the hashtag #zamiguzmakers. I love seeing what you make.
- Pin it now: Are you not ready to make it yet? You can use the above image to Pin it to your crochet boards, or follow me on Pinterest for more.
- Join The Makers community: Join my community group on Facebook and be the first to know about pattern releases and other crochet-related content.
Would you rather bookmark this blog post for later? You can create a free Grow.me account and use the “heart” on the left-hand side of your screen to save it. It’s easy to have your internet favorites bookmarked in one place.