Fun Crochet Loaf Bunny Pattern | Minimal Sew
Looking for an easy spring project? This crochet loaf bunny pattern is perfect for last-minute Easter gifts or spring decorations.

This website is reader-supported and contains affiliate links. As an Amazon Associate, I earn from qualifying purchases. Find my affiliate disclosure here.
The bunny has a unique loaf shape and adorable large ears. I created it using the Amigurumi technique, and the only sewing needed is to attach the paws, which makes it incredibly fun to crochet!
You may have noticed my love for bunnies if you’ve followed me for a while. I previously designed this floppy-eared Amigurumi bunny, a cute and quick bunny appliqué perfect for small gifts, as well as this unique marshmallow Amigurumi bunny peep. I’ve also put together this crochet bunny pattern roundup that includes work from other designers.

Let’s talk about this crochet loaf bunny pattern details, gather the supplies, and get started.

Explore More Amigurumi Patterns
Pro Tips for the Cutest Crochet Loaf Bunny
- Create tight stitches for a solid fabric without holes. The easiest way to achieve that result is to use a smaller hook than the yarn label calls for.
- Stuffing tiny Amigurumi, such as this bunny, can be challenging, but it’s essential to shaping your work well. Using a stuffing tool helps to add fiber uniformly in every cavity—this YouTube video shows you how to do it.
- The medium-weight chenille yarn used in this pattern may be tricky for beginners. The best way to crochet with chenille yarn is to feel the stitches instead of trying to see them—it takes some practice to get used to it.
Is this Crochet Loaf Bunny Pattern Easy?
Yes, the pattern is easy to follow. However, to complete this project, you will need Amigurumi skills like crocheting in continuous rounds using single crochet stitches, basic embroidery, and sewing.
Can I Use a Different Yarn to Crochet this Bunny?
Absolutely! I used a medium-weight chenille yarn, which I found easier to work with than expected. However, depending on the brand, thickness, and stitch tension, the bunny may end up smaller or larger.
Can I Create this Loaf Bunny Lop-Eared Instead?
Yes! You can use a larger crochet hook to make the ears slightly bigger, then sew them to the side of the face with a needle and yarn to give them a drooping appearance.
Crochet Loaf Bunny Pattern
Materials & Tools
- Medium-weight (4) yarn: I used approximately 45 yards (42 m) of Skinny Chenille by Loops & Threads.
- 2.75 mm/US C Clover Amour crochet hook.
- One pair of 8 mm safety eyes with washers.
- Safety eye placement tool (optional but very useful).
- Stuffing fiber – PolyFil is an excellent quality polyester fiber.
- A stuffing tool – like a hemostat.
- Stitch marker – mark the first stitch in every round, moving it up as you go.
- Scraps of brown and pink embroidery floss or crochet thread for the facial features.
- Tapestry needle – a bent tip needle is ideal for small Amigurumi projects.
- Scissors – these Fiskars thread snip scissors are super sharp.
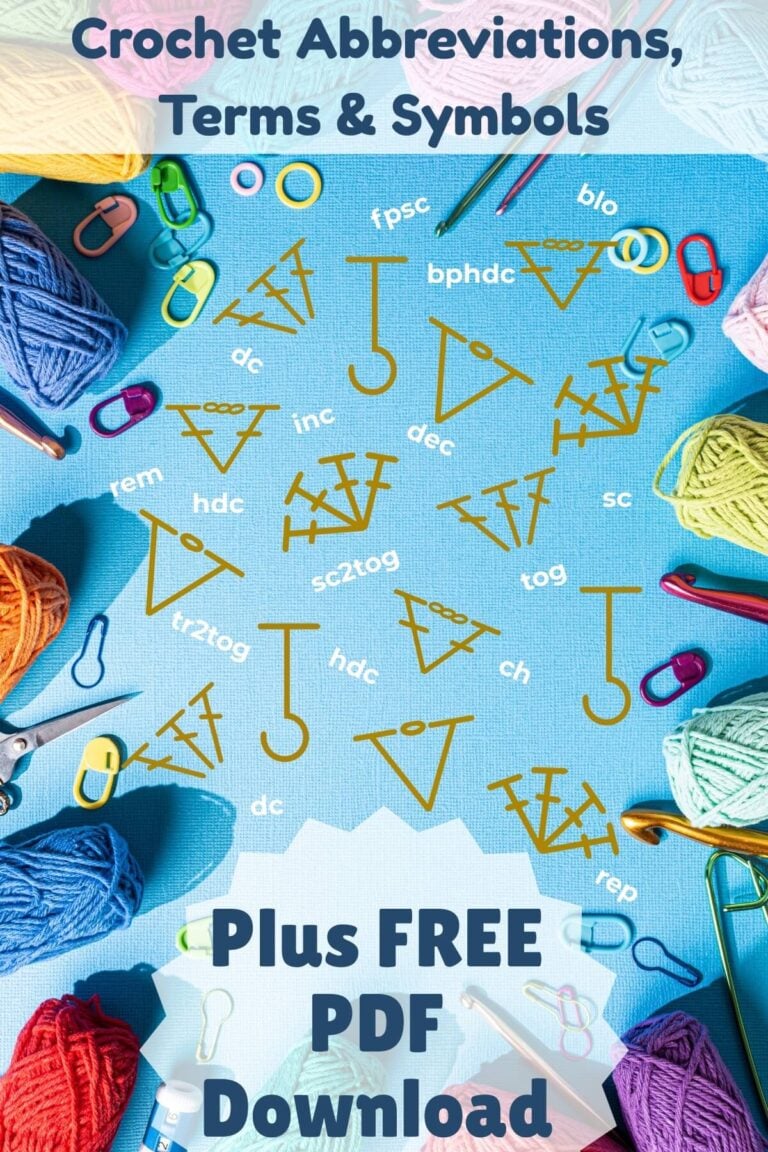
Pattern Abbreviations
- approx.: approximately
- ch: chain
- inc : increase (2 sc in the next stitch)
- dec: invisible decrease (single crochet 2 together)
- FO: fasten-off
- Rnd: Round
- st(s): stitch(es)
- sk: skip
- sc: single crochet
- ( ): repeat the instructions within parenthesis as many times as directed
- [ ]: stitch count in a round
Helpful Resources
- 14 Best Amigurumi Materials and Tools
- Crochet Magic Circle
- Crochet Invisible Decrease
- How to Crochet a Perfect Circle
- Crochet Invisible Finish

Stitch Tension
Gauge is not crucial for this crochet bunny loaf pattern. However, to give you an idea of stitch tension, the finished bunny ear should measure 2 inches (5 cm) long.
Finished project size
This Amigurumi Loaf Bunny measures approximately 4 inches (10 cm) in height, including the ears, and about 3.5 inches (6 cm) in length, not including the tail.
Pattern notes:
- This crochet loaf bunny pattern uses US crochet terms.
- Skill level: Intermediate.
- Techniques used: the basics of the Amigurumi, such as single crochet in continuous rounds, attaching limbs as you go, basic embroidery, stuffing, and basic sewing.

Purchase a PDF Download
- Inexpensive (costs less than a coffee)
- Ad-free
- Print-friendly
Pattern Instructions
Ears (x 2)
Tip: Don’t worry about making the stitches too tight on the ears; otherwise, they will be too small. It should measure approximately 2 inches (5 cm) long.
Rnd1: ch 2, sc 6 into the 2nd ch from hook.
Rnd2: sc around [6]
Rnd3: inc x6 [12]
Rnd4-10: sc around [12]
Rnd11: dec x6 [6]
FO, and there is no need to stuff them. This will be the bottom of the ears (leave the bottom open). Cut the yarn and leave a tail of about 8 inches (20 cm). Set them aside.
Pinch the bottoms of the ears one at a time. Then, thread a needle with the tail and stitch it twice to hold the bottom pinched and make the ear fold.


Tail
Rnd1: 6 sc in a magic circle or ch 2, sc 6 into the 2nd ch from the hook.
Rnd2: inc x6 [12]
Rnd3-4: sc around [12]
Rnd5: (dec, sc 2) x3 [9]
FO, leaving it open, and there is no need to stuff the tail. Set it aside.

Head
Stuff the head and the body as you go.
Rnd1: 6 sc in a magic circle or ch 2, sc 6 into the 2nd ch from the hook.
Rnd2: inc x6 [12]
Rnd3: (inc, sc) x6 [18]
Rnd4: (inc, 2 sc) x6 [24]
Rnd5: (inc, 3 sc) x6 [30]
Rnd6-7: sc around [30]
Attach the ears in the next round with the folded indentations outwards.
Rnd8: sc 2 with the first ear, sc 2, sc 2 with the other ear, (dec, sc 2) x6 [24]
Place the eyes between rounds 4 and 5, two stitch rows below the ears (see photo).
Rnd9: (dec, sc 2) x6 [18]
Rnd10: (dec, sc 4) x3 [15]
Do not cut the yarn.

Body
Rnd11: inc 15x [30]
Rnd12: inc x6, 24 sc [36]
Rnd13: inc x9, 27 sc [45]
Rnd14-19: sc around [45]
Rnd20: (dec, sc 13) x3 [42]
Rnd21: (dec, sc 5) x6 [36]
Attach the tail in the next round. Pinch the “cup” opening you made for the tail and use the stitches to attach it as instructed in the next round.
Rnd22: dec, sc 4, dec, sc 4 with the tail, (dec, sc 4) x4 [30]
Rnd23: (dec, sc 3) x6 [24]
Rnd24: (dec, sc 2) x6 [18]
Rnd25: (dec, sc) x6 [12]
Rnd26: dec x6 [6]
FO. Cut the yarn.
Facial indentations
Thread the needle with a piece of the same yarn used to make the bunny to create the indentations:
- Then, move it from one eye to the other.
- Next, pull it tight and repeat the process, back-and-forth, three additional times (or until you are satisfied with the result).
- Use the same piece of yarn to create a slight indentation for the mouth between rounds #4 and #5.
- Finish by bringing the ends to the back of the head in the same spot and creating a knot. Then, use the hook to hide the ends inside the work.

Facial embroidery
Use the brown floss to embroider the mouth in the center of the indentation and the pink floss to embroider the nose. Use the photo below as a reference.

Paws
Creating the paws in this crochet loaf bunny pattern:
Front paws (x2): chain 2, leaving a 4-5 inches (10-13 cm) tail, and place 6 sc sts into the 2nd chain from the hook. Cut the yarn, leaving another tail of the same size.
Back paws (x2): chain 2, leaving a 4-5 inches (10-13 cm) tail, and place 6 sc sts into the 2nd chain from the hook. Then, crochet a 2nd row of 6 inc (12 sts). Cut the yarn, leaving another tail of the same size.
Finishing: Use the tails and crochet hook to attach the four circles to the bottom of the bunny’s belly. The head can be used as a reference to make them centered (see photo for placement guidance). Rows 5 and 10 (5 sts apart) are good spots.
Tip: There is no need to sew the paw circles on the edges. One stitch at the back and one in the middle will be sufficient.
Your bunny is done. I hope you loved working on this crochet loaf bunny pattern.


More Free Patterns
- Mini Crochet Easter Basket
- Crochet Easter Eggs
- No-Sew Crochet Bunny Amigurumi
- No-Sew Crochet Chick in an Egg
- No-Sew Crochet Bee
- No-Sew Crochet Hen and Rooster
- Crochet Chicken Potholder
What to do next
- Comment on this post: I always read comments and reply to all questions posted on the blog, and I love it when you stop by to say hello.
- Share your project: if you make this or any of my other patterns, tag me on Instagram or Facebook, or use the hashtag #zamiguzmakers. I love seeing what you make.
- Pin it now: Are you not ready to make it yet? You can use the above image to Pin it to your crochet boards, or follow me on Pinterest for more.
- Join The Makers community: Join my community group on Facebook and be the first to know about pattern releases and other crochet-related content.
Would you rather bookmark this blog post for later? You can create a free Grow.me account and use the “heart” on the left-hand side of your screen to save it. It’s easy to have your internet favorites bookmarked in one place.