Crochet flower free pattern + photo tutorial
I am so excited spring is here that I couldn’t wait to create something to celebrate it. I love spring. I’ve been thinking about creating a crochet flower free pattern for a while. I couldn’t wait any longer.
So, I sat down in my craft room yesterday and started crocheting these flowers and thought to myself “this is it”. It’s time to share an easy flower pattern with you. So here it is.
I was thinking about how many things there are that you can do with crochet flowers. What would you use it for? I like using them to decorate hats. But there are other things you can use them for. For example, I envisioned these cute flowers as appliqués for a summer tote bag.
Okay, now I want to make a bag to put them on! You could use them as head accessories for little girls. Add an alligator clip at the back and you will have a super cute head flower.
Another option would be to add them to a headband. I have a cute pattern here that you could use and replace the bow with the flower.
This website is reader supported and contains affiliate links. As an Amazon Associate, I earn from qualifying purchases. Find my affiliate disclosure here.
Pin it here for later
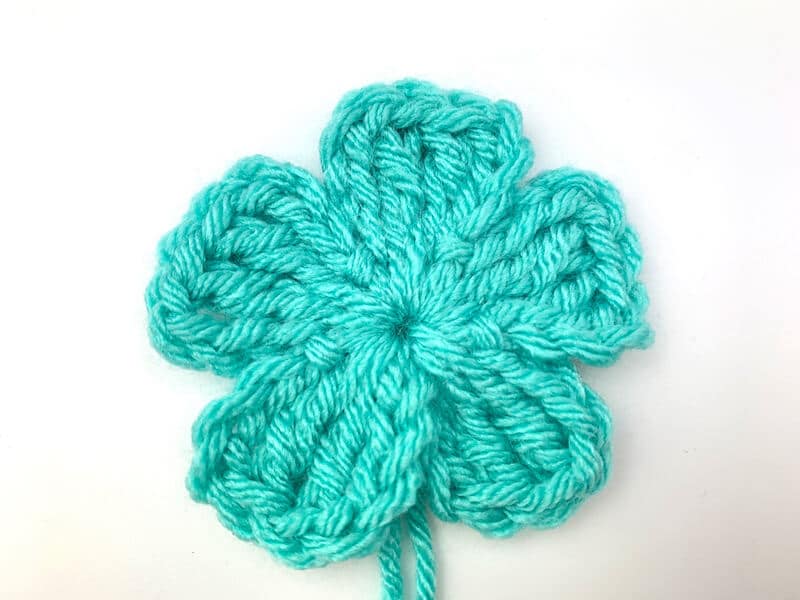
How do you crochet this 5 petal flower?
This is a very simple 5 petal flower to crochet, even if you are a beginner. First, you create a magic circle, then you will crochet all 5 petals inside the magic circle. Pick the stitch you would like to use: for the first one you will use dc. For the second flower you will use tr. And for the last one you will use dtr. Then you will pull the yarn tail to tighten up the circle. Lastly, you will make the center of the flower. Also with dc in a magic circle.
Here are the pattern instructions
- This pattern was written using US terminology.
- When your flower is done, use a hot iron to make them look nice and flat. Do not press too hard.
- This pattern has instructions for three flower sizes. You will be using three different stitches to make them.
- Gauge is not relevant for this pattern. The good thing about this beautiful crochet flowers is you can make them with almost any kind of yarn.
Materials and tools for this crochet flower free pattern
- Two crochet hooks: one to crochet the flower in size compatible with the yarn weight and a smaller one for the center for the flower.
- Any kind of yarn for the flower.
- For the center of the flower, you will need a small amount of yarn. But I recommend it to be finer than the one you used for the flower. It will look more delicate.
- Darning needle
Abbreviations
ch(s): chain(s)
dc: double crochet – yo 1 time, insert hook in st, yo, pull up a loop, (yo, pull through 2) 2 times
flo: front loop only
FO: fasten off
mc: magic circle
tr: treble – yo 2 times, insert hook in st, yo, pull up a loop, (yo, pull through 2) 3 times.
dtr: double treble – yo 3 times, insert hook in st, yo, pull up a loop, (yo, pull through 2) 4 times.
sl st: slip stitch
st(s): stitch (es)

How do you crochet this simple flower?
Note: before you start, check out this tutorial on how to do a magic circle.
Option 1: Crochet the flower using dc
To start the flower, form a mc leaving a tail about 10” (26 cm) long, all next sts will be in the mc: *ch 3, 2 dc, ch 3, sl st in mc, repeat 4 more times from*
If you don’t want to do the mc, you can start with 4 chs, then do the steps above, starting at the asterisk.


Option 2: Crochet the flower using tr
To start the flower, form a mc leaving a tail about 10” (26 cm) long, all next sts will be in the mc, *ch 4, 2 tr, ch 4, sl st in mc, repeat 4 more times from*
If you don’t want to do the mc, you can start with 5 chs, then do the steps above, starting at the asterisk.


Option 3: Crochet the flower using dtr
To start, form a mc leaving a tail about 10” (26 cm) long, all next sts will be in the mc, *ch 5, 2 dtr, ch 5, sl st in mc, repeat 4 more times from*
If you don’t want to do the mc, you can start with 6 chs, then do the steps above, starting at the asterisk.


For all sizes above: Cut the yarn when you are done with the flower, leaving a tail the same size as the initial one. Pull the initial tail tight to close the mc. FO. Pull the tail to the back of the flower with help of the crochet hook. You may use the tails to sew the flower on to your project.
Last step: Make the center of the flower
- Leave a long tail about 10” (25 cm) long.
- Do a mc, ch 3 (ch 3 doesn’t count as a stitch).
- 12 dc in the mc. Pull the initial tail to tighten the hole. Join to initial ch 3 with a sl st.
- FO. Leave another long tail the same size as the initial one.
- Thread the darning needle with the last tail.
- Whip stitch in flo on every dc around the ring.
- Pull tight to form a ball, right side out.
- Now you will place the ball in the middle of the flower: insert the crochet hook from the wrong side, grab both tail leftovers from the small ball you created, pull them through the hole completely. Fasten off at the back.


I hope you enjoy making these beautiful crochet flower free pattern. If you like it, please leave a comment below, I love hearing your opinions about my patterns. If you share it on Instagram, I would love to see it, please tag @zamiguz or use the hashtag #zamiguzmaker.


I think I’m going to find ,this interesting to do. Tedious long but think the end will be worth it. I’ll be using this as a chair cover or for my couch will be worth it
Hi Rosina! I bet the end result of that will be beautiful. I would love to see it, if you don’t mind sharing when it’s done. Thanks!
Maggie