DIY Quick & Easy Crochet Fried Egg
Are you looking for something unusual and fun to crochet? Then you’ll love this realistic, sunny-side-up crochet fried egg pattern.
This website is reader-supported and contains affiliate links. As an Amazon Associate, I earn from qualifying purchases. Find my affiliate disclosure here.
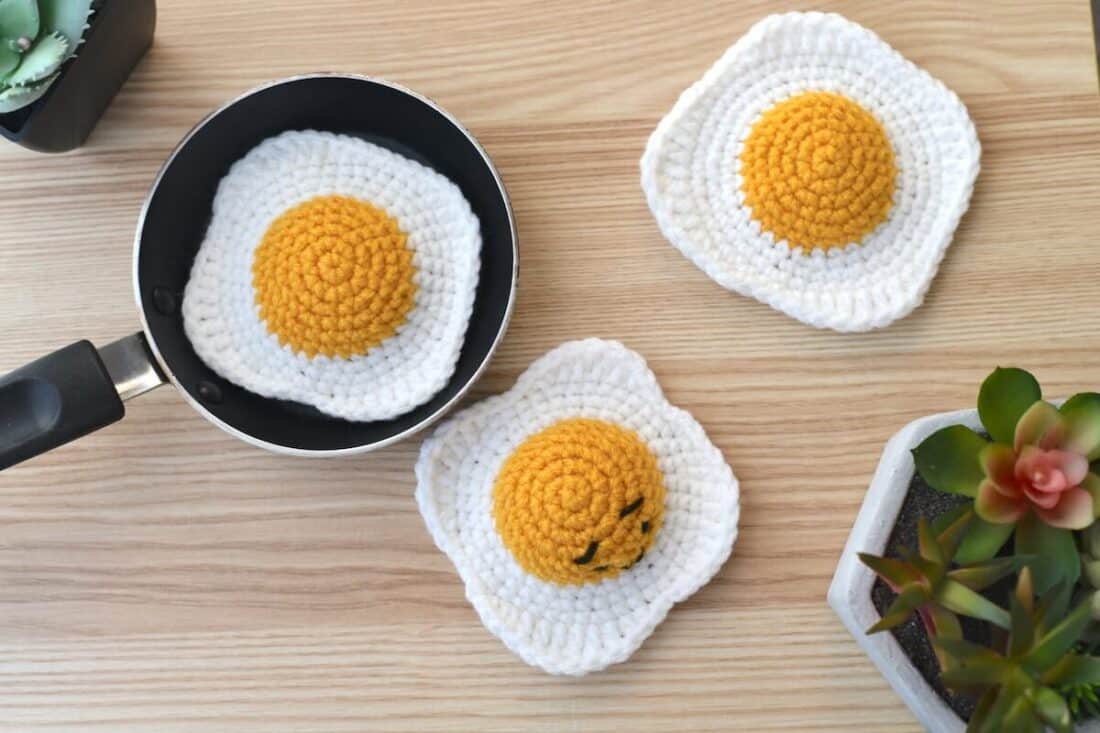
Here is a photo of three samples I created for my crochet fried egg pattern:
As a kid, pretend cooking was one of my favorite games. I spent hours playing with felt and plastic foods, and that early love for food never really went away. To this day, cooking is still one of my favorite hobbies—and eggs, of course, are one of my favorite foods.
Now, as a crochet designer, I love that yarn gives me the freedom to create almost anything, not only practical projects, but also fun stuff, such as Amigurumi food and toys.
Today, I’m excited to share this realistic Amigurumi fried egg, a beginner-friendly crochet project that’s pure crochet fun.
Crochet Fried Egg Pattern
This fried egg is crocheted in the round using continuous rounds of single crochet, in a few simple steps. By “continuous rounds,” I mean there is no joining when you finish a round – you simply keep going in a spiral.
Why You’d Crochet a Fried Egg
A crochet fried egg is the perfect project when you want to step away from serious makes and create something fun.
Here is a list of what you can use these realistic fried crochet eggs for:
- Playful décor or pin cushion – perfect for your farmhouse kitchen or craft room.
- A cute photo prop – since this crochet egg looks so realistic, it can easily be used in food or recipe photo shoots.
- Pretend food toy – make it as part of a larger pretend-food set.
- Appliqué for bags, hats, or kitchen towels – it can be easily sewn onto larger projects.
- Stash buster – perfect for using up your yarn leftovers to make small gifts and for craft markets.
Let get into the details, the list of material and crochet the cutest fried eggs you’ve ever seen. But before you begin…
You may also like these other quick Amigurumi projects:
- Amigurumi Loaf Bunny Pattern
- Amigurumi Easter Eggs
- No-Sew Crochet Chick in an Egg
- Small Crochet Angel Pattern
- Tiny Amigurumi Whale Pattern
- Small Amigurumi Doll Pattern
- Christmas Crochet Pine Trees
- Amigurumi Strawberry Pattern

What You’ll Need:
- About 10 yards of medium-weight (4) yarn in color yellow/golden for the yolk.
- About 17 yards of medium-weight (4) yarn in color white.
- Black embroidery floss for the face (optional).
- 3.50 mm (E) crochet hook.
- One pair of 6 mm safety eyes (optional).
- A tiny amount of stuffing fiber, like Poly-Fil – you can also use yarn scraps if you don’t have stuffing.
- Stitch marker, tapestry needle, and scissors.
Yarn Recommendations:
One of the best things about making these crochet eggs is the freedom to use any yarn weight or color you like. That said, if you’re aiming for a realistic look like the samples shown, I recommend sticking with a medium weight (4) yarn.
The crochet fried eggs pictured were made using 100% acrylic yarn from my own stash, which gives them just the right texture and structure. Here are my recommendations for yarns that will work great for this project:
- Red Heart Super Saver in golden – perfect for the realistic, sun-side-up yolks.
- Red Heart Super Saver in White
- Chenille Yarn if you want a more huggable, plushie-like fried egg.
Abbreviations (US terms):
- ch(s): chain(s)
- inc: increase (2 sc in the next stitch)
- FO: fasten off
- hdc: half double crochet
- mc: magic circle
- R: round
- sl st: slip stitch
- st(s): stitch(es)
- sk: skip
- sc: yarn under single crochet
- ( ): Repeat the instructions in parentheses as many times as directed
- [ ]: stitch count in a round
- * Repeat the instructions after the asterisks as many times as directed
Project Size:
The finished crochet fried egg will measure approximately 4.5 inches (11.5 cm) in diameter when made with the recommended yarn weight and hook size.

Pattern Notes:
- This pattern uses US Crochet Terminology.
- Skill Level: Easy – the project is entirely created with single crochet stitches.
- Use a stitch marker to mark the beginning or the end of every round, moving it up as you go.
- Stitch tension: Gauge is not crucial, but for reference, my gauge gave me approximately 2.5 inches (6.5 cm) for the first six rounds of the egg yolk.
About Exclusive Content: When you create a Grow.me account, you can bookmark your favorite content in one place. With one free account, you can save not only mine, but also the content of many other creators, allin one place.
When you visit my blog and see the “Unlock Exclusive Content” button, please create an account or click the login button and sign in with an existing Grow account. It’s a secure, free feature, and you can unsubscribe at any time. Everything you bookmark with the “heart” on a page that uses Grow.me will show up under “Grow Bookmarks” in your account.
Disclosure: Please note that Grow.me is a third-party app for Exclusive Content, and I have no control over their user policies. Neither will I be able to assist with account creation and/or password resetting. For information on how to troubleshoot login and password resetting, go to “Resources” on the Grow.me website’s top menu.

Purchase a PDF Download
- Inexpensive
- Ad-free
- Formated and Print-friendly
Amigurumi Fried Egg Instructions

Refer to the list of materials and other important information above and to these helpful resources before you begin to crochet the egg: How to Create a Slip Knot, How to Do the Invisible Finishing in Crochet, and A Free Guide to Abbreviations & Terms (PDF download).
Total Time: 30 minutes
-
Egg Yolk (yellow yarn)

R1: sc 6 in a mc
R2: (inc) x 6. [12]
R3: (inc, sc) x 6. [18]
R4: (inc, sc 2) x 6. [24]
R5: (inc, sc 3) x 6. [30]Maggie’s pro tip: For a “bumpier” yolk, add one extra plain round after round 6 in the next step. This will be especially useful if you’re adding a face to turn your crochet fried egg into a cute plush.
R6: sc in each st around. [30]
-
Creating a face

This step is optional, but if you’re doing it, this is the best time to place the safety eyes and embroider the mouth (you can also embroider the eyes, instead of using plastic safety eyes). Then cut the yarn, FO, and set it aside.
-
Egg White (white yarn)

R1-5: Use the instructions from the egg yolk section. Then, align the yellow piece on top of the white one (with both circles right side facing you), and continue to the next round.
R6: sc around using both layers of sts to join the two circles together. Add a small amount of stuffing as you go, before finishing this row. [30]
R7: (inc, sc 4) x 6. [36]
R8: (inc, sc 5) x 6. [42]
R9: (inc, sc 6) x 6. [48]
R10: 3 sl st, sc inc, (2 hdc, 4 dc, hdc inc, 4 sc) x 2, 2 hdc, 2 dc, 2 tr, 2 dc, hdc inc, sc 3, 2 hdc, 4 dc, hdc inc, sc 3. -
Finishing the crochet egg

Weave in any loose ends. If you decide to embroider a little face instead of adding safety eyes, this is the time to do it. Another finishing option is to add a keychain clip or key ring if you’re making this fried egg into a keychain.


Estimated Cost: 5.00 USD
Supply:
- Medium Weight Yarn (4) in white and golden
Tools:
- 3.5 mm (E) hook
Materials: Black embroidery floss for the face (optional), One pair of 6 mm safety eyes (optional), A tiny amount of stuffing fiber, like Poly-Fil – you also use yarn scraps if you don’t have stuffing, Stitch marker, tapestry needle, and scissors.
Your fried egg is done! Easy-peasy, isn’t it? I hope you enjoyed making it.
Happy Crocheting!
Pin, Share, and Comment
- Comment on this post: I always read comments and reply to all questions posted on the blog, and I love it when you take the time to stop by and say hello.
- Have you made this? Share your project if you make this or any of my other patterns, tag me on Instagram or Facebook, or use the hashtag #zamiguzmakers. I love seeing what you make.
- Pin it now: Are you not ready to make it yet? You can use the above image to pin it to your crochet boards or follow me on Pinterest for more.
- Join The Makers community: Join my community group on Facebook and be the first to know about pattern releases and other crochet-related content.
Would you rather bookmark this blog post for later? You can create a free Grow.me account and use the “heart” on the left-hand side of your screen to save it. It’s easy to have your internet favorites in one place.


Maggie,
Thank you so much for sharing your beautiful work. You are an incredible design artist!
Brenda
Awww… thank you so much, Brenda! I love creating with yarn. Appreciate your kind feedback <3
Maggie