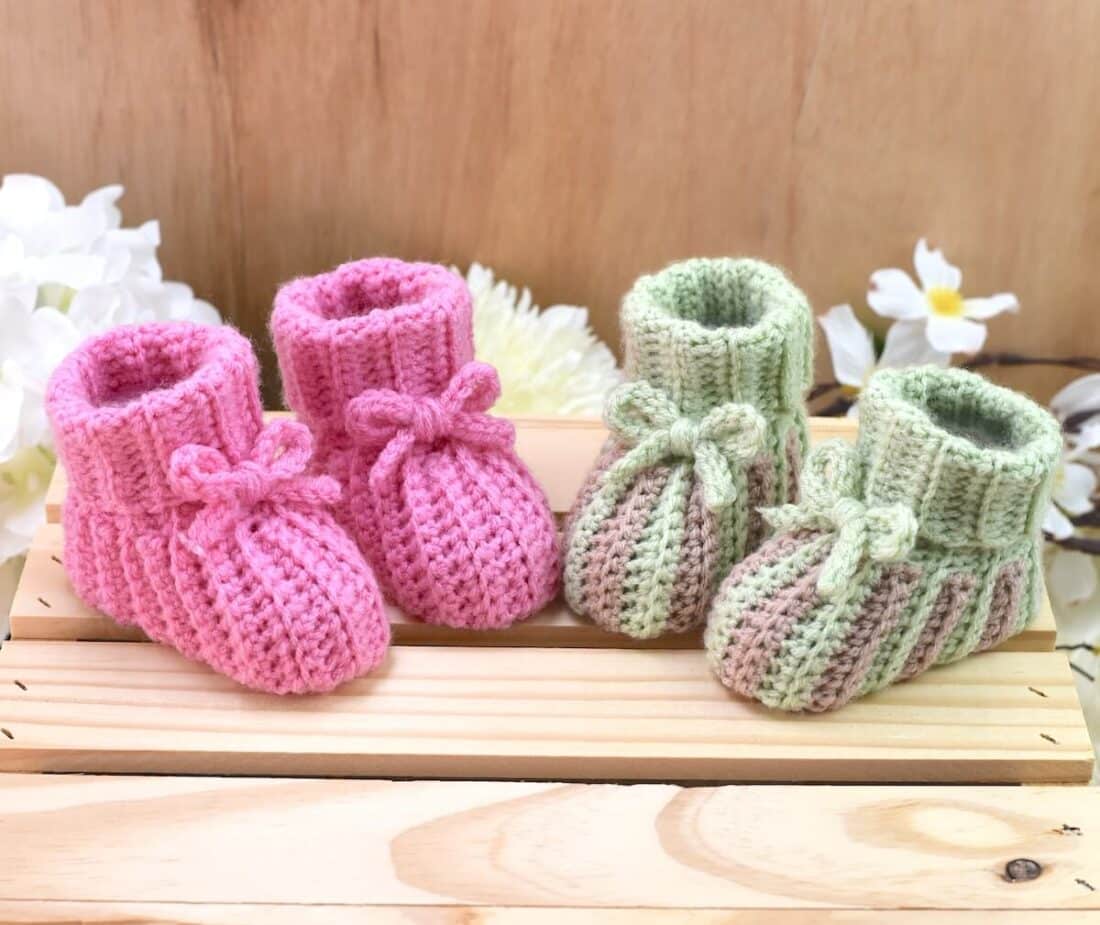
If you’ve been searching for an easy crochet baby booties pattern, you’ll love this one! These cuffed crochet booties are not only adorable and cozy for newborns, but they’re also simple to customize—making them a perfect project for baby showers, gifts, and craft markets.
This pattern includes complete instructions for newborn crochet booties, along with tips on how to adjust the size by adding stitches and rows. This allows you to create the perfect fit for different sizes—whether you’re making them for a tiny newborn or a busy toddler.
The design uses a short row technique with back loop single crochet stitches, which creates a stretchy, ribbed texture that looks unique and feels soft for the delicate baby’s skin.
The cuff provides extra snugness to keep the booties in place, while the bow detail adds a cute touch, making them suitable for any occasion.
Why You’ll Love This Crochet Baby Booties Pattern
Ready to start? Grab your light-worsted-weight yarn and hook, and let’s begin this easy baby booties crochet tutorial you’ll want to come back to again and again! But before you scroll…
… you may also like to check these other crochet projects for babies and kids:
- C2C Granny Stitch Baby Blanket
- Baby Girl Heirloom Blanket
- Baby Blanket Pattern Roundup
- Crochet Freeze Pop Holder
- Baby Girl Headband with Bow
- 80+ Crochet Patterns for Babies

Crochet Baby Booties Pattern
Materials, Tools & Notions
- Light Worsted (3)/DK yarn – each pair of the pictured crochet baby booties was made with approximately 83 yards (76 m) of Premier Basix DK.
- 2.75mm/C Crochet Hook
- Clear Plastic Baby Feet Display (optional) – perfect for crafters that sell on craft markets or need to photograph the crochet baby booties for their online shop.
- Tapestry needle, scissors, and stitch marker.
Finished Project Size
These booties fit newborn baby feet sizes between 3.5 and 4 inches (9 to 10 cm). Tips on how to adjust the size were added to the instructions below.
Abbreviations (US Terms)
Get a FREE Abbreviations & Terms Guide (PDF download).
- blo: back loop only
- ch(s): chain(s)
- FO: Fasten Off
- sc: single crochet
- st(s): stitch(es)
- Asterisks: used to indicate which instructions are repeated
- [ ]: stitch count in a round
Stitch Tension
Since this is a small project, you don’t need to crochet a swatch – I’ve included instructions on how to measure it from the start to determine stitch tension. However, for reference, 17.5 rows of 20 back loop only single crochet stitches measure about 4 inches (10 cm).
Pattern Notes
- This crochet baby booties pattern uses US Crochet Terms.
- Level of difficulty: Advanced beginner.
- These baby shoes were created with a simple short-row method that, as the name suggests, is a mix of short rows with long rows to make one end broader than the other.
- The booties are crocheted in one piece, then we hand-sew the bottom and create a decorative bow.

Purchase a PDF Download
- Inexpensive
- Ad-free
- Formated and Print-friendly
About Exclusive Content: When you create a Grow.me account, you can bookmark your favorite content in one place. With one FREE account, you can have not only mine, but many other creators’ content saved in one place.
When you come to my blog and see the button “Unlock Exclusive Content”, go ahead and create an account or simply click the login button and sign in with an existing Grow account. It’s a secure, free feature, and you can unsubscribe at any time. Everything you bookmark with the “heart” on a page that uses Grow.me will show up under “Grow Bookmarks” in your account.
Disclosure: Please note that Grow.me is a third-party app for Exclusive Content, and I have no control over their user policies. Neither will I be able to assist with account creation and/or password resetting. For information on how to troubleshoot login and password resetting, go to “Resources” on the Grow.me website’s top menu.
Instructions
Step 1: Booties (x2)
Ch 31, or any other even number of chains. Note that the ideal length, from the beginning of the long rows to the end, after five or six rows are crocheted, should be about 6 inches (15 cm).
Before you begin, check these resources out (helpful for beginner!): how to do an invisible finish in crochet and how to do a slip knot.

Size tip: Add or subtract chains from the foundation to adjust the booties’ height.
Color Change Instructions (optional):
Working with two yarn colors to make these crochet baby booties is straightforward. Here is what to do:
- Crochet the first two long rows using the main color.
- Then, at the end of the second row, before pulling up the last loop to finish the final stitch, drop the main color.
- Pick up the second color and crochet the following two short rows.
- Continue repeating the process: long rows with the main color and short rows with the second color.
Row 1 (long row): sc in the 2nd ch from the hook and in each ch across, ch 1, turn. [30]
Row 2 (long row): sc in blo of each st across. [30]
Row 3 (short row): sc in blo of the next 12 sts, which is four sts less than halfway the row, ch 1, turn. [12 sc sts]
Row 4 (short row): sc in blo of the next 12 sts, ch 1, turn. [12 sc sts]
Row 5 (long row): sc in blo of the next 12 sts, do not turn yet, sc in blo of the next 18 sts of the previous long row, ch 1, turn. [30 sc sts]
Row 6 (long row): sc in blo of each st across, ch 1, turn. [30 sc sts]
Repeat rows 3-6 until you reach row 37 or a measurement of 8.5 inches (21.5 cm) on the wider end. Alternatively, continue until the size is twice the baby’s foot length plus half an inch. The last row should be a long one. Do not cut the yarn yet.
Step 2: Assembling the Booties
Tip: For the little feet’s comfort, aim to keep the seam as thin as possible and avoid bulky knots, as the seam will be the inside of the crochet baby booties.


- Start by folding the piece in half lengthwise.
- Use slip stitches to join the last row to the first row, only looping through the inside loops of each stitch to create a less bulky seam.
- When you reach the end of the row, cut the yarn, leaving a long tail for hand-sewing the bottom of the booties.
- Thread a tapestry needle with the tail, then sew about 1.5 inches (4 cm) using the overcast stitch and pull to cinch, forming the rounded heel of the bootie.
- Make a knot in the seam to secure the cinch. Continue sewing with overcast stitches until about 1.5 inches (4 cm) remain, then sew and pull to cinch, shaping the rounded toes.
- To finish, go back and sew another row of overcast stitches without cinching to reinforce the seam.
Step 3: Bow (x2)
Begin with 31 chain stitches, then slip stitch into the back bump of each chain across (this will create a string approximately 6 inches/15 cm long). Cut the yarn and fasten off.
Secure the bow by wrapping the matching yarn around the center at least ten times, leaving long tails (see photo below). Then, use the tails to attach the bows to the booties.

Tip: Instead of just the bow, you can use a store-bought ribbon at least three times as big as the cuff circumference. Then, use the small holes created when switching from short to long rows to weave the ribbon in and out, leaving the ends at the front (or side) to tie a bow.
Step 4: Finishing
Weave in the ends and turn the crochet baby booties right side out, with the seams on the inside. Then, fold the cuff, and the cute baby booties are ready to wear.
Note that the ribbed stitch’s nature makes it stretchy and easy to adapt to the baby’s feet.

The crochet baby booties are now complete. I hope have enjoyed making them.

Comment, Pin, and Share
- Comment on this post: I always read comments and reply to all questions posted on the blog, and I love it when you stop by to say hello.
- Share your project: if you make this or any of my other patterns, tag me on Instagram or Facebook, or use the hashtag #zamiguzmakers. I love seeing what you make.
- Pin it now: Are you not ready to make it yet? You can use the above image to Pin it to your crochet boards or follow me on Pinterest for more.
- Join The Makers community: Join my community group on Facebook and be the first to know about pattern releases and other crochet-related content.
Would you rather bookmark this blog post for later? You can create a free Grow.me account and use the “heart” on the left-hand side of your screen to save it. It’s easy to have your internet favorites in one place.