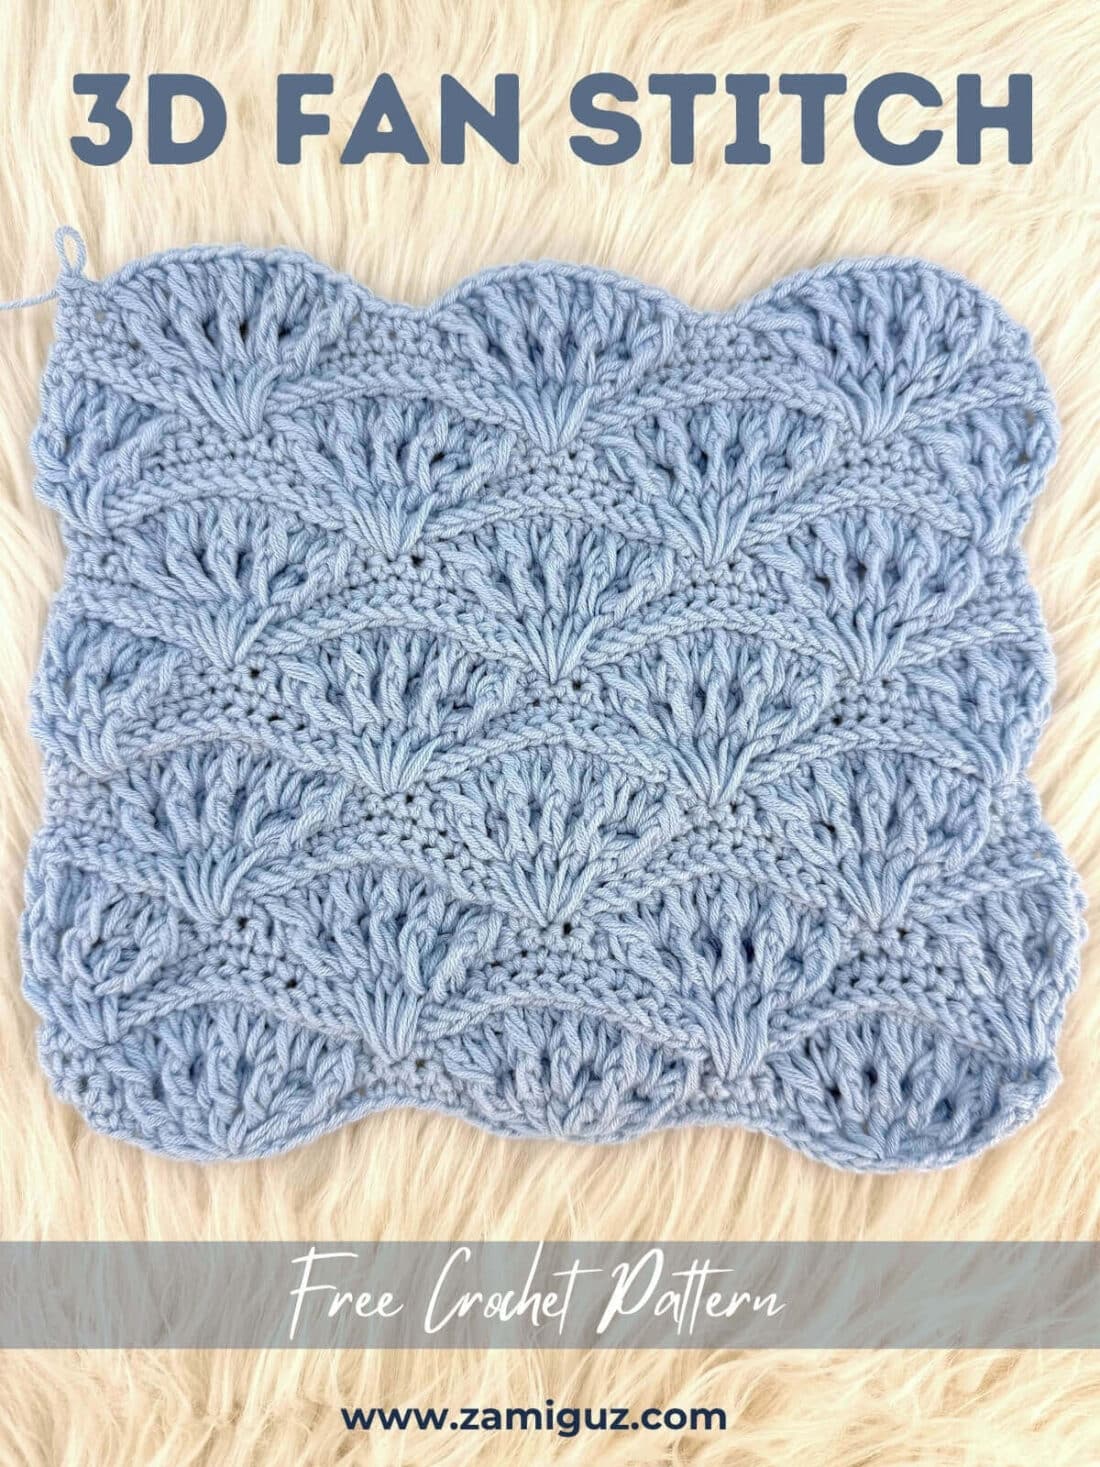
Beautiful 3D Crochet Fan Stitch Step by Step
There’s something magical about discovering a stitch that feels like a work of art with every repeat. That’s exactly how I felt the first time I created a swatch of the 3D Crochet Fan Stitch, also known as Textured Shell Stitch.
This website is reader-supported and contains affiliate links. As an Amazon Associate, I earn from qualifying purchases. Find my affiliate disclosure here.
The texture evolved into one of the most elegant stitch patterns I’ve ever crocheted. With each row, the fans unfolded like the pages of a vintage lace book, revealing a beautifully structured, layered texture that practically invites you to touch it.
Although this stitch may look intricate (and it is!), it’s a perfect choice for intermediate to advanced crocheters seeking their next “wow” project.
The pattern consists of a eight-row repeat and cleverly combines basic and post stitches—single and double crochets, along with front and back post techniques—working together to create that dimensional, fan-like motif.
Delicate yet full of depth, this stitch is ideal for heirloom-quality projects, such as baby blankets, shawls, or even statement projects for your home. By the way, I have a Guide on how to Size Crochet Blankets if you decide to create one with this stitch.
Are you ready to give it a try? Let’s dive into the instructions for this textured beauty!
More Crochet Stitches & Techniques


3D Crochet Fan Stitch Pattern
This pattern uses US Crochet Terminology.
Skill Level: Intermediate +
Stitch Multiple: 14 + 2
Row repeat: 8 rows (2-9)
Materials
- Yarn: The stitch definition for this 3D crochet fan stitch will look better with DK (#3) or lighter yarns.
- Crochet Hook: in a size appropriate for your yarn weight.
- Stitch marker: It helps with stitch placement and counting. I found it useful to mark and count the skipped stitches.
- Scissors
- Yarn needle
Abbreviations & Skills
Get a FREE Abbreviations & Terms Guide (PDF download).
- beg: beginning
- bpdc: back post double crochet
- ch(s): chain(s)
- dc: double crochet
- FO: Fasten Off
- fpdc: front post double crochet
- fpsc: front post single crochet
- rep: repeat
- Shell: a group of 5 double crochet stitches in the same stitch
- Half shell: a group of 3 double crochet stitches in the same stitch
- sk: skip
- sp: space
- st(s): stitch(es)
- *: Repeat the group of instructions after the asterisk as many times as directed.
- { }: Repeat the group of instructions in brackets as many times as directed.

Instructions
In the following step-by-step for this 3D crochet fan stitch, I’ve written the instructions spelled out in bullet points that are helpful for less experienced crocheters. A printable card is available at the bottom of the page with the abbreviated instructions for those who are comfortable following abbreviations.
Note that turning chains of 3 count as a stitch throughout the pattern, while turning chains of 1 do not count as a stitch.
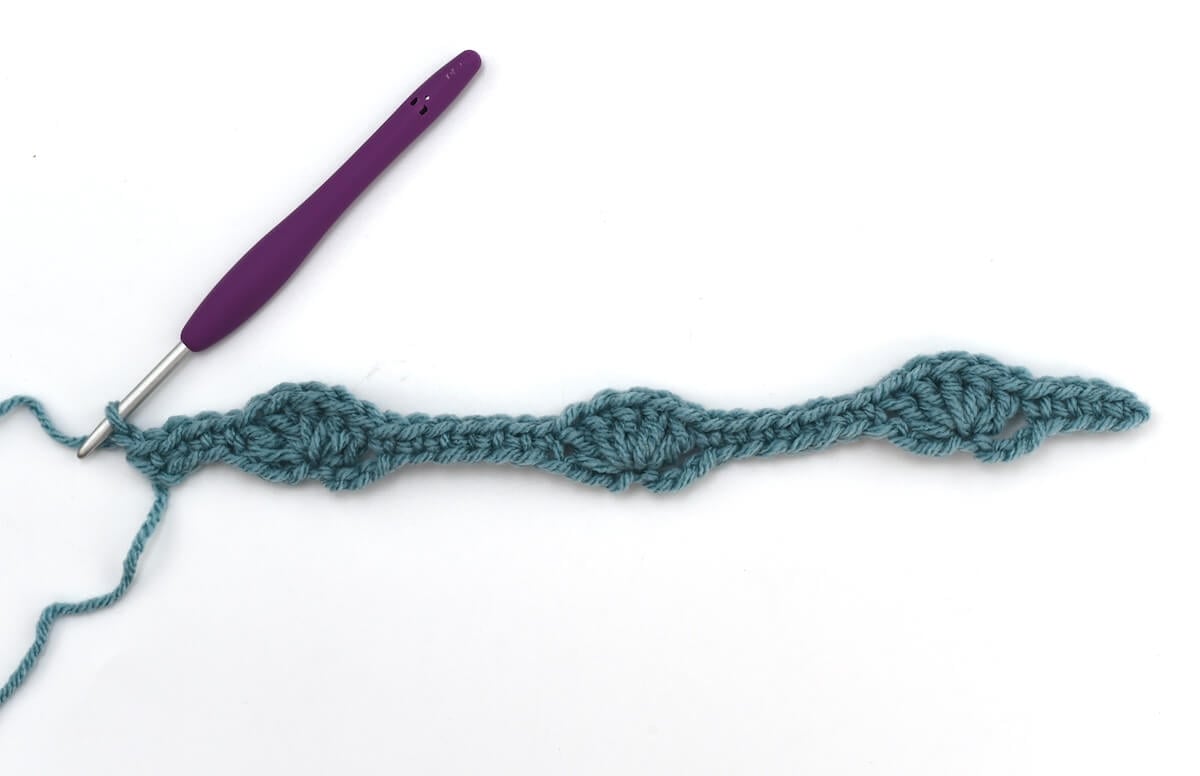
To begin, chain 44 for the swatch or any other multiples of 14 + 2.
Row #1
- Single crochet into the 2nd chain from the hook, then single crochet into the next 3 chains.
- *Skip 3 chains, then double 5 into the next chain, skip 3 chains.
- Single crochet into the next 7 chains.
- Repeat the instructions from the asterisk (*) until 11 chains remain.
- To finish the row, skip the next 3 chains and double crochet 5 into the next chain. Then, skip 3 more chains, and single crochet into the next 4 chains. Chain 1 and turn.

Row #2
- Single crochet into the next 3 stitches, then skip 1 single crochet stitch.
- {*back post double crochet in the next double crochet stitch.
- Double crochet into the next space between the double crochet stitches (not on top of the stitch). Repeat from the asterisk 3 more times.
- Back post double crochet in the next double crochet stitch, then skip one single crochet, and single crochet into the next 5 stitches}.
- Repeat the instructions between { } until 4 single crochet stitches remain, then skip one single crochet.
- Single crochet into the next 3 single crochet stitches. Chain 1 and turn.
Row #3
- Single crochet into the next 2 stitches, then skip 1 single crochet stitch.
- {*front post double crochet in the next double crochet stitch, then [double crochet into the next space between the double crochet stitches (not on top of stitch)] twice.
- Then, repeat from the asterisk 3 more times, front post double crochet in the next double crochet, and skip one single crochet, single crochet into the next 3 stitches}.
- Repeat the instructions between { } until 3 single crochet stitches remain.
- To finish the row, skip one single crochet, then single crochet in each of the next 2 single crochet stitches. Chain 1 and turn.
Row #4
- Single crochet, then *front post single crochet 13, and skip one stitch.
- Next, single crochet into the next stitch.
- Repeat from the asterisk until 2 stitches remain, then skip one single crochet and single crochet into the last stitch. Chain 3 and turn.
Row #5
- Double crochet 3 into the first post double stitch two rows below.
- Then, *skip 2 single crochet stitches, and single crochet into the next 7 stitches.
- Next, skip 3 single crochet stitches, then double crochet 5 into the next single crochet stitch two rows below.
- Repeat from the asterisk until 4 stitches remain, then skip 3 single crochet stitches.
- To finish, double crochet 3 into the next post double crochet stitch two rows below, then double crochet into the last stitch. Chai 3 and turn.
Row #6
- *Back post double crochet in the next double crochet stitch, then double crochet into the next space between the double crochet stitches (not on top of the stitch)
- Repeat from the asterisk 1 more time, then back post double crochet in the next double crochet.
- Next, skip one single crochet stitch, then single crochet into the next 5 single crochet stitches, and skip one single crochet stitch.
- {**back post double crochet in the next double crochet stitch, then double crochet into the next space between the double crochet stitches (not on top of the stitch).
- Repeat from the two asterisks 3 more times, then back post double crochet in the next double crochet. Skip one single crochet, and single crochet into the next 5 stitches}.
- Repeat the instructions between { } until 4 stitches remain.
- ***back post double crochet in the next double crochet stitch, then double crochet into the next space between the double crochet stitches (not on top of the stitch).
- Repeat from the 3 asterisks 1 more time, back post double crochet in the next double crochet, and double crochet into the last st. Chain 3 and turn.
Row #7
- *Front post double crochet in the next double crochet stitch, then [double crochet into the next space between the double crochet stitches (not on top of the stitch)] twice.
- Repeat from the asterisk 1 more time, then front post double crochet in the next double crochet.
- Then, {skip one single crochet, single crochet into the next 3 stitches.
- **front post double crochet in the next double crochet stitch, then [double crochet into the next space between the double crochet stitches (not on top of the stitch)] twice.
- Repeat from the two asterisks 3 more times, then front post double crochet in the next double crochet}.
- Repeat the instructions between { } until 11 stitches remain, then skip one stitch.
- Single crochet into the next 3 stitches, skip one stitch, then ***front post double crochet in the next double crochet stitch.
- [dc into the next space between the double crochet stitches (not on top of the st)] twice.
- Repeat from the three asterisks 1 more time, front post double crochet in the next double crochet, double crochet into the last stitch. Chain 1 and turn.
Row #8
- Single crochet and skip one stitch, then front post single crochet 6.
- Next, skip one stitch and single crochet into the next stitch.
- Then, * front post single crochet 13, skip one single crochet, and single crochet into the next stitch.
- Repeat from the asterisk until 9 stitches remain, then skip one stitch and front post single crochet 6.
- To finish the row, skip one stitch, then single crochet into the last stitch. Chain 1 and turn.
Row #9
- Single crochet 4, then*skip 3 stitches.
- Next, double crochet 5 into the single crochet stitch two rows below.
- Skip 3 stitches and single crochet into the next 7 stitches.
- Repeat from the asterisk until 11 stitches remain, then skip 3 stitches.
- Double crochet 5 into the next single crochet stitch two rows below, then skip 3 stitches. Single crochet into the next 4 stitches to finish the row. Chain 1 and turn.
Repeat rows 2-9 of these 3D crochet fan stitch instructions to the desired project length.
As you can see, this is a very detailed 3D stitch that creates a beautiful fan texture. I hope to get to create something beautiful.
More Crochet Tutorials & Resources
If you enjoyed this 3D crochet fan stitch, you might also like to check out these other stitch patterns and resources here on the blog.
- Common Crochet Mistakes and How to Fix Them
- How to Crochet A Non-Stretch Bag Strap
- Crochet Sunflower Square
- Stacked Shell Crochet Stitch
- Crochet Alpine Stitch
- Granny Spike Stitch
- Moss (or Linen) Crochet Stitch
- Crochet Seed Stitch
Comment, Pin, and Share
- Comment on this post: I always read comments and reply to all questions posted on the blog, and I love it when you stop by to say hello.
- Share your project: if you make this or any of my other patterns, tag me on Instagram or Facebook, or use the hashtag #zamiguzmakers. I love seeing what you make.
- Pin it now: Are you not ready to make it yet? You can use the above image to Pin it to your crochet boards or follow me on Pinterest for more.
- Join The Makers community: Join my community group on Facebook and be the first to know about pattern releases and other crochet-related content.
Would you rather bookmark this blog post for later? You can create a free Grow.me account and use the “heart” on the left-hand side of your screen to save it. It’s easy to have your internet favorites in one place.

3D Crochet Fan Stitch Step-by-Step Printable Instructions
Here is a printable card with the abbreviated instructions for the 3D crochet fan stitch. Scroll up if you prefer the spelled out instructions in bullet points. Plus, a list of stitch abbreviations is also included in this blog post.
As a side note, turning chs of 3 count as a st throughout the pattern, while turning chs of 1 do not count as a st.
Materials
- Yarn, preferrably Fine (2) or Light Worsted/DK (3)
- Yarn needle
- Stitch marke
Tools
- Crochet Hook
- Scissors
Instructions
- Foundation/Row 1: Chain 44 for the swatch or any other multiples of 14 + 2. Then, sc into 2nd ch from the hook, sc into the next 3 chs, *sk 3 chs, dc 5 into the next ch, sk 3 chs, sc into next 7 chs. Rep from the asterisk until 11 chs rem, sk 3 chs, dc 5 into next ch, sk 3 chs, sc into next 4 chs, ch 1, turn.

- Row 2: sc into next 3 sts, sk 1 sc, {*bpdc in the next dc st, dc into the next sp between the dc sts (not on top of st), rep from the asterisk 3 more times, bpdc in next dc, sk one sc, sc into next 5 sts}. Repeat instructions between { } until 4 sc sts rem, sk one sc, sc in into the next 3 sc sts, ch 1, turn.
- Row 3: sc into next 2 sts, sk 1 sc, {*fpdc in next dc st, [dc into the next sp between the dc sts (not on top of st)] twice, rep from the asterisk 3 more times, fpdc in next dc, sk one sc, sc into next 3 sts}. Repeat instructions between { } until 3 sc sts rem, sk one sc, sc in the next 2 sc sts, ch 1, turn.
- Row 4: sc, *fpsc 13, sk one st, sc into next st, rep from the asterisk until 2 sts rem, sk one sc, sc into last st, ch 3, turn.
- Row 5: dc 3 into the first post dc st two rows below, *sk 2 sc sts, sc into next 7 sts, sk 3 sc sts, dc 5 into the next sc st two rows below, rep from the asterisk until 4 sts rem, sk 3 sc sts, dc 3 into the next post dc st two rows below, dc into last st, ch 3, turn.
- Row 6: *bpdc in next dc st, dc into the next sp between the dc sts (not on top of st),
rep from the asterisk 1 more time, bpdc in next dc, sk one sc st, sc into next 5 sc sts, sk one sc st, {**bpdc in next dc st, dc into the next sp between the dc sts (not on top of st), rep from the two asterisks 3 more times, bpdc in next dc, sk one sc, sc into next 5 sts}, repeat instructions between { } until 4 sts rem,***bpdc in next dc st, dc into the next sp between the dc sts (not on top of st), rep from the three asterisks 1 more time, bpdc in next dc, dc into the last st, ch 3, turn. - Row 7: *fpdc in next dc st, [dc into the next sp between the dc sts (not on top of st)] twice, rep from the asterisk 1 more time, fpdc in next dc, {sk one sc, sc into next 3 sts,
**fpdc in next dc st, [dc into the next sp between the dc sts (not on top of st)] twice, rep from the two asterisks 3 more times, fpdc in next dc}, rep instructions between { } until 11 sts rem, sk one st, sc into next 3 sts, sk one st,***fpdc in next dc st, [dc into the next sp between the dc sts (not on top of st)] twice, rep from the three asterisks 1 more time, fpdc in next dc, dc into the last st, ch 1, turn. - Row 8: sc, sk one st, fpsc 6, sk one st, sc into next st, * fpsc 13, sk one sc, sc into next st,
rep from the asterisk until 9 sts rem, sk one st, fpsc 6, sk one st, sc into the last st,
ch 1, turn. - Row 9: sc 4, *sk 3 sts, dc 5 into sc st two rows below, sk 3 sts, sc into next 7 sts. Rep from the asterisk until 11 sts rem, sk 3 sts, dc 5 into next sc st two rows below, sk 3 sts, sc into next 4 sts, ch 1, turn.
- Rep rows 2-9 to the desired project length.


Notes
- This pattern uses US Crochet Terminology.
- Skill Level: Intermediate +
- Stitch Multiple: 14 + 2
- Row repeat: 8 rows (2-9)


