This website is reader-supported and contains affiliate links. As an Amazon Associate, I earn from qualifying purchases. Find my affiliate disclosure here.
🐷 Meet the Cutest Amigurumi Pig You’ll Ever Crochet!
Looking for a fun and charming new project? This standing Amigurumi pig is here to steal your heart—and your hook time! I originally designed this adorable pig back in 2020 as part of my whimsical Hands-in-Pocket Amigurumi series, and I’m thrilled to finally share the pattern with my blog followers.
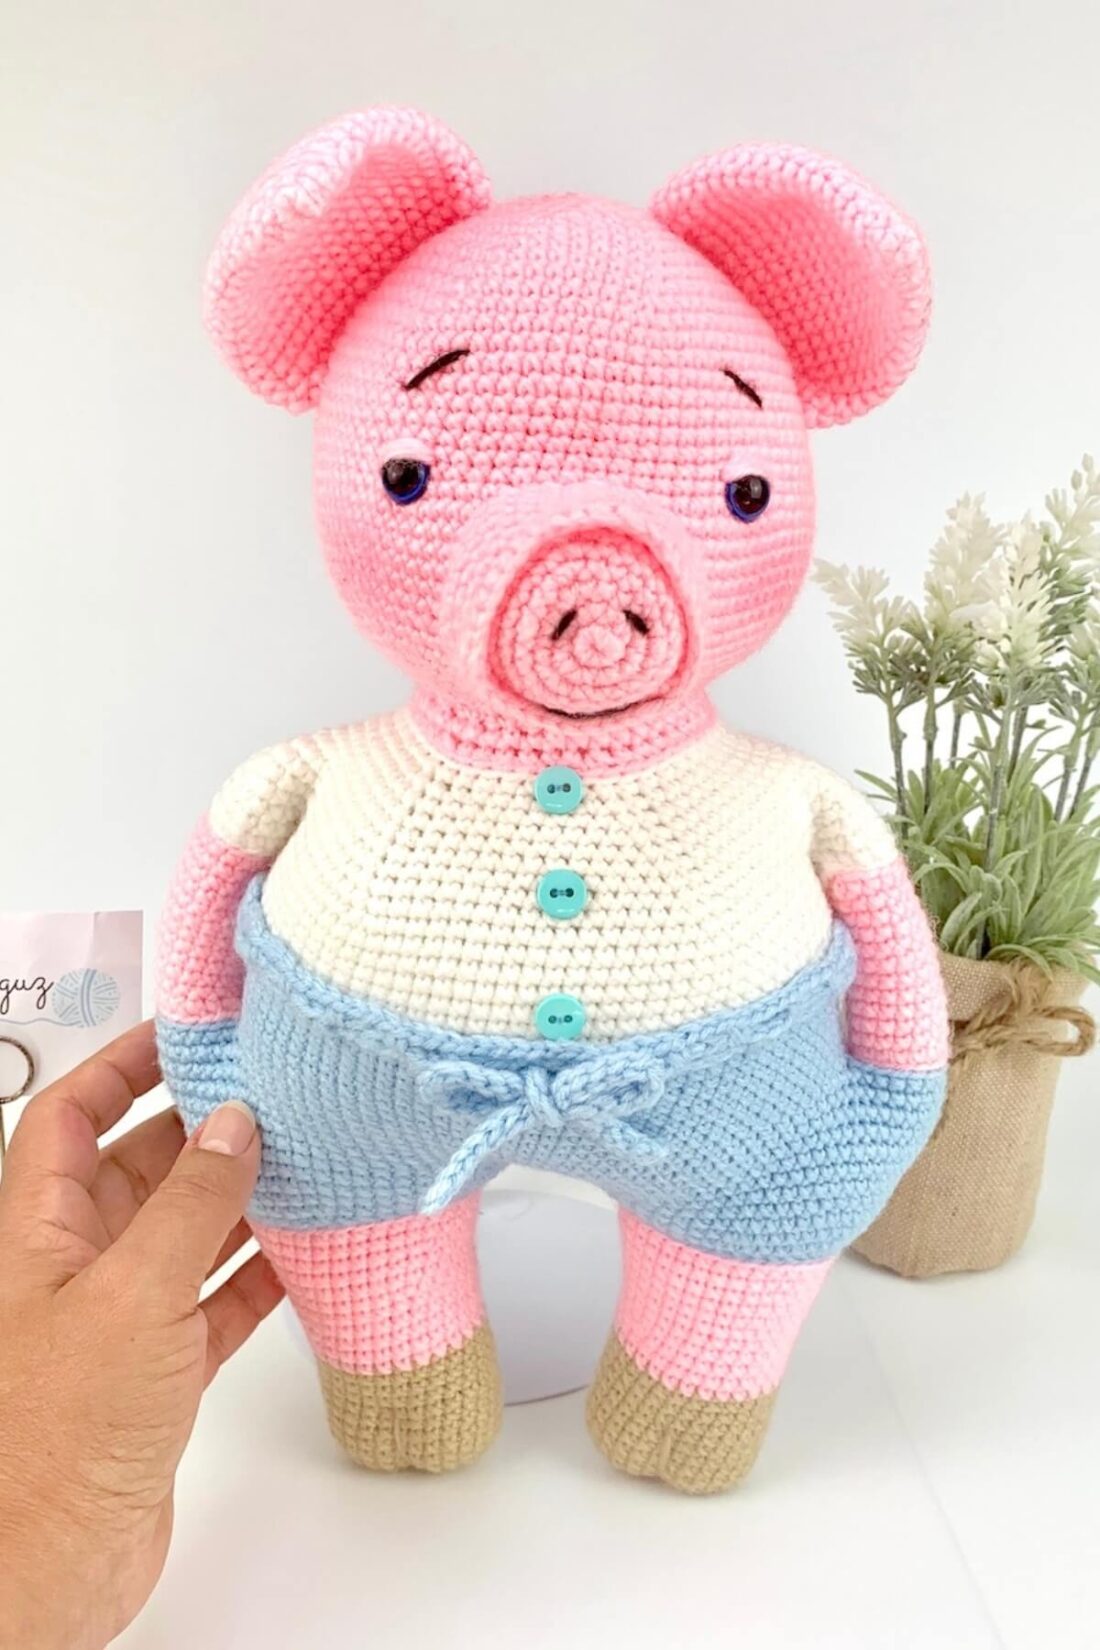
This isn’t just any crochet pig—he stands tall at approximately 14 inches (34 cm) and brings loads of character with his playful outfit and cuddly shape. You can look at different photos of the finished pig projects from my testers on Ravelry.
If you adore crocheting farm animals or soft toys with a touch of character, this cute crochet pig will be a perfect addition to your collection.
And if you enjoy this style, don’t miss the matching patterns for my crochet elephant and tiny crochet doll—more pocket-handed friends are on the way! However, if you’re into smaller crochet animals and dolls, you’ll find dozens of other patterns here on the blog as well.
Ready to get started? Then, get your tools and supplies ready and happy crochetting!
Explore More Amigurumi Patterns
Amigurumi Pig Pattern
Materials, Notions & Tools
- Worsted weight (4) yarn – more on the yarn below
- 3.5 mm (US E) crochet hook
- A pair of 12mm safety eyes
- Safety eyes placement tool for stuffed animals
- Stuffing fiber, like Poly-fil
- Tapestry needle, scissors, and stitch markers
- Stuffing tool, like a craft dowel or a hemostat
- Three 7/16” (11 mm) buttons for the shirt (optional)
- Sewing needle and thread matching the color of the buttons
- Scraps of dark yarn (I used black) to embroider the mouth, nostrils and eyebrows
- Sewing pins (optional)
The Yarn Specifics
Red heart super saver 100 % Acrylic
- C1: Petal Pink, for the skin. 3.69 oz (105 g), 197 yds (180 m)
- C2: Buff (beige), for the feet. 0.46 oz (13 g), 24 yds (22 m)
- C3: Light Blue, for the shorts. 1.7 oz (48 g), 91 yds (83 m)
Red heart With Love 100 % Acrylic
- C4: White, for the shirt. 1.07 oz (30 g), 57 yds (52 m)
Special Stitch Guide
This Amigurumi pig is made almost entirely in single crochet stitches worked in continuous rounds. However, one of the rounds on the snout requires single crochet stitches in the back post (bpsc). Here is how you do it:
- Draw up a loop around the post of the next stitch at the wrong side of the work, inserting the hook from right to left.
- Yarn over and draw through the two loops on the hook.
- Repeat steps 1 and 2 around.

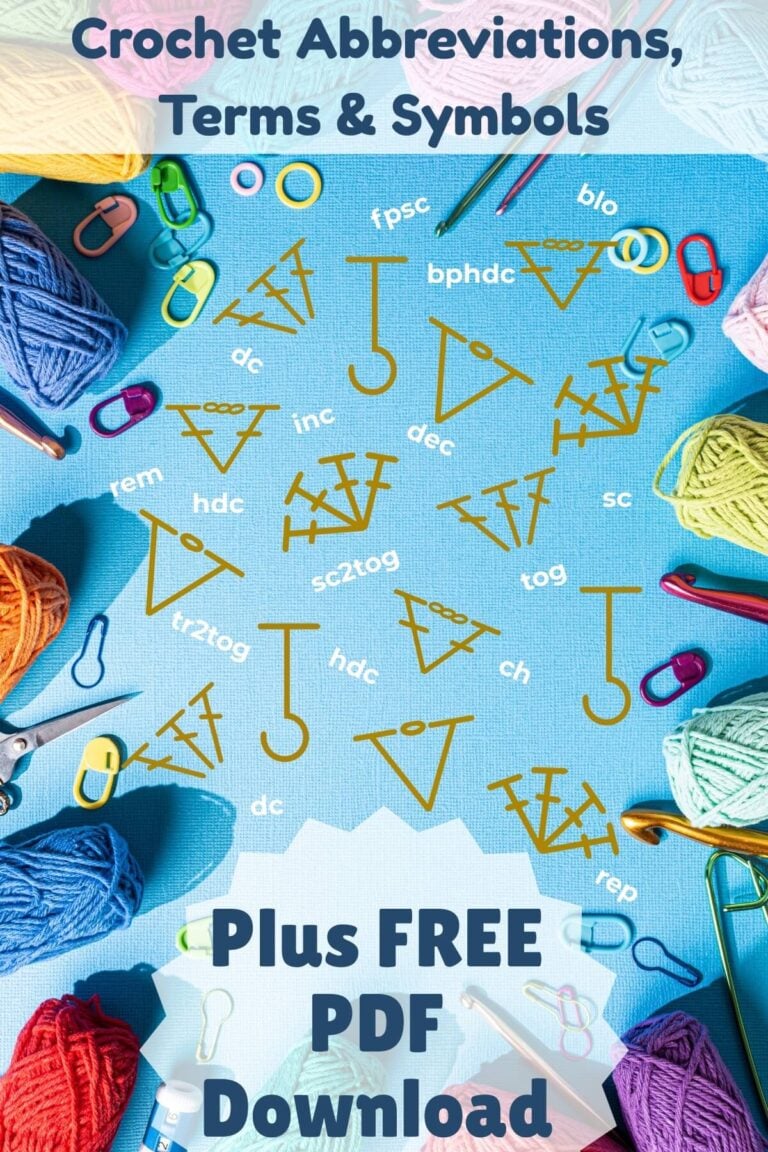
Abbreviations & Techniques (US terms)
Get a FREE Abbreviations & Terms Guide (PDF download).
- approx.: approximately
- blo: back loop only
- bpsc: back post single crochet
- flo: front loop only
- ch(s): chain(s)
- C1: Color 1
- C2: Color 2
- C3: Color 3
- C4: Color 4
- inc: increase (2 sc in the next stitch)
- dec: decrease (single crochet 2 together)
- FO: fasten off
- hdc: half double crochet
- mc : magic circle
- Rnd: round
- sl st: slip stitch
- st(s): stitch(es)
- sk: skip
- sc: yarn under single crochet
- yo: yarn over
- ( ): repeat instructions within parentheses as many times as directed
- [ ]: stitch count in a round
- * Repeat the instructions after the asterisks as many times as directed
Amigurumi Pig Finished Size
This pig will measure approximately 14 inches (35.5 cm) in height when made with the recommended yarn and hook size.

Pattern Notes
- This Amigurumi pig pattern uses US Crochet Terms
- Skill Level: Experienced (Amigurumi making skills are needed)
- This Amigurumi pig is made in continuous rounds of single crochet stitches.
- First, you crochet the head from top down, then the snout, and the earsears.
- Next, you crochet the legs, followed by the torso, and arms all in one piece, starting with the feet up to the neck.
- Then, you sew the ears on the head, the snout on the face and sew the torso to the head.
- The armpits and crotch may require some sewing to prevent holes from forming where the pieces join.
- If the crochet pig is intended for a child, please avoid using small parts such as safety eyes and buttons. These can easily detach and pose a choking hazard.
- Stitch tension: Gauge is not crucial, but for reference the diameter of my first six rounds of the head measured about 2 1/8” (5.3 cm), across the center.
Helpful Resources
- 14 Best Amigurumi Materials and Tools
- Crochet Magic Circle
- Crochet Invisible Decrease
- How to Crochet a Perfect Circle
- Crochet Invisible Finish

Purchase a PDF Download
- Inexpensive (costs less than a coffee)
- Ad-free
- Print-friendly
About Exclusive Content: When you create a Grow.me account you can bookmark your favorite content in one place. With one FREE account you can have not only mine, but many other creators’ content saved in one place.
When you come to my blog and see the button “Unlock Exclusive Content”, go ahead and create an account or simply click the login button and sign-in with an existing Grow account. It’s a secure, free feature and you can unsubscribe at any time. Everything you bookmark with the “heart” in a page that uses Grow.me will show up under “Grow Bookmarks” in your account.
Please note that Grow.me is a third-party app for Exclusive Content, and I have no control over their user policies. Neither will I be able to assist with account creation and/or password resetting. For information on how to troubleshoot login and password resetting, go to “Resources” on the Grow.me website’s top menu.
Step-by-Step Instructions

Before you begin working on your Amigurumi pig, ensure you check the list of materials and pattern notes.
Total Time: 6 hours
-
Head (Pink)

Rnd1: sc 6 in mc
Rnd2: (inc) 6 x [12]
Rnd3: (inc, sc in next st) 6 x [18]
Rnd4: (inc, sc in next 2 sts) 6 x [24]
Rnd5: (inc, sc in next 3 sts) 6 x [30]
Rnd6: (inc, sc in next 4 sts) 6 x [36]
Rnd7: (inc, sc in next 5 sts) 6 x [42]
Rnd8: (inc, sc in next 6 sts) 6 x [48]
Rnd9: (inc, sc in next 7 sts) 6 x [54]
Rnd10: (inc, sc in next 8 sts) 6 x [60]
Rnd11: (inc, sc in next 9 sts) 6 x [66]
Rnd12: (inc, sc in next 10 sts) 6 x [72]
Rnd13: (inc, sc in next 11 sts) 6 x [78]
Rnd14-21: sc around [78]
Rnd22: sc in next 66 sts, (inc, sc in next st) 6 times [84]
Rnd23: (inc, sc in next st) 6 x, sc in next 72 sts [90]
Rnd24-28: sc around [90]Attach the eyes: Start by folding the head piece to mark the center of the face, right where rnd 28 ends. Then, attach the eyes between rounds 21 and 22, 16 sts apart (8 sts on each side of the fold).
Before attaching the washers, fold the Amigurumi pig’s head piece again to check if the eyes are centered.
Rnd29: (dec, sc in next 13 sts) 6 x [84]
Rnd30: (dec, sc in next 12 sts) 6 x [78]
Rnd31: (dec, sc in next 11 sts) 6 x [72]
Rnd32: (dec, sc in next 10 sts) 6 x [66]
Rnd33: (dec, sc in next 9 sts) 6 x [60]
Rnd34: (dec, sc in next 8 sts) 6 x [54]
Rnd35: (dec, sc in next 7 sts) 6 x [48]
Rnd36: (dec, sc in next 6 sts) 6 x [42]
FO and cut the yarn. -
Embroidering the eyelids (Pink)

Start with the left eye: From inside the Amigurumi pig’s head, insert the yarn needle with a long strand of yarn (about 25 inches / 65 cm) on the left side of the eye. Pull it out, then draw it through to the upper right side of the eye at an angle. Repeat these steps three more times.
Cut the yarn. Then, repeat the process with the other eye, beginning on the right side of the right eye. -
Snout (Pink)
Rnd1: 9 sc in a mc
Rnd2: (inc) 9 x [18]
Rnd3: (inc, sc in next 5 sts) 3 x [21]
Rnd4: (inc, sc in next 6 sts) 3 x [24]
Rnd5: (inc, sc in next 7 sts) 3 x [27]
Rnd6: (inc, sc in next 8 sts) 3 x [30]
Rnd7: hdc twice in next st, sc in next 7 sts, hdc in next 2 sts, dc twice in next st, hdc in next 2 sts, sc in next 7 sts, hdc twice in next st, sc in next 9 sts [33]FO and cut the yarn.
Rnd8: attach yarn around back post of the first stitch at back of work, in rnd 6, bpsc in each st around rnd 6 [30]
Rnd9-10: sc around [30]
Rnd11: (inc, sc in next 4 sts) 6 x [36]
Rnd12-13: sc around [36]
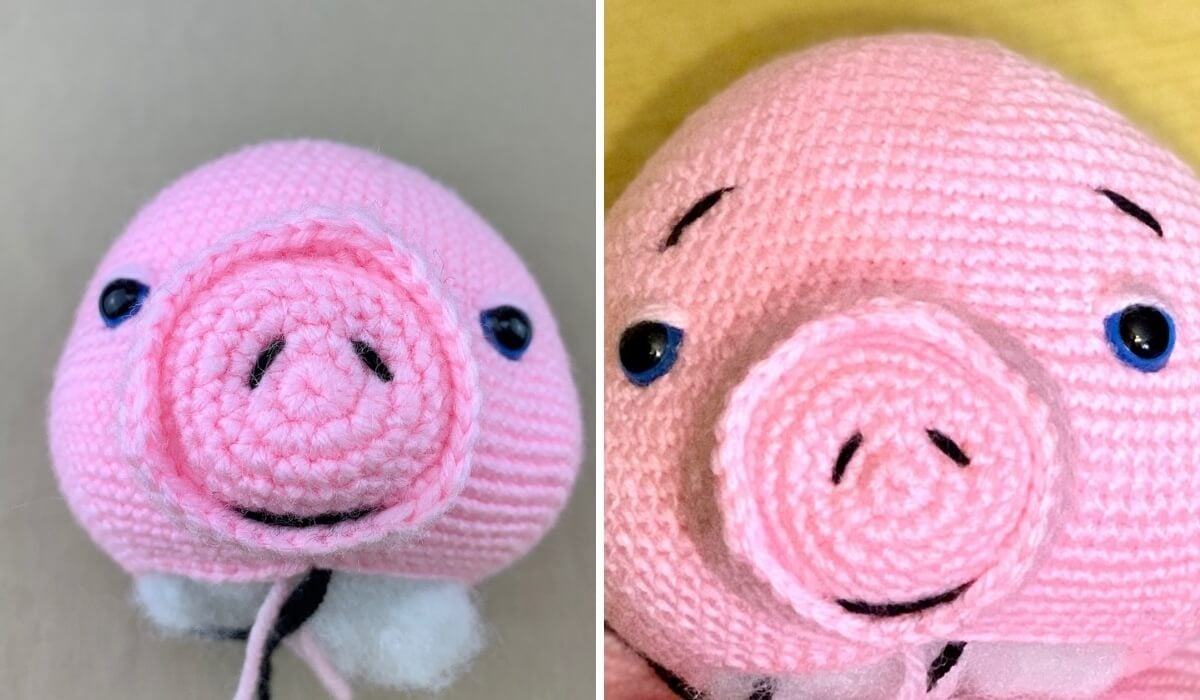
FO and cut the yarn, leaving a long tail.The front of the snout will have a slightly triangular shape. Place the snout on the center of the face, between rnd22-32 (see photos above), with the shortest side at the bottom. Use sewing pins to help hold it in place, but do not stuff it yet.
Using the long tail and a yarn needle, sew the snout onto the face in a counterclockwise direction. When you’re about two-thirds of the way through, add stuffing, then finish sewing to close.
-
Embroidering the pig’s face features (Black)
Embroider the nostrils, mouth, and eyebrows using dark yarn scraps. Pull the stitches for the nostrils slightly tighter to create indentations.
The crochet pig’s eyebrows will be placed on the 4th and 5th rounds just above the eyes, at an angle.
Make one stitch for each nostril, one for the mouth, and one for each eyebrow. -
Crocheting and Attaching the Ears x2 (Pink)
Rnd1: sc 6 in mc
Rnd2: sc around [6]
Rnd3: (inc) 6 x [12]
Rnd4: sc around [12]
Rnd5: (inc, sc in next st) 6 x [18]
Rnd6: sc around [18]
Rnd7: (inc, sc in next 2 sts) 6 x [24]
Rnd8: sc around [24]
Rnd9: (inc, sc in next 3 sts) 6 x [30]
Rnd10: sc around [30]
Rnd11: (inc, sc in next 4 sts) 6 x [36]
Rnd12-18: sc around [36]
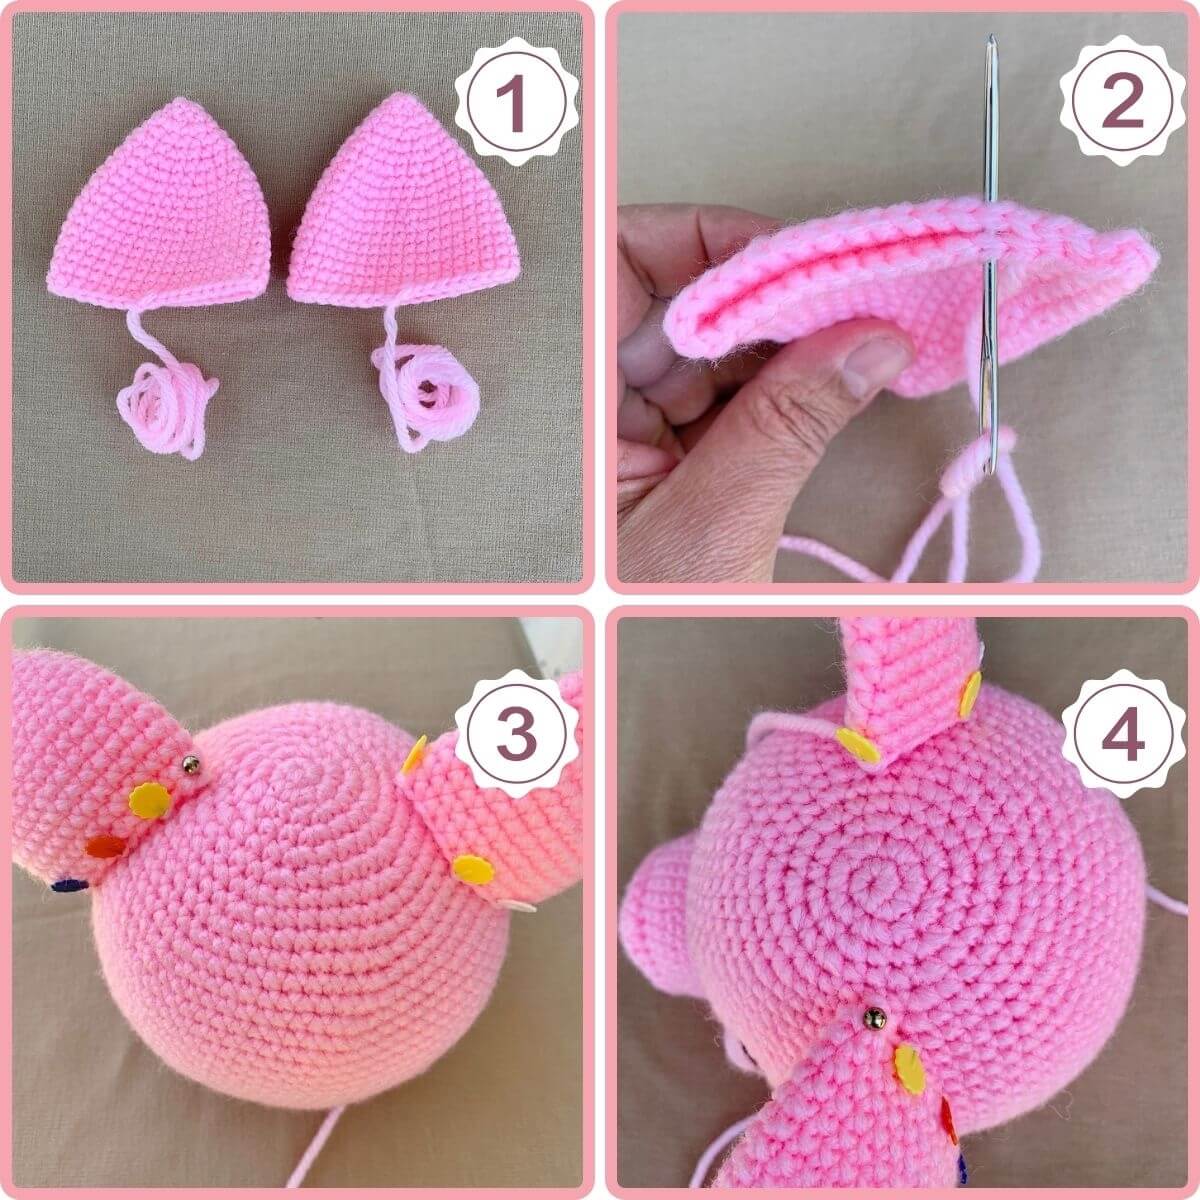
FO and cut the yarn, leaving a long tail.Squeeze the Amigurumi pig’s ears flat (no need to stuff them), then sew the open ends closed. Place one ear on each side of the head, then sew them between rnd 4 and 16, curved towards the eyes. Use sewing pins to hold them in place while sewing.
Set the head aside until it’s time to sew it onto the body.
-
Hooves & Legs x2 (brown, pink, and blue)
Begin with the hooves using C2. The oval technique is applyed to crochet them.
Ch 11
Rnd1: inc in 2nd ch from hook, sc in top loop of next 8 chs, inc in next ch, sc in the opposite side of next 8 chs [20]
Rnd2: *(inc) 2 times, sc in next 8 sts, repeat from * 1 more time [24]
Rnd3: *(inc, sc) 2 times, sc in next 8 sts, repeat from * 1 more time [28]
Rnd4-11: sc around [28]
FO and cut the yarn.Switch to C1, then attach it to the first st on rnd 11.
Rnd12-13: sc around [28]
Rnd14: (inc, sc in next 13 sts) 2 x [30]
Rnd15-16: sc around [30]
Rnd17: (inc, sc in next 9 sts) 3 x [33]
Rnd18-19: sc around [33]
Rnd20: (inc, sc in next 10 sts) 3 x [36]
Rnd21-22: sc around [36]
FO and cut the yarn.Switch to C3, then attach it to blo of the first st on rnd 22.
Rnd23: sl st in blo around [36]
Rnd24: (inc in blo, sc in blo of next 5 sts) 6 x [42]
Rnd25: (inc, sc in next 6 sts) 6 x [48]
Rnd26-27: sc around [48]
FO and cut the yarn (for first leg only).Using a contrasting yarn or a second stitch marker, mark the 14th stitch of round 27 on the first leg. This helps you identify that stitch when you return in the next step to join your Amigurumi pig’s legs.
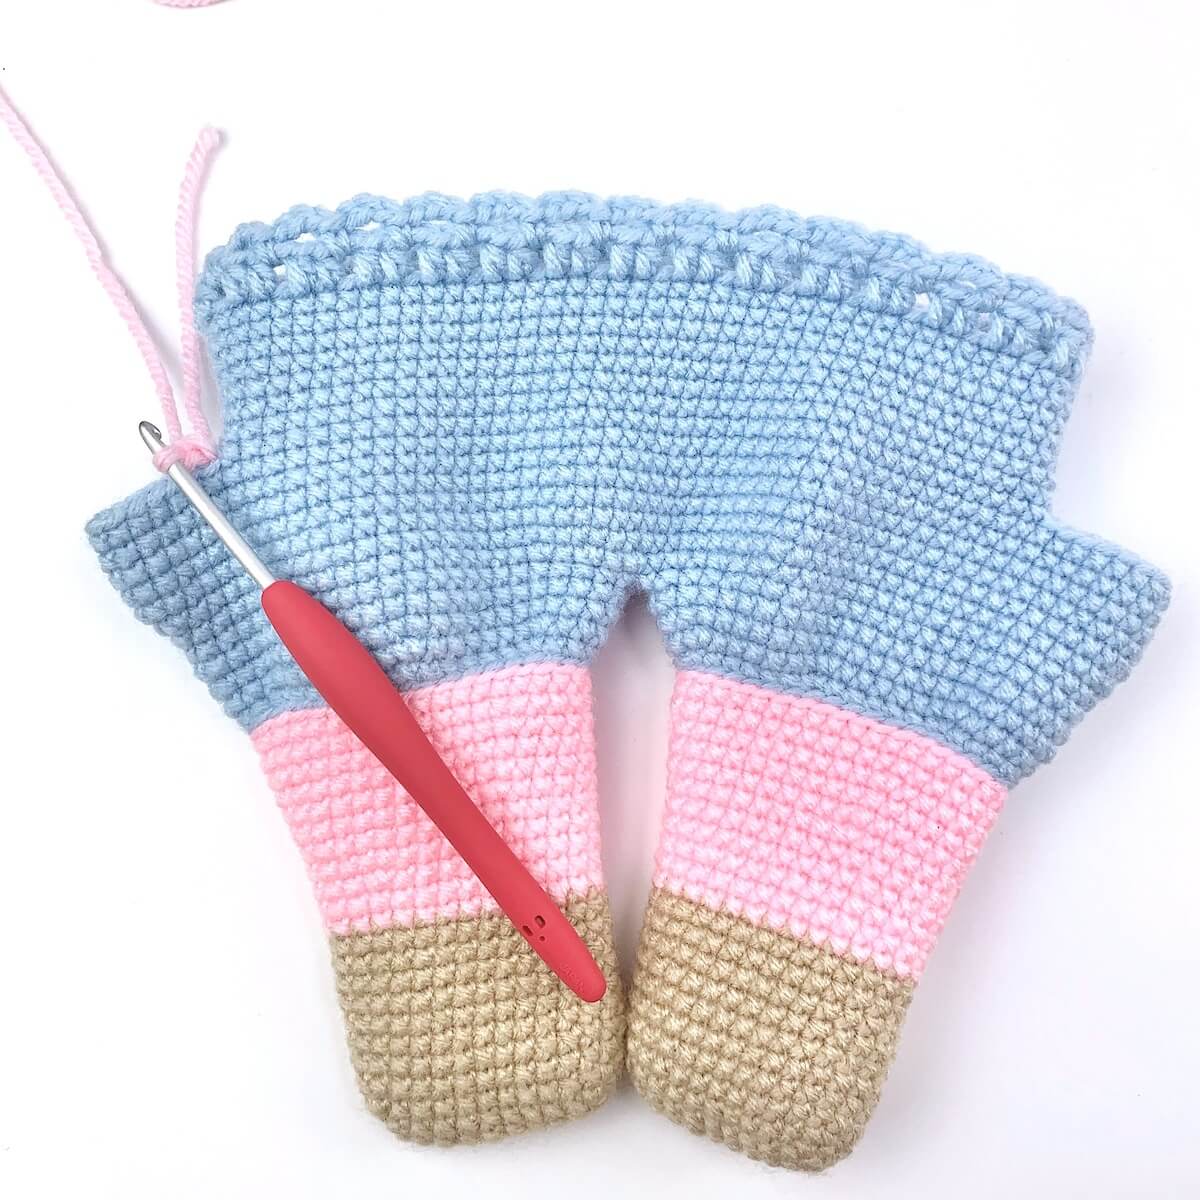
Once you finish round 27 on the second leg, do not cut the yarn yet. Continue to round 28 (see below). Then, flatten the first leg. You will attach the legs in the next round.Rnd28: sc in next 36 sts. Insert the hook in the 14th st of rnd 27 of the first leg, sc in that st and in the next 47 sts, sc in next 12 sts of 2nd leg [96]
Now that you have joined the legs, you can remove the second stitch marker or contrasting color strand of yarn you placed in the first leg. Do not cut the yarn yet.
-
Torso & Pants’ Waist (Blue)
Next, you’ll continue with blue to crochet around both legs in birg rounds and begin the torso.
Tip: The side where the rounds begin, where the stitch marker is placed, will be the back of the Amigurumi pig.
Rnd29: sc in next 11 sts, inc, sc in next 18 sts, (inc, sc in next st) 6 x, sc in next 18 sts, inc, sc in next 17 sts, (inc, sc in next st) 6 x, sc in next 6 sts [110]
Rnd30: sc in next 11 sts, (inc) 2 x, sc in next 54 sts, (inc) 2 x, sc in next 17 sts, (inc, sc in next st) 9 x, sc in next 6 sts [123]
Rnd31-35: sc around [123]Leave the holes for the lower arms in the next rnd (this is what mimics the hand tucked in the pockets).
Rnd36: sc in next 7 sts, (sk the next 15 sts, sc in next 43 sts) 2 x [93]
Rnd37-43: sc around [93]Now, use a contrasting color yarn strand or a second stitch marker to mark the first stitch in the round on rnd 43, because you’ll return to it later to attach C4 and continue the torso after making the arms.
Rnd44: (hdc in flo of next 2 sts, ch 1, sk next st) 31 x, sl st in 1st st of next rnd [93]
Rnd45: (ch 3, sc in next ch space) 31 x [93]
FO and cut the yarn. -
Right Arm (Pink and White)
Rnd1: Lay the already done Amigurumi pig’s piece flat with its front facing you, then attach yarn C1 to the blo of the first st of the right lower arm hole (photo above), sl st in the blo around. [15]
Rnd2: sc in blo around [15]
Rnd3-13: sc around [15]
FO and cut the yarn. Switch to C4, attach the new yarn to blo of the first st on rnd 13.
Rnd14: sl st in blo around [15]
Rnd15: sc in blo around [15]
Rnd16: sc around [15]
FO and cut the yarn. -
Left Arm (Pink and White)
Rnd1: lay the piece flat with the right arm to your right side, attach yarn C1 to blo
of the first st of the left arm hole, sl st in blo around. [15]
Rnd2: sc in blo around [15]
Rnd3-13: sc around [15]
FO and cut the yarn. Switch to C4, attach new yarn to the blo of the first st on rnd 13.
Rnd14: sl st in blo around [15]
Rnd15: sc in blo around [15]
Rnd16: sc around [15]
FO and cut the yarn. -
Back to the Amigurumi Pig’s Torso (White)
Rnd1: Lay the piece with the back of the doll facing you. Then, attach the yarn (C4) to the blo of the first st of rnd 43 (rnd 44 and 45 will be the pant’s waist), sc around in blo. [93]
Rnd2: sc around [93]
Rnd3: sc in next 63 sts, (dec, sc in next st) 9 x, sc in next 3 sts [84]
Rnd4-5: sc around [84]
Rnd6: sc in next 63 sts, (dec, sc in next st) 6 x, sc in next 3 sts [78]Do not cut the yarn yet. The the torso is now rejoined to the upper arms, in the next rnd.
Rnd7: sc in next 10 sts, squeeze left arm flat, sc in first st on the closest folded side of the arm, sc in next 14 sts of the arm, sc in next 42 sts of the torso. Then squeeze the other arm flat, sc in first st on the closest fold crease of the arm, sc in next 14 sts of the arm, sc in next 26 sts of the torso [108]
This is a good time to stuff the Amigurumi pig’s legs and arms. Stuff the lower parts of the arms firmly, add less fiber to the upper parts, leaving them softer rather than too firm. Add fiber to the torso as you go.
Rnd8: (dec, sc in next 16 sts) 6 x [102]
Rnd9: (dec, sc in next 15 sts) 6 x [96]
Rnd10: (dec, sc in next 14 sts) 6 x [90]
Rnd11: (dec, sc in next 13 sts) 6 x [84]
Rnd12: (dec, sc in next 12 sts) 6 x [78]
Rnd13: (dec, sc in next 11 sts) 6 x [72]
Rnd14: (dec, sc in next 10 sts) 6 x [66]
Rnd15: (dec, sc in next 9 sts) 6 x [60]
Rnd16: (dec, sc in next 8 sts) 6 x [54]
Rnd17: (dec, sc in next 7 sts) 6 x [48]
FO and cut the yarn. -
Creating the neck and attaching the head (Pink)
Switch to C1, and attach it to the blo of first st of rnd17.
Rnd18: sl st in blo around [48]
Rnd19: (dec in blo, sc in blo in next 6 sts) 6 x [42]
Rnd20: sc around [42]
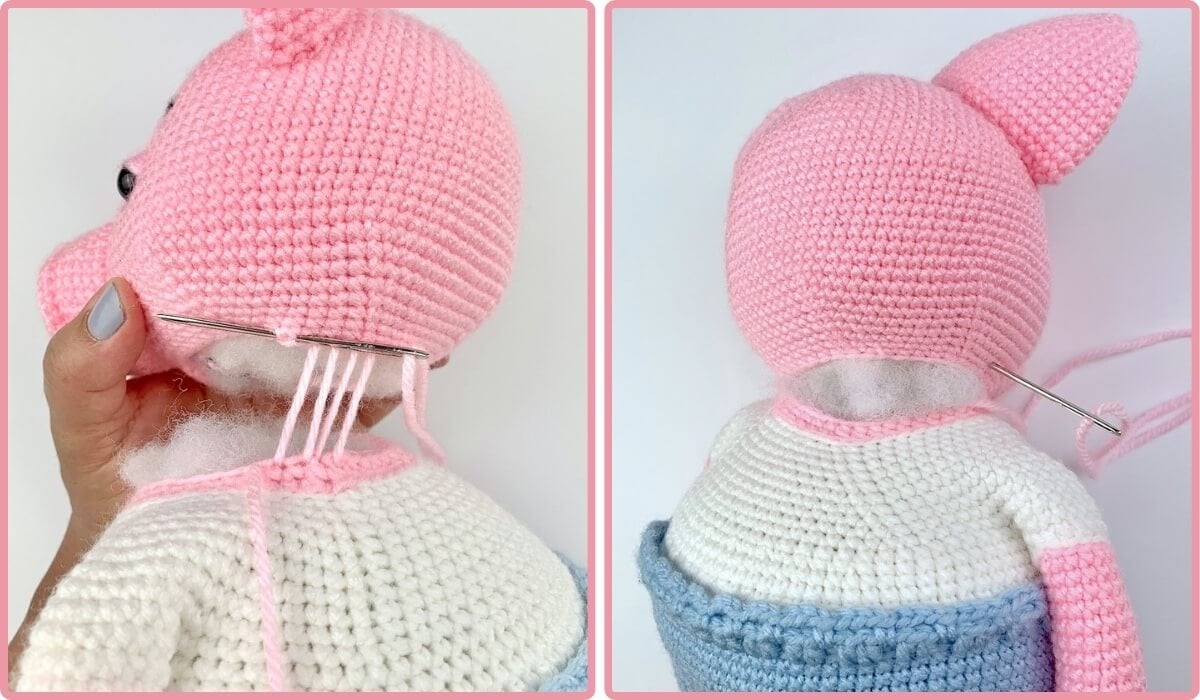
FO and cut the yarn. Leave a long tail to attatch the Amigurumi pig’s body to its head.Before sewing it closed, add more stuffing fiber to the crochet pig’s bottom and shape it firmly.
Next, position the Amigurumi pig’s head on top of the body, making sure it faces forward and is centered. Then join the open edge of the head to the open edge of the neck using the yarn needle and the long strand of yarn remaining.
When you’re about two-thirds through the sewing process, add more fiber to make the neck firm. FO and weave in the ends. -
Belt (Blue)
You will crochet a string long enough to insert into the waistband and tie a bow in the front. Chains don’t need to be too tight.
Ch 121, or approximately that many chains, depending on your tension and yarn chosen, sl st in the third loop of the 2nd ch from the hook and in the third loop of every ch across.
FO and cut the yarn. Then, weave in ends. Mine measured 22 inches (56 cm) long when finished.
Using the crochet hook or your fingers, insert the belt into the waistband chain spaces, starting in the front and centered, with one end, weaving in and out around the waist.
-
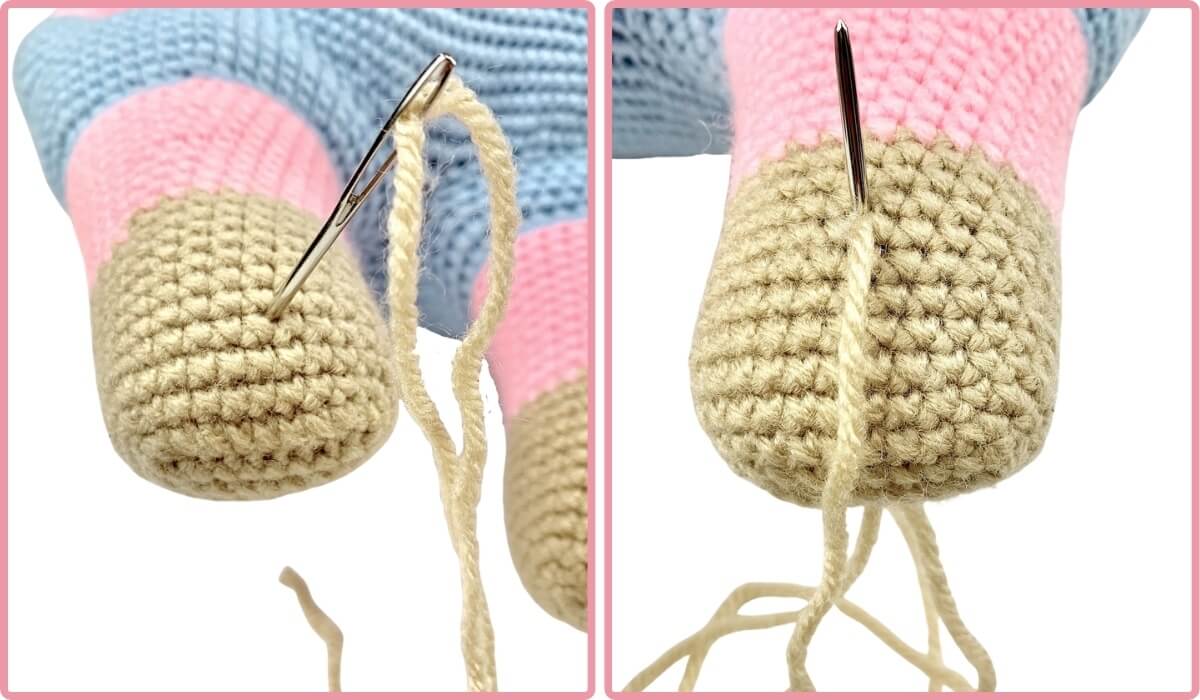
Shaping the pig’s hooves
Thread a strand of yarn C2 through the needle, insert it at the back of the hoof, between rounds 4-5, then pull it out at the front between rounds 8-9.
Repeat the above process once more. Tighten the yarn and make a double knot. Hide the ends inside. Then, repeat the process for the other hoof. -
Amigurumi pig’s tail
Leave a strand of yarn about 5 inches (13 cm) long.
Then, ch 21, sc 3 in 2nd ch from hook and in each of the next 19 chains [60].FO and cut the yarn, leaving a 5-inch (13 cm) tail. Use the crochet hook to attach the tail to the back of the Amigurumi pig with a double knot. Then, weave in the ends.
-
Final touches
Sew the buttons onto the front of the shirt using a sewing needle and thread.
Optional cheed blush: Gently rub the cheeks with a make-up brush or beeswax crayon, being careful not to rub too hard. If using crayons, firs rub it on a scrap piece of fabric, then softly press the fabric against the crochet pig’s cheeks. Then, use a different scrap of fabric to clean up any excess.


Estimated Cost: 12.00 USD
Supply:
- 12mm safety eyes, Stuffing fiber, Stitch markers, Three 7/16” (11 mm) buttons, Sewing needle and thread, Tapestry needle, Scraps of dark yarn, Sewing pins
Tools:
- 3.5 mm/US E crochet hook, Safety eyes placement tool, Stuffing tool, Scissors
Materials: Worsted weight yarn (more on the yarn above)
Your Amigurumi pig is now complete. Congratulations!

More Crochet Animals
- Bunny Loaf Amigurumi Pattern
- No-Sew Crochet Chick in an Egg
- No-Sew Crochet Bee
- No-Sew Crochet Hen and Rooster
- No-Sew Crochet Cat Pattern
- Crochet Whale Pattern
- No-Sew Floppy Ears Bunny
Pin, Share, and Comment
- Comment on this post: I always read comments and reply to all questions posted on the blog, and I love it when you stop by to say hello.
- Share your project: if you make this or any of my other patterns, tag me on Instagram or Facebook, or use the hashtag #zamiguzmakers. I love seeing what you make.
- Pin it now: Are you not ready to make it yet? You can use the above image to Pin it to your crochet boards or follow me on Pinterest for more.
- Join The Makers community: Join my community group on Facebook and be the first to know about pattern releases and other crochet-related content.