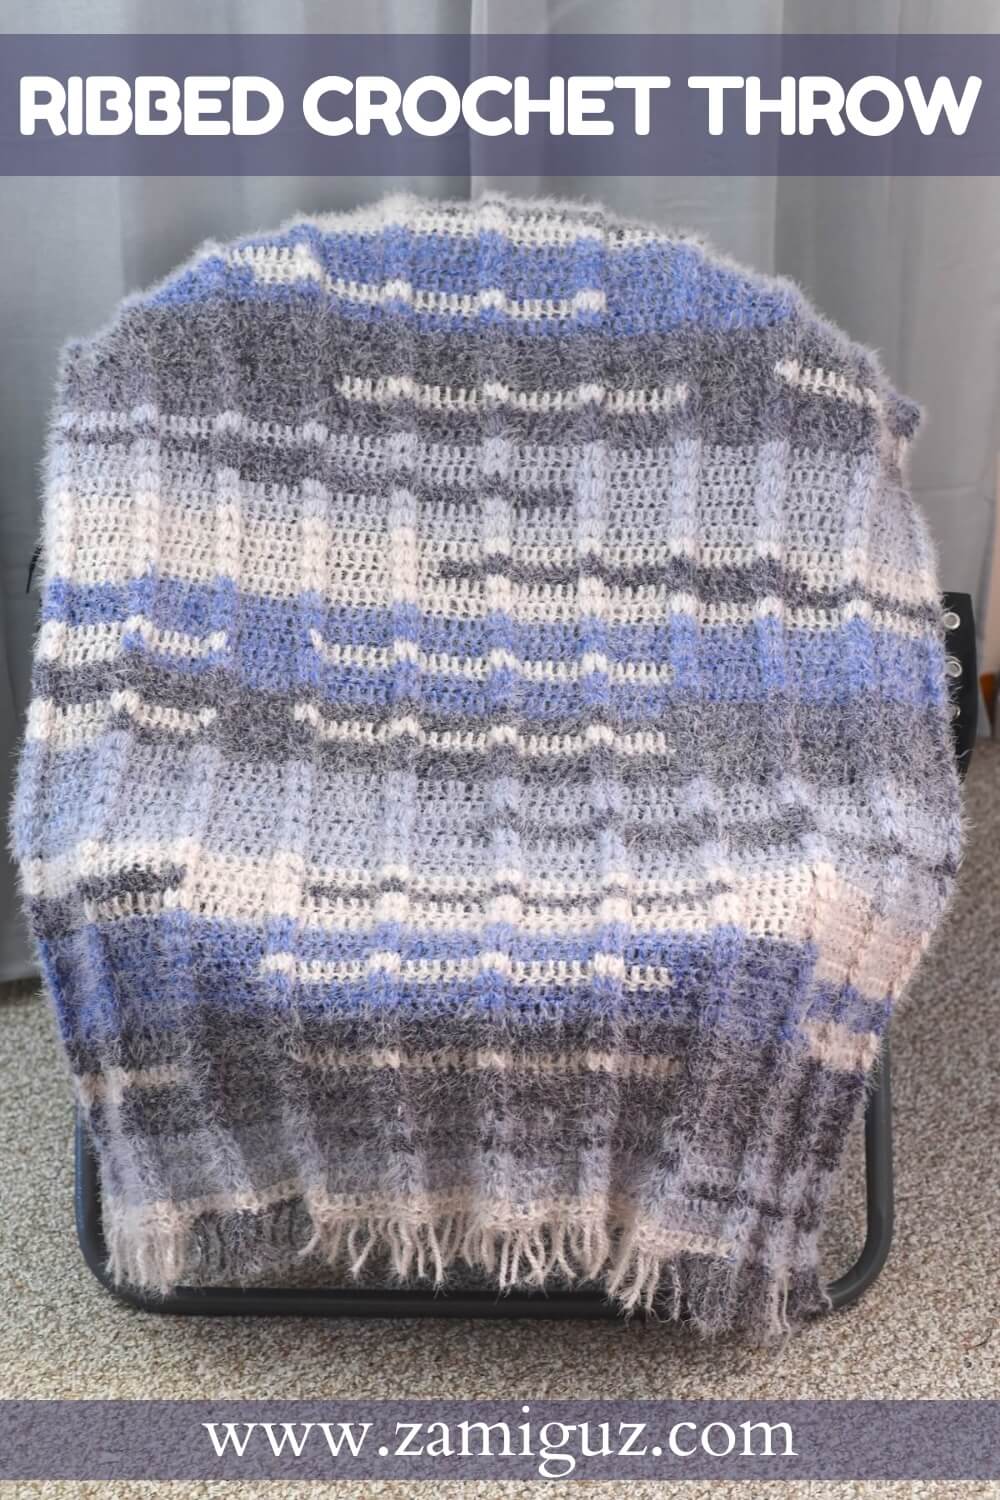
There’s nothing quite like wrapping yourself in a handmade blanket that’s both soft and beautiful. My newest design, the Ribbed Crochet Throw Blanket, was created to be the perfect mix of texture and comfort.

This website is reader-supported and contains affiliate links. As an Amazon Associate, I earn from qualifying purchases. Find my affiliate disclosure here.
I used a simple combination of front and back double crochet stitches for this crochet afghan, which creates a beautifully defined ribbing that adds depth and drape — all while keeping the project relaxing and fun to make.
The pattern repeat consists of only two rows: one with front post double crochets and one with back post double crochets, maintaining the ribbing on the right side only.
Here is a picture of my cozy handmade blanket draped over my favorite craft chair — I just know it’s going to be my snuggle buddy during long crochet sessions!

The highlight in this design is that instead of using just one post stitch, we use two post stitches together to create that beautiful, puffy ribbing.
For this throw blanket, I used Caron Latte Cake yarn in the color Night Storm, and I couldn’t be happier with the result. The fur texture, paired with gentle gradients of blues, grays, and creams, brings a soothing, modern look that works perfectly in any cozy corner of your home.
Ready to dive into the instructions? Let’s gather our yarn and hook and get started!
But before you scroll…
… you may also like to check these other crochet blanket patterns here on the blog: The Rusty Cottage – a Classic Granny Square Blanket, this C2C Granny Spike Stitch Blanket, and this Unique Square Crochet Blanket.

Purchase a PDF Download
- Inexpensive
- Ad-free
- Formated and Print-friendly
More Relaxing Crochet Patterns
- Crochet Coaster Set with Basket
- I See Hearts Doily
- Snowflake Doily
- Poinsettia Wine Cozy Pattern
- Farmhouse Pumpkin Garland
- Crochet Mason Jar Cozies
- Farmhouse Crochet Towels
What You’ll Need:
- Bulky (5) yarn – I used approximately 1,107 yards (1,012 m) of Caron Latte Cakes in color Night Storm to make this ribbed crochet throw blanket.
- 6.00 mm (US J) crochet hook
- Stitch marker, darning needle, and scissors
Watch the Video Tutorial

Ribbed Crochet Blanket Pattern
Blanket Size:
The finished ribbed crochet throw blanket shown measured approximately 38 inches (97 cm) wide and 45 inches (114 cm) long, with about 6 inches (15 cm) added for the fringe.

Abbreviations (US terms):
Before you begin making your ribbed crochet project throw, you can get an Abbreviations and Terms Free Guide (sign up for a free PDF download).
- ch(s): chain(s)
- dc: double crochet
- FO: Fasten off
- pfpdc: Puff Front Post Double Crochet (stitch explanation included in the pattern with video)
- pbpdc: Puff Back Post Double Crochet (stitch explanation included in the pattern with video)
- RS: Right Side
- WS: Wrong side
- st(s): stitch(es)
- ( ): Repeat instructions within parentheses as many times as directed.
- [ ]: stitch count in a round
Stitch Tension:
10 double crochet stitches and 6 ¼ rows measure approximately 4″ (10 cm).
Pattern Notes:
- This ribbed crochet throw afghan pattern uses US Crochet Terms.
- Skill Level: Advanced beginner.
- This blanket is crocheted in turning rows.
- The foundation is created with multiples of 9 + 1 chains for the width, and rows 1 and 2 are the pattern repeat for the length.
- Turning chains won’t count as stitches.
- Use stitch markers to help keep track of row and stitch counts.
About Exclusive Content: When you create a Grow.me account, you can bookmark your favorite content in one place. With one FREE account, you can have not only mine, but many other creators’ content saved in one place.
When you come to my blog and see the button “Unlock Exclusive Content”, go ahead and create an account or simply click the login button and sign in with an existing Grow account. It’s a secure, free feature, and you can unsubscribe at any time. Everything you bookmark with the “heart” on a page that uses Grow.me will show up under “Grow Bookmarks” in your account.
Disclosure: Please note that Grow.me is a third-party app for Exclusive Content, and I have no control over their user policies. Neither will I be able to assist with account creation and/or password resetting. For information on how to troubleshoot login and password resetting, go to “Resources” on the Grow.me website’s top menu.
Blanket Step-by-Step Instructions
Before you begin working on this throw blanket, you may find these resources helpful: How to Crochet a Slip Knot and How to Create an Invisible Finish in Crochet. Also, please note, I used a non-fur yarn in the swatch below for a better view of the stitch details.
Foundation:
Start with 100 chs or any other multiples of 9 + 1. Alternatively, you can create a chainless foundation of 98 dc sts, or other multiples of 9 + 8, ch 2, turn.
Tip: Wondering to size your own blankets? Check this Free Guide On How to Size your Crochet Blankets (I can send you a FREE pdf when you subscribe).

Row 1:
Row 1 (RS): 3 dc, *2 pfpdc, dc 7, 2 pfpdc, repeat from the until 5 sts left, 2 pfpdc, 3 dc, ch 2, turn. [98]
Tip: I’ve included a YouTube Video above that may be helpful to understant this stitch construction, in case you get stuck. Also, you can follow along with the stitch explanation below.
- Puff Front Post Double Crochet (pfpdc) explanation: YO (photo #1), insert the hook around the post of the next st – front to back, then back to front – (photo #2), YO, and pull up a loop (photo #3). YO again and pull through two loops on the hook (photo #4). YO again (photo #5), insert the hook around the post of the same dc st – front to back, then back to the front. YO again and pull up a loop (photo #6), YO again and pull through two – three loops on hook – (photo #7). YO and pull through all three loops on the hook to complete the st (photo #8).
Row 2 :
Row 2 (WS): 3 dc, 2 pbpdc, *dc 7, 2 pbpdc* repeat until 5 sts left, 2 pbpdc, 3 dc, ch 2, turn. [98]
- Puff Back Post Double Crochet (pbpdc) explanation: YO (photo #9), insert the hook around the post of the next st, (back to front, then front to back), YO and pull up a loop (photo #10), YO again and pull through two (photo #11). YO again, insert the hook around the post of the same st (back to front, then front to back). YO and pull up a loop, YO again and pull through two (three loops on the hook). YO (photo #12) and pull through all three loops on the hook to complete the st.

Double Crochet Post Stitch Graph:

Rows 3-65:
Repeat the instructions in rows 2 and 3 to row 65 or to any other length you like. [98]

Finishing: Make a Twisted Fringe
Follow this blog post with written instructions and a video a on how to create a twisted fringe.
- Attach the yarn to the first stitch along one edge of the blanket, where you want to start the fringe, and do a single crochet stitch.
- Next, decide how long you want the fringe to be and pull up a loop twice that length – a ruler will be useful here!
- Twist the loop as many times as needed to create the first fringe (about 25 to 30 twists). Once released, it will naturally form a cord-like torsion.
- Then, single crochet again in the same stitch.
- Repeat the process with the remaining stitches, cut the yarn, and secure it at the end of the row.

Twisted Fringe Placement Graph:
This graph, along with the tutorial linked above will help you to vizualize the fringe placement for your ribbed crochet throw blanket.

And your ribbed crochet throw blanket is done! If you loved making it, leave a comment, or scroll down to see how you can connect with me on social media.
Happy Crocheting!

Pin, Share, and Comment
- Comment on this post: I always read comments and reply to all questions posted on the blog, and I love it when you take the time to stop by and say hello.
- Have you made this? Share your project if you make this or any of my other patterns, tag me on Instagram or Facebook, or use the hashtag #zamiguzmakers. I love seeing what you make.
- Pin it now: Are you not ready to make it yet? You can use the above image to pin it to your crochet boards or follow me on Pinterest for more.
- Join The Makers community: Join my community group on Facebook and be the first to know about pattern releases and other crochet-related content.
Would you rather bookmark this blog post for later? You can create a free Grow.me account and use the “heart” on the left-hand side of your screen to save it. It’s easy to have your internet favorites in one place.