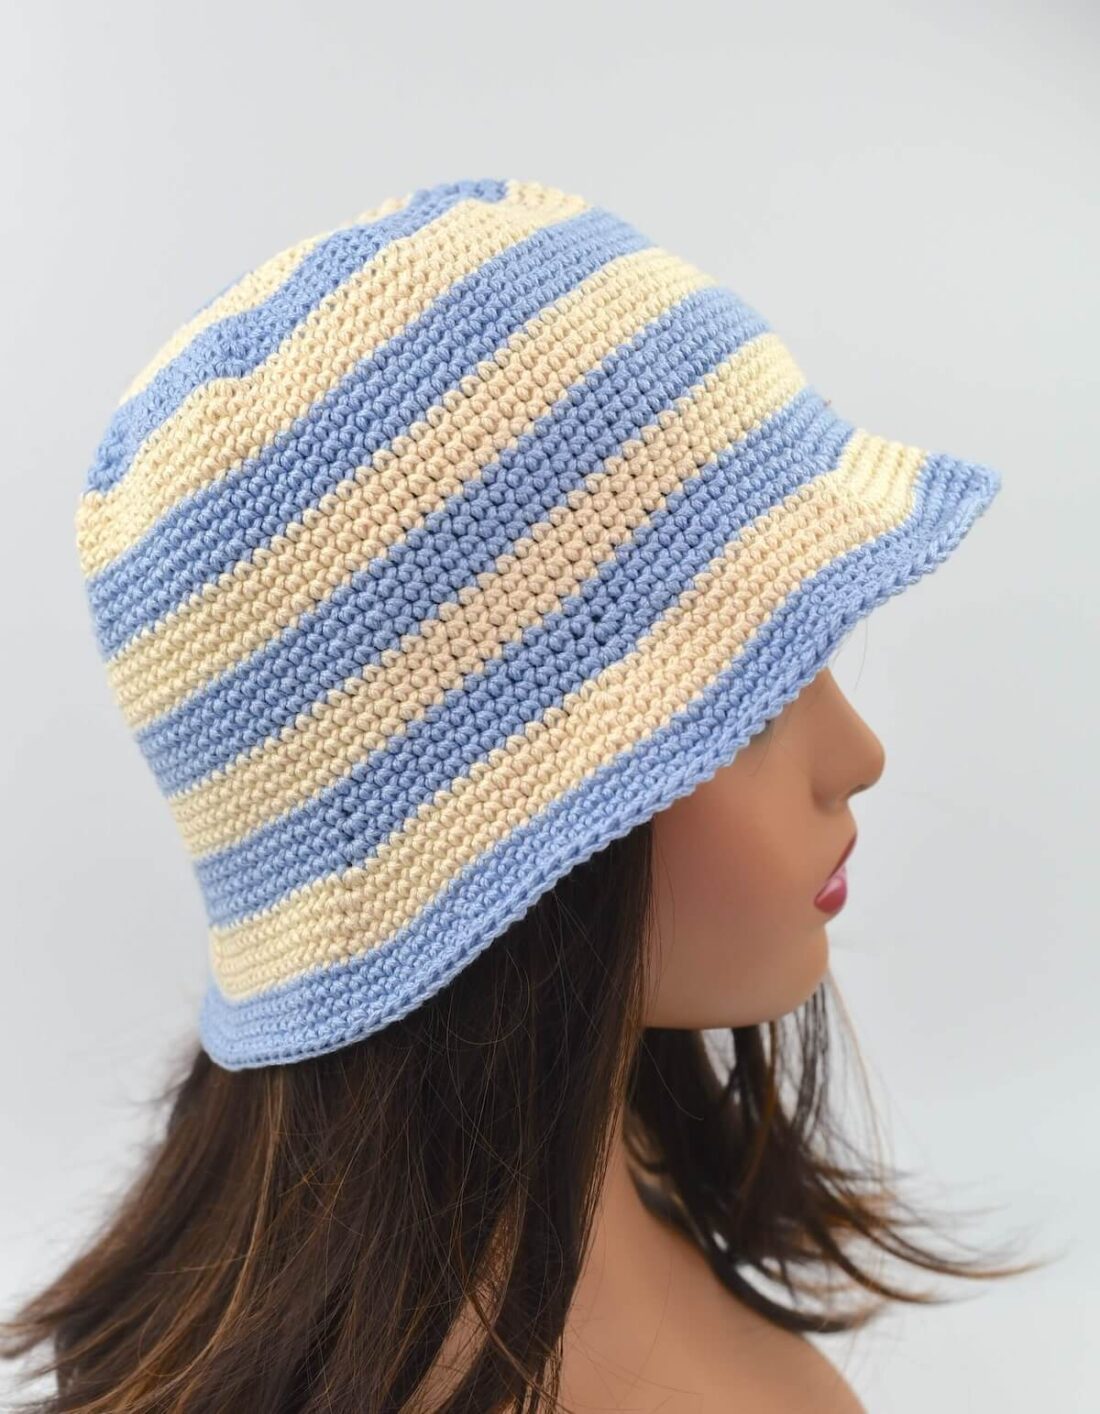
FREE Printable Bucket Hat Crochet Pattern
With this easy printable bucket hat crochet pattern you can make a simple, cute and stylish hat. Did you know that they are also known as fisherman hats or sun hats and that they are an iconic trend from the 90’s?
Like any other fashion trend, this one comes and go, but it never really went away. And now they are trending again everywhere.
In fact, if you search online you will find celebrities wearing them everywhere. They can be your “go to” accessory to complement your warmer weather outfits.
This website is reader supported and contains affiliate links. As an Amazon Associate, I earn from qualifying purchases. Find my affiliate disclosure here.
Table of Contents
Would you rather have a PDF?
An inexpensive PDF including this and 7 other sizes is available for sale, from Premie to Adult Large. It can be purchased on my Ravelry or Etsy shops.
See Ravelry makers projects here.

FAQ
Here are the answers for a few frequent questions about crochet bucket hats that may be helpful before you start making yours.
Can beginners crochet a bucket hat?
Absolutely! It is very simple to crochet a bucket hat. In fact, this is an easy pattern for beginners because you will crochet continuous rounds using single crochet stitches only.
And to make it even better, it’s very quick to crochet as well. Not to mention, making your own hat is the best bet to have it the way you like.
How to customize a crochet bucket hat?
You can just make it plain with one color, or you can make it with stripes using multiple-colored yarns. Or you can even use a self striping yarn, if you don’t feel like cutting the yarn to add a new one.
And it’s very easy to adjust the size as well. I added instructions where you can add more rounds to make in longer, if you need to.
How long does it take to crochet a bucket hat?
On average, a bucket hat will take you about 3 hours to crochet. However, there are a few things to consider.
If you have never made a hat before and are still learning the beginner skills, it will probably take you a little longer.

Best yarn for a crochet bucket hat
Cotton or cotton blend yarns are the best to make bucket hats because it’s absorbent and cool for the warmer weather. I used worsted weight (4) 100% cotton yarn I Love This Cotton, by Hobby Lobby.
Acrylic will be okay as well though, as there is very good quality acrylic yarn out there. But I thought I would give you a hint on what my preference was and why.
Amount of yarn
Crochet bucket hats don’t take a lot of yarn. For a Teen/Adult Small size, you will need 3.61 oz (102 g) / 186 yds (170 m), that’s less than one and a half skein of I Love This Yarn by Hobby Lobby.

Bucket hat pattern variations
Here are a few ways you can customize this bucket hat crochet pattern.
- Color and stripes: if you don’t feel like using different colors of yarns, this pattern will look great with self-striping yarn. Or if you would rather have it plain, use plain yarn in your favorite color to suit your style.
- Size: although the instructions in this pattern are for an Adult size, it’s not hard to make it smaller. Increase to a crown circumference you need, then crochet the body of the hat to be right above the ear.
- Brim: Bucket hats sometimes don’t need a wide brim, so you can add or take rows out to adjust the size of the brim as you like.
Please keep in mind this hat was designed to be a close fit. If you would like it to have some ease, consider using a larger hook.
Also, you will achieve better results with a tighter tension and if you keep it consistent throughout the end. If you crochet loose, you may have to use a smaller hook.

Pattern Notes and Instructions
Here is what you should know before you jump in to the actual pattern.
- This bucket hat crochet pattern was written using standard US terminology.
- Level of difficulty: Advanced beginner
- The hat is made from top down, worked in continuous rounds, meaning you don’t have to join the rounds with a slip stitch.
- Use the “single crochet yarn under” technique to achieve the “x” looking stitches. See instructions below.
- A stitch marker may be needed to mark the first stitch of every round, moving it up as you go, that way you won’t lose count.
- Instructions in the pattern are for size Teen/Small Adult.
- Measurements and yarn amounts are based on using informed yarn and gauge. Yarn amounts may vary if you use different yarn.
- When you finish the body of the hat, before starting the brim, the hat length should reach about the top of the ear. If it needs to be longer, you can add more rows.
Materials for a bucket hat crochet pattern:
- Worsted weight (4) 100% cotton yarn. I used love this Cotton by Hobby Lobby
- Yarn substitution: 24/7 by Lion brand
- 5.00 mm (US H) crochet hook
- A pair of scissors
- Stitch marker
- Tapestry needle to weave in the ends
Abbreviations (US terms)
- inc increase (2 sc in next stitch)
- FO fasten off
- mc magic circle
- Rnd round
- st(s) stitch(es)
- sc single crochet
- ( ) repeat instructions within parentheses as many times as directed
- [ ] stitch count in a round
Gauge
Meeting gauge is crucial to achieve the right size for this bucket hat crochet pattern.
Gauge: 6 rounds = 3” with 5.00 mm (US H) hook before blocking/washing.
Gauge swatch pattern
- Rnd1: 8 sc in a mc [8]
- Rnd2: (inc) 8 times [16]
- Rnd3: (inc, sc in next st) 8 times [24]
- Rnd4: (inc, sc in next 2 sts) 8 times [32]
- Rnd5: (inc, sc in next 3 sts) 8 times [40]
- Rnd6: (inc, sc in next 4 sts) 8 times [48]

Finished project size:
The hat finished size is approximately 21.5″ (55 cm), fits head sizes 21-22″ (53-56 cm), if gauge is met.
Bucket Hat Crochet Pattern Tips & tricks
Here are a few tips on how to crochet this hat and make it fit and look right. Make sure you read through all of this information section and follow the gauge instructions to make it the right way.
Tip# 1 – How to yarn under to make an “x” shaped sc stitch
I used the “yarn under” technique for this hat, which is the x-shaped single crochet stitch. However, this is optional, you can use the regular single crochet stitch if you prefer. My only advice is to make sure you meet gauge.
Here is how you do the “yarn under” single crochet stitch.
- After you insert the hook in next stitch, you will place the hook facing down on top of the yarn (see picture below)
- Next, grab the yarn and pull up a loop.
- Then, complete the single crochet stitch as normal.
With the “yarn over” technique the stitches will look like a “v” and not like an “x”, as shown on the hat pictured on this pattern.
Note: In my experience making this hat, I found that with the conventional single crochet stitch, your swatch will be bigger than the other way around. A smaller hook may fix that, but please make sure you meet gauge.

Tip# 2 – Color changing method
Color changing is not a requirement for this pattern. However, as you can see, if you use multiple yarn colors you can make a trendy striped crochet bucket hat. Here is what to keep in mind for color change.
- For the sample pictured in this pattern, which is a Teen/Adult Small size, I changed colors every four rounds.
- Before you start, I would like to mention that this method leaves a visible ladder looking seam every time you change colors (see picture below). The seam, in my opinion, looks better than a seam from joining rounds with a slip stitch.
- But if you are not happy with it, there is other color changing methods out there that may be a little less visible. Go to Google and search for “how to do invisible color change crochet” and you will find tons of tutorials.
Here is how I did the color change.
- After you do the last stitch of the round with the current color, cut the yarn and pull the end through so it doesn’t unravel.

- Insert the hook in that last stitch like you would to continue to crochet normally. Then, grab the new yarn with the hook and pull up a loop. Next, continue the new round as normal.

- To finish off, leave both tails at the back of work and tie a knot with both ends to make it secure. You may come back later and weave in the ends.
- Crochet as many rounds as needed with the new yarn. Then, repeat the process when you are changing colors again.

Would you rather have a PDF?
Purchase an inexpensive PDF download with 8 different sizes in my pattern shops here:
See Ravelry makers projects here.
Instructions
With this step by step free instructions you will be able to make an adult size hat. Pick your favorite color of yarn, a crochet hook and let’s get started.
Step 1: Make the crown
In this first step you are making the crown. You will crochet twelve rounds of single crochet, increasing in every round.
At this point, it’s important that you have read all the pattern notes and have crocheted a gauge swatch. That way you will have the result you want.
Rnd1: 8 sc in a mc (alternatively, you can make two chs and sc 8 sts in 2nd ch from hook [8]
Rnd2: (inc) 8 times [16]
Rnd3: (inc, sc in next st) 8 times [24]
Rnd4: (inc, sc in next 2 sts) 8 times [32]
Rnd5: (inc, sc in next 3 sts) 8 times [40]
Rnd6: (inc, sc in next 4 sts) 8 times [48]
Rnd7: (inc, sc in next 5 sts) 8 times [56]
Rnd8: (inc, sc in next 6 sts) 8 times [64]
Rnd9: (inc, sc in next 7 sts) 8 times [72]
Rnd10: (inc, sc in next 8 sts) 8 times [80]
Rnd11: (inc, sc in next 9 sts) 8 times [88]
Rnd12: (inc, sc in next 10 sts) 8 times [96]
Continue to the body of the hat. No need to cut the yarn if you are not changing colors here
Step 2: Make the body of the hat
In this step you will crochet plain rounds, with no increases. As a reminder, when you reach round 32, the ideal hat body length will be right above the ear.
Need your hat to be taler? Add more plain rounds if needed.
Rnd13-32: sc around
Continue to making the brim. No need to cut the yarn.
Step 3: Make the brim
The brim is the last step. In this step you will crochet two rounds of increases and eight rounds of plain single crochet. If you want it longer, all you have to do is to add more plain rounds after round 42.
Rnd33: (inc, sc in next 11 sts) 8 times [104]
Rnd34: (inc, sc in next 12 sts) 8 times [112]
Rnd35-42: sc around [112]
Step 4: Finishing the hat
When you are done with the brim, sl st in next st. Cut the yarn leaving a tail of 5-6 inches, pull the tail through the last loop and fasten off. Weave in all the ends.
More Crochet Patterns
- 20+ Under 2-Hour Crochet Beanies
- Beginner Ribbed Beanie Free Pattern
- Cat Ears Hat Free Crochet Pattern
- Braided Crochet Ear Warmer Free Pattern
- Crochet Scrunchie Free Pattern
- 1.5 Hour Easy Hat Pattern
Bucket hat pattern printing version

Easy Bucket Hat Crochet Pattern
This striped bucket hat pattern is for a Teen/Small adult size. The fisrt step is to make the crown. You will crochet twelve rounds of single crochet, increasing in every round.
At this point, it’s important that you have read all the pattern notes and have crocheted a gauge swatch.
Materials
- Worsted weight (4) 100% cotton yarn
Tools
- 5.00 mm (US H) crochet hook
- Scissors
- Stitch marker
- Tapestry needle
- Measurement tape or ruler
Instructions
- Rnd1: 8 sc in a mc (alternatively, you can make two chs and sc 8 sts in 2nd ch from hook [8]
- Rnd2: (inc) 8 times [16]
- Rnd3: (inc, sc in next st) 8 times [24]
- Rnd4: (inc, sc in next 2 sts) 8 times [32]
- Rnd5: (inc, sc in next 3 sts) 8 times [40]
- Rnd6: (inc, sc in next 4 sts) 8 times [48]
- Rnd7: (inc, sc in next 5 sts) 8 times [56]
- Rnd8: (inc, sc in next 6 sts) 8 times [64]
- Rnd9: (inc, sc in next 7 sts) 8 times [72]
- Rnd10: (inc, sc in next 8 sts) 8 times [80]
- Rnd11: (inc, sc in next 9 sts) 8 times [88]
- Rnd12: (inc, sc in next 10 sts) 8 times [96]
- Rnd13-32: sc around
- Rnd33: (inc, sc in next 11 sts) 8 times [104]
- Rnd34: (inc, sc in next 12 sts) 8 times [112]
- Rnd35-42: sc around [112]
- Cut the yarn leaving a tail of 5-6 inches, pull the tail through the last loop and fasten off. Weave in all the ends.
Notes
- The first 12 rounds are for the crown of the hat.
- Then, rounds 13-32 will be the body of the hat.
- You don't need to cut the yarn if you are not changing colors.
- Lastly, the final section will be rounds 33-42, which is the brim.
- This Pattern is written using standard US terminology.
- The hat is made from top down, worked in continuous rounds, meaning you don’t have to join the rounds with a slip stitch.
- Use the “single crochet yarn under” technique to achieve the “x” looking stitches. See instructions above.
- Use a stitch marker to mark the first stitch of every round, moving it up as you go, that way you won’t lose count.
- Instructions in the pattern are for size Teen/Small Adult.
- This hat was designed to be a close fit. If you would like it to have some ease, consider using a larger hook.
- If you are using a different yarn brand or fiber, like acrylic for example, there may be variation in size. Make sure you meet gauge.
- You will achieve better results with a tighter tension and if you keep it consistent throughout the end. If you crochet loose, you may have to use a smaller hook.
- Measurements and yarn amounts are based on using informed yarn and gauge. Yarn amounts may vary if you use different yarn thickness/brand.
- When you finish the body of the hat, before starting the brim, the hat length should reach about the top of the ear. If it needs to be longer, you can add more rows.
You’re all done! Before we know it, spring will be here, and I hope this bucket hat crochet pattern will be your choice for your next sun hat project. I hope you enjoy making it as much as did.
What’s next?
Drop a comment below if you have any questions or if you just would like to say “hi”. Another way to reach out to me is by joining my community group on Facebook.
If you use any of my patterns or tutorials for a project, please tag me @zamiguz or use the hashtag #zamiguzmakers. I would love to see what you make.
Would you rather bookmark this list for later? You can create a free Grow.me account and use the “heart” on the left hand side of your screen to save it. It’s an easy way to have your internet favorites bookmarked in one place.
Join me on Facebook
I have a community group on Facebook to share all things crochet related (not only my patterns). You’re more than welcome to join to share your makes and to ask questions about this free crochet hat pattern or any of my other pattern. It’s free and you and private. Click this link and give it a try.
Pint the bucket hat crochet pattern for later.


Question: do you chain 1 stitch at the beginning of each row for rows 13 -32? This is my first hat project ever as I am trying to teach myself how to crochet. Thank you!
Hi Dawn! Thanks for your question. No, you don’t chain 1 in the beginning of rounds 13-32. This hat is worked in continuous rounds, meaning you don’t have to join the rounds with a slip stitch. When you reach the end of the round, you just keep going. Good luck with your first hat. If you have any other questions, please feel free to reach out.
Maggie
Made one in 2 evenings
Check it out on https://www.ravelry.com/projects/DutchCrochetbyMdK/the-copacabana-bucket-hat#
And on Instagram @marjolein_food_fit_fibers
Hi, i have made my version in pink and purple variagated yarn, 90 m/50 gram, hook 5 mm
I used the regular yarnover since that is my default way of crochet,
It fits my 8 and 11 year old daughters as well as myself.
I have shared the pictures on Instagram marjolein_food_fit_fibers and on ravelry, where my id is DutchCrochetbyMdK.
Made it in 2 evenings while watching tv, clear instructions !
Hi Marjolein, I love your yarn choice, your hat came out great. Thank you so much for the feedback, I’m so glad to hear the pattern worked out good. I appreciate the comments, sharing and project posted on Ravelry!
Maggie
Hi Maggie! I’m currently making this from your free pattern and I’m loving the outcome of it! The instructions are very clear and straightforward..easy to understand, Thank you!! I am definitely going to buy your pattern of the other sizes in Ravelry as well.
Hi Yasmin. Thank you so much for your kind words and for purchasing my pattern. I am so glad you liked it. If you have any questions, please reach out to me at any time! Cheers!
Maggie
Hello, hat looks cute. I’m gonna try and make this hat. I’ve only done Bernie hats so this will be a very new project for me. Thank you for making this a free pattern.
Hi Caryl, thank you, I am so glad you like the hat. And you are very welcome. I’ve had feedbacks that this is a very easy hat to make. I can’t wait to see it when you’re done. Let me know if you have any questions.
Maggie