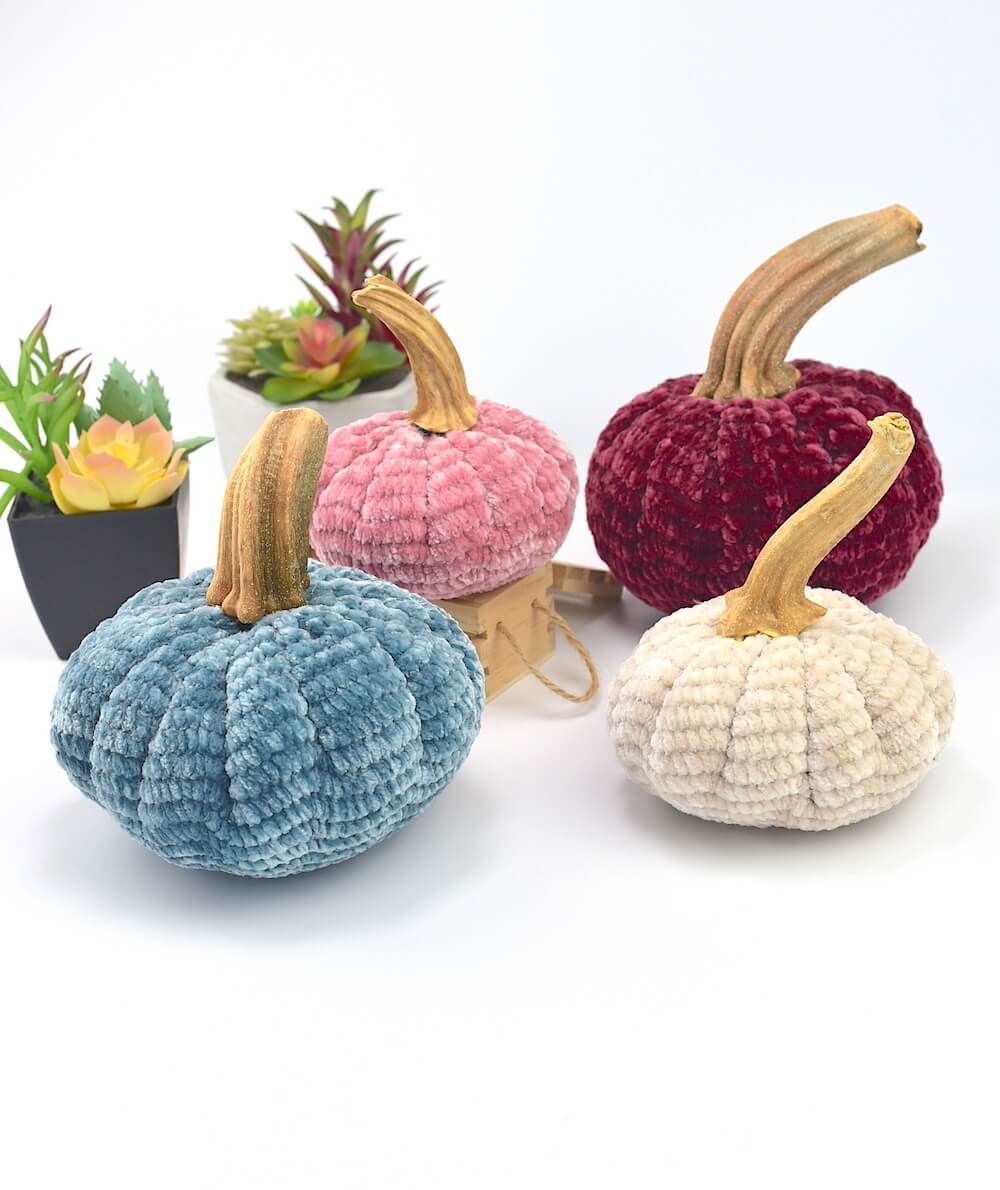
Free Crochet Pumpkin Pattern – 3 Sizes
Velvet pumpkins have been trending for a reason—they’re the perfect mix of cozy, chic, and timeless charm. With this free crochet pumpkin pattern, you’ll learn how to create your own elegant and whimsical pumpkins that rival even the most luxurious handmade decor.
This website is reader-supported and contains affiliate links. As an Amazon Associate, I earn from qualifying purchases. Find my affiliate disclosure here.
These 3D crochet pumpkins bring a touch of sophistication to any space and are endlessly versatile. Whether you’re crafting a warm fall centerpiece, adding a whimsical touch to a wedding, or decorating your mantel, fireplace, or porch for fall, these little beauties fit right in.
Make a handful or a whole patch—group them together for maximum impact or scatter them throughout your home for a subtle, stylish seasonal upgrade.
Purchase the Ad Free PDF or save it to Ravelry
More Decoration Patterns


Materials and Tools
- Bulky (#5) Yarnspirations Bernat velvet yarn
- Strong Crochet tread or upholstery thread
- Fiber fill, like polyfil
- Fabric glue (or hot glue)
- 3.75 mm (US F) crochet hook
- Stitch marker
- Bent tip yarn needle
- Scissors
Yarn Specifics
You will need bulky (#5) Yarnspirations Bernat velvet yarn to achieve this elegant and whimsical look for these pumpkins.
You can pick from a variety of beautiful colors, there are neutral shades and also the traditional velvet colors. It worked out great for what I envisioned and I will make a lot more of them to decorate my home this fall.
Here is what to keep in mind about velvet yarn:
- Due to the fuzzy nature of the yarn I recommend that you practice with a swatch before starting a major project. That way you will get used to count the stitches and find the right tension.
- Also, it’s important to keep in mind that “unraveling that frogging velvet yarn projects multiple times will pill off the fur.
- Velvet yarn is also slippery, so please avoid pulling the inside end of the skein, that way you won’t end up with a tangled mess.
If you would like to try this free crochet pumpkin pattern with any other type of yarn, I recommend you to crochet a swatch before proceeding to a larger project to make sure you will be happy with the result.

How much yarn will you need?
- Small Pumpkin: 1.78 oz (50 g), 54 yds (50 m). Color used: Mulled Rose
- Medium Pumpkin: 2.55 oz (72 g), 77 yds (70 m). Color used: Ivory
- Large Pumpkin: 3.56 oz (101 g), 107 yds (98 m). Color used: Smoke Blue
Pattern Notes
- This free crochet pumpkin pattern was written using standard US terminology.
- Level of difficulty: Easy.
- As you progress with your circle in the pattern, you will notice it ruffling up. That’s totally fine, it’s what we are aiming for. That technique is what will create the indentations for the pumpkin (see image #6 in photo tutorial below).
- The thread to sew the top of the pumpkin doesn’t need to be the same color as the pumpkin. It will be hidden once you finish off. For the larger pumpkin, I used a thread about 90” long (228 cm). The thread needs to be extra strong, that way it won’t break as you pull it tight.
- Use the smallest hook possible with the velvet yarn, that way you won’t get holes and prevent the polyfil from showing once you stuff it.
- The yarn I used called for a 6.5 mm hook, but I recommend using a 4 mm (US G) hook or smaller with that yarn. I used a 3.75 mm (US F) one and the tension was perfect.
- If you are a beginner, you may find it easier to count the stitches by sections of increases. For example: on round 5 you have 60 stitches, which means 12 sections of 5 stitches each (inc + 3 sc = 5).
- So, instead of counting all the way up to 60, count by 5’s, twelve times. That will help you to know exactly where the increases go. And also you won’t get bored once you have a round with a high stitch count. At the end, if you did it right, there won’t be any missed stitch.
Pin this free crochet pumpkin pattern here to your Pinterest boards:
Pattern Abbreviations (US Terms)
- approx.: approximately
- ch/chs: chain/chains
- FO: fasten off
- inc: increase (two single crochets in the same st)
- Rnd: round
- sc: single crochet
- st/sts: stitch/stitches
- RS: Right Side
- ( ): Repeat instructions within parentheses as many times as indicated
- [ ]: Stich count in a round
- *: Repeat Instructions after asterisks as many times as indicated.
Gauge
A gauge swatch is optional, but it will help you to compare your stitch tension with mine. In fact, if you are using the same yarn and hook size I did, it will be helpful for you to have an idea if your pumpkins will have the same size as mine.
A swatch of 6 rounds in sc, the diameter is 2 ¾ in / 7 cm
Gauge swatch pattern:
Ch 2
- Rnd1: sc 6 in second chain from hook
- Rnd2: (inc) 6 times [12]
- Rnd3: (inc, sc in next st) 6 times [18]
- Rnd4: (inc, sc in next 2 sts) 6 times [24]
- Rnd5: (inc, sc in next 3 sts) 6 times [30]
- Rnd6: (inc, sc in next 4 sts) 6 times [36]
Finished Size
Here is the approximate circumference of the pumpkins if you use the recommended materials:
- Small: 13” (33 cm)
- Medium: 15” (38 cm)
- Large: 18” (46 cm)
Would you rather have an Ad Free PDF?
Instructions
Before you get started with your free crochet pumpkin pattern, make sure you check the the list of material and supplies above.

With this free crochet pumpkin pattern you can make modern looking velvet pumpkins that can be used as master pieces for your fall decoration.
Total Time: 3 hours
Step 1: Ch 2, sc 12 in 2nd ch from hook for Rnd1

Helpful hint before you start: For this free crochet pumpkin pattern, you will be using the spiral technique, which means you won’t join the rounds with a slip stitch. This is the technique we use for Amigurumi. Which means you will crochet in continuous rounds.
Use a stitch marker to mark the beginning or the end of every round, moving it up as you go.
Rnd2: (inc) 12 times [24]
Rnd3: (inc, sc in next st) 12 times [36]
Rnd4: (inc, sc in next 2 sts) 12 times [48]
Rnd5: (inc, sc in next 3 sts) 12 times [60]
Rnd6: (inc, sc in next 4 sts) 12 times [72]
Rnd7: (inc, sc in next 5 sts) 12 times [84]
Rnd8: (inc, sc in next 6 sts) 12 times [96]
Rnd9: (inc, sc in next 7 sts) 12 times [108]
Rnd10: (inc, sc in next 8 sts) 12 times [120]
Rnd11: (inc, sc in next 9 sts) 12 times [132]
Rnd12: (inc, sc in next 10 sts) 12 times [144]
Rnd13: (inc, sc in next 11 sts) 12 times [156]
Rnd14: (inc, sc in next 12 sts) 12 times [168]
Stop here for the small pumpkin. FO. Cut the yarn.
Rnd15: (inc, sc in next 13 sts) 12 times [180]
Rnd16: (inc, sc in next 14 sts) 12 times [192]
Rnd17: (inc, sc in next 15 sts) 12 times [204]
Stop here for the medium pumpkin. FO. Cut the yarn.
Rnd18: (inc, sc in next 16 sts) 12 times [216]
Rnd19: (inc, sc in next 17 sts) 12 times [228]
Rnd20: (inc, sc in next 18 sts) 12 times [240]
FO. Cut the yarn.
Step 2: Close it with sewing thread

Thread the yarn needle with the crochet thread folded in the middle and place a stitch marker at the folded end so it doesn’t go loose as you do the stitching.
Before you start, it’s important that you know you won’t do a running st in every stitch around the edge of the pumpkin because it would end up too thick to close it. Do it in sections instead. Doing so, will also help creating the indentations around the pumpkin.
To start, lie the piece on a flat surface with the wrong side facing you. Then with the yarn needle and the folded thread, find one of the increases on the edge and insert the needle into the two loops of one stitch from the wrong side and draw it out to the right side.
As you may have noticed, the edge has 12 increases, insert the needle in one stitch in each increase. It’s easy to visualize them because they are a little pointy.
Step 3: Pull the thread to cinch the edges and add fiber

Once you have stitched 12 times as explained in previous step, insert the needle in the folded end of the thread.
Then, remove the st marker and gently start pulling to cinch, leaving a cavity to add stuffing fiber (see photo above).
Next, you will fill the pumpkin with the desired amount of stuffing and using your fingers, tuck the fiber in as you tighten the thread. You will be able to add more stuffing in next step.
Step 4: Fasten off in the center to secure the thread

Pull the thread tight until it closes the ring. FO. Do not cut the thread yet.
Step 5: Add more stuffing fiber and keep sewing

At this point, the pumpkin will look like a flower with petals. To simplify it, “petals” is what we will call it. Add some extra stuffing into the “petals”.
Next, make sure there is stuffing all the way up to the top but do not tuck it in too firm to not overstuff it, otherwise it will make it difficult to close it.
Then, with the uncut thread *insert the bent tip yarn needle into a stitch in the top of one of the petals in the outside edge.
Go back and insert the needle into the center knot. Repeat from * in each of the remaining petals. Pull it tight as you go.
Step 6: Continue sewing

If you are making the small pumpkin, at this point you will have the opening almost closed. For instance, if you look closely you will be able to see the edges of the remaining “petals”.
Gather them together like instructed in next step until you close it completely. The free crochet pumpkin pattern is almost done.
Step 7: Finish closing the edges with the needle and thread

This is the last step to close it. Again, you will repeat what you did in step 2. Go ahead and insert the needle in the edge of each small “petal” that now look more like bumps and insert it back in the center.
Then, repeat this step with each remaining “petal” and pull it tight as you go. Remember, the thread to sew this free crochet pumpkin pattern needs to be strong.
FO. Cut the thread. Weave in the ends.
Step 8: Place the stems

For this free crochet pumpkin pattern, I used real dried stems I saved from pumpkins we used for decoration last fall. But any craft stick, cinnamon sticks or even leather stripes will work too.
Even dry sticks you get from trees, if you have them around, will be a great option too. Or you can also buy them online, there is real dried stems and resin ones for sale on Etsy and Amazon.
Here is how you will place the stem: First, squeeze one drop of glue on top of the pumpkin right where the gathering stitches are. Then, place the felt scrap (or fabric) on top of the glue and squeeze another generous drop of glue on top of the felt and place the stem on top of i. Let it dry completely.
Estimated Cost: 10.00 USD
Supply:
- Bulky (#5) Yarnspirations Bernat velvet yarn,
- Strong Crochet tread or upholstery thread,
- Fiber fill like polyfil,
- Fabric glue (or hot glue)
Tools:
- 3.75 mm (US F) crochet hook,
- Stitch marker,
- Bent tip yarn needle,
- Scissors
Materials: Dried pumpkin stems (wood craft sticks, cinnamon sticks or leather strips are also good options for the stem), Scraps of felt or fabric, about 0.5” square or small enough to be covered by the base of the stem, if you are using dry stems.
Explore More Free Patterns
- Amigurumi Ghost Pattern
- Easter Egg Pattern 3 sizes
- Bunny Appliqué Crochet Pattern
- Peep Bunny Crochet Pattern
- Crochet Christmas Garland Pattern

You are done with the free crochet pumpkin pattern. Congratulations!
I hope you liked this pattern and that you make beautiful decoration pieces with your pumpkins.
Ways to Get Engaged
- Comment on this post: I always read comments and reply to all questions posted on the blog, and I love it when you stop by to say hello.
- Share your project: if you make this or any of my other patterns, tag me on Instagram or Facebook, or use the hashtag #zamiguzmakers. I love seeing what you make.
- Pin it now: Are you not ready to make it yet? You can use the above image to Pin it to your crochet boards or follow me on Pinterest for more.
- Join The Makers community: Join my community group on Facebook and be the first to know about pattern releases and other crochet-related content.
Would you rather bookmark this blog post for later? You can create a free Grow.me account and use the “heart” on the left-hand side of your screen to save it. It’s easy to have your internet favorites bookmarked in one place.
Let’s stay in touch, sign up to my newsletter here, so you never miss a pattern or tutorial. I can’t to wait to see you there.
More Halloween and Fall decor patterns


