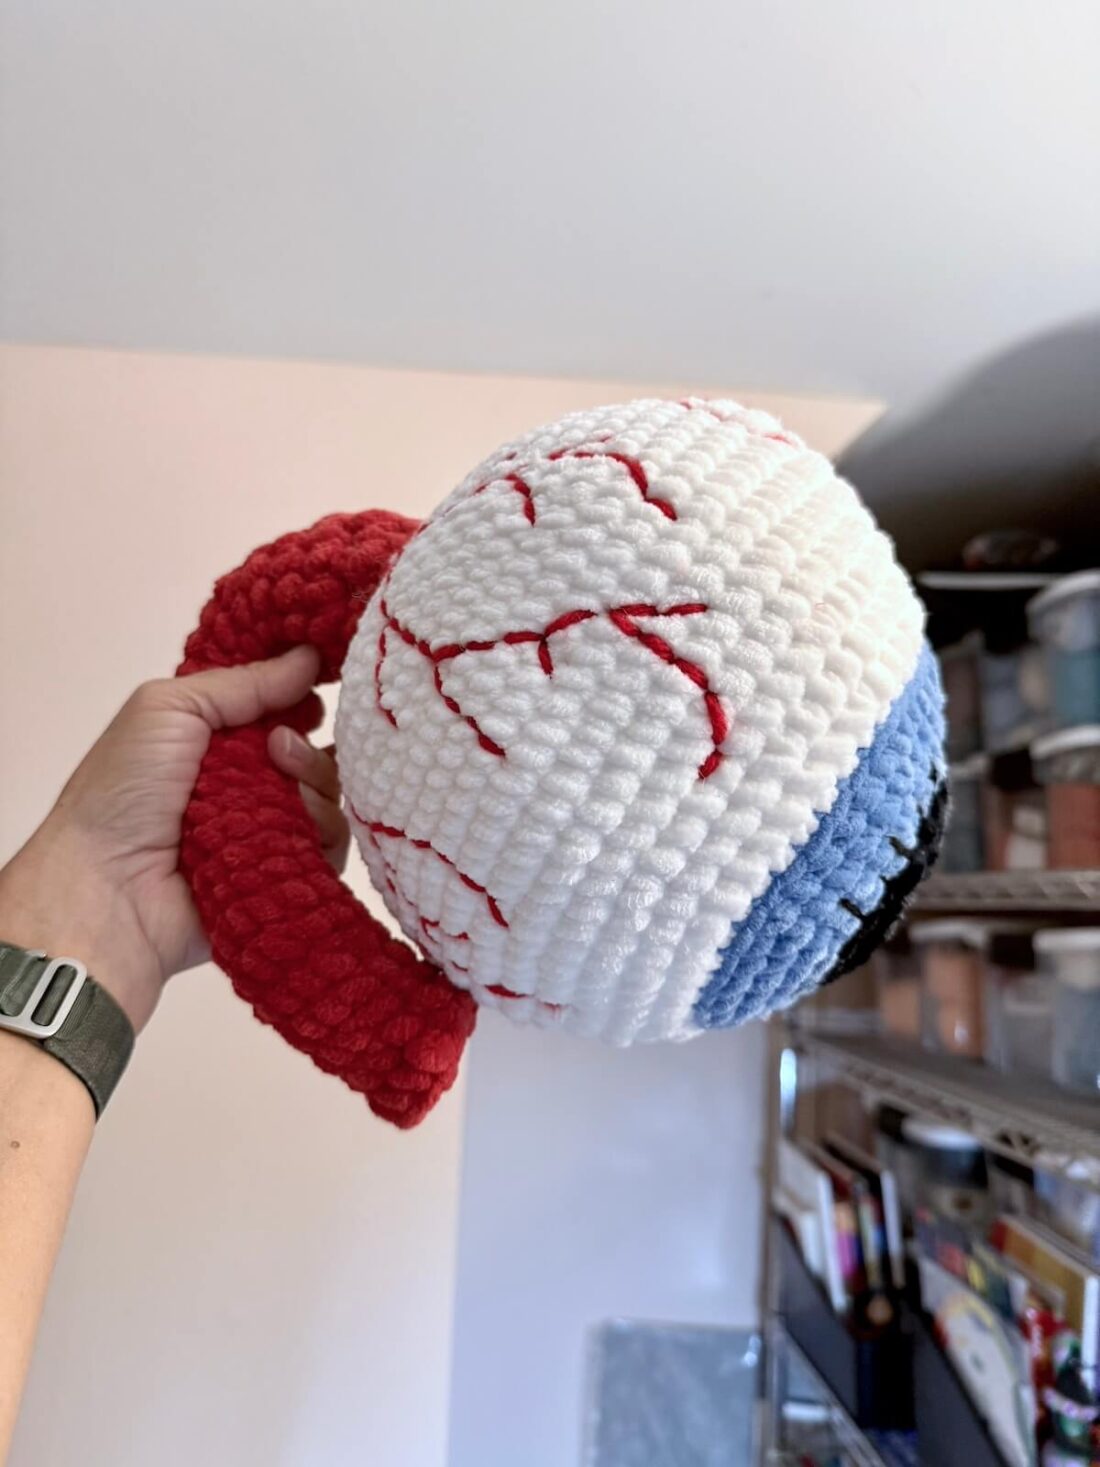
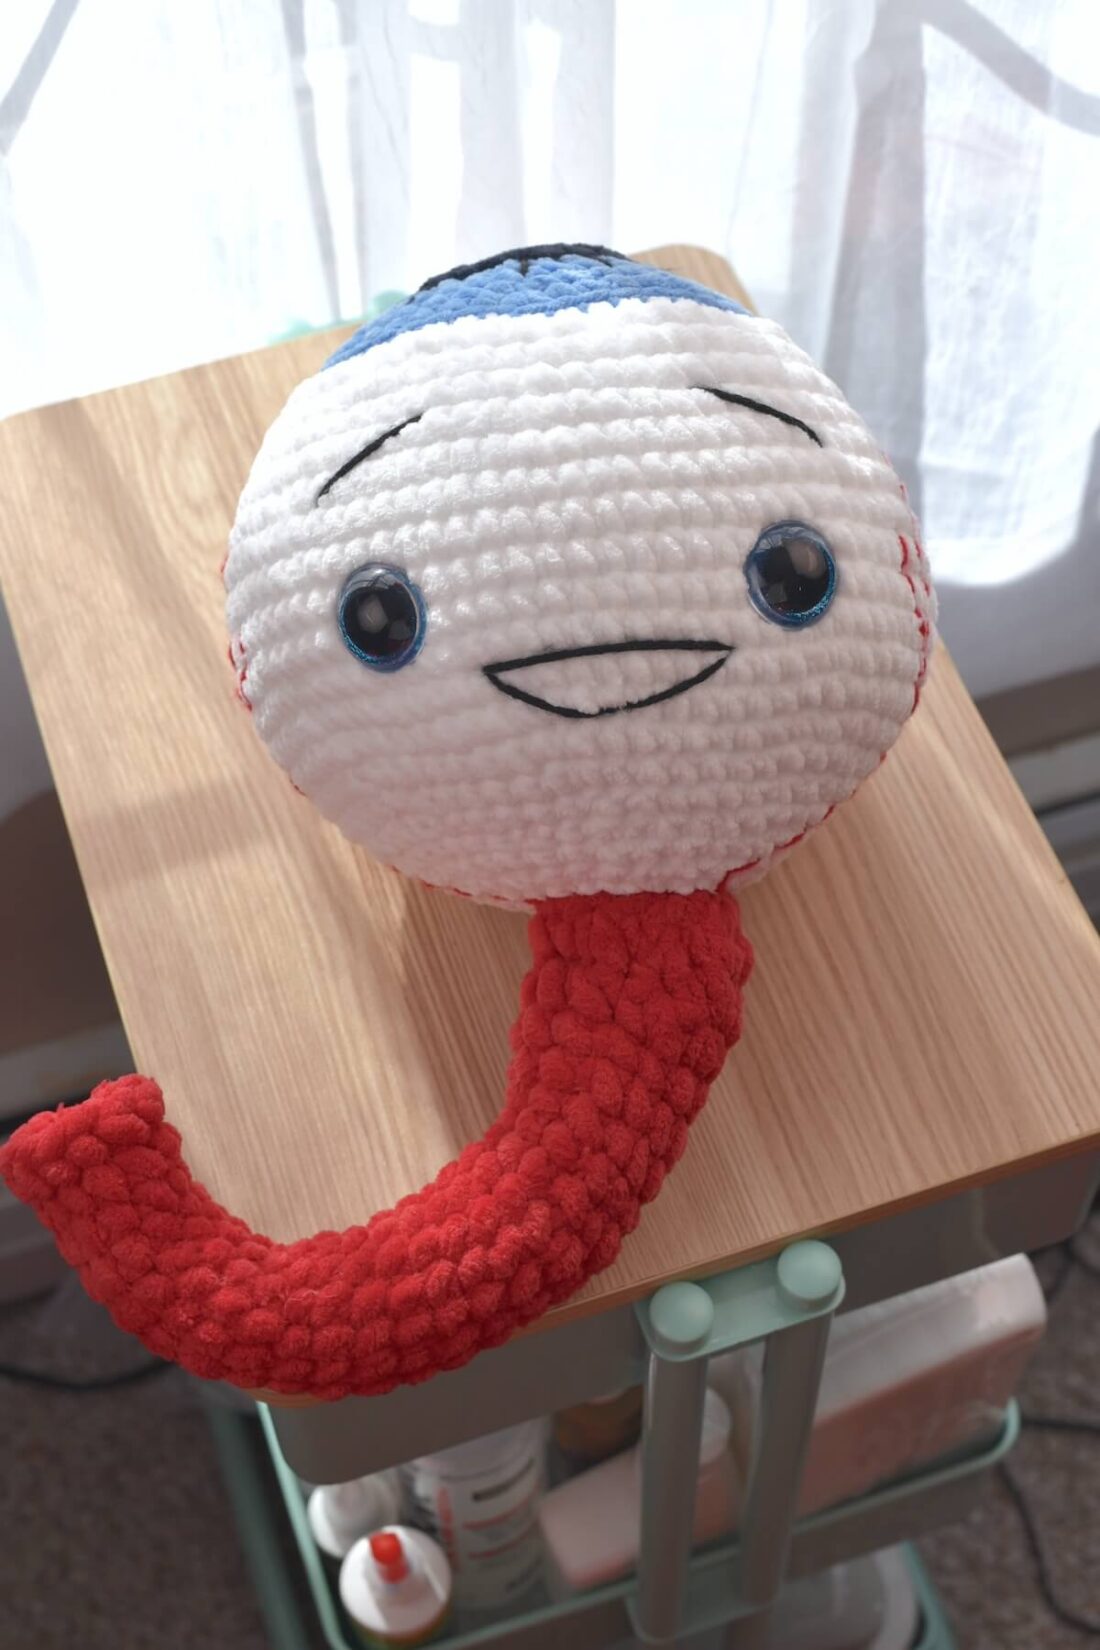
Looking for a spooky yet fun project to add to your Halloween makes or quirky home décor? This crochet eyeball plushie pattern is just what you need!
Made with the Amigurumi technique, this oversized eyeball features a bright blue iris, embroidered blood vessels, and even an optic nerve for extra detail.
This website is reader-supported and contains affiliate links. As an Amazon Associate, I earn from qualifying purchases. Find my affiliate disclosure here.
I designed mine using soft chenille yarn, which gives it a plush and huggable feel, but you can easily adapt the pattern to any yarn type you prefer. Whether you’re creating a creepy-cute crochet Halloween prop, a playful gift to an optometry student, or just because, this Amigurumi eyeball crochet pattern is a quick and fun project, even if you’re new to Amigurumi.
Let’s gather our tools and supples and get started! But before you scroll to the instructions…
… you might also like my super cute Crochet Amigurumi Frankenstein Monster and my No-Sew Ghost Pattern (he has an adorable witch hat on!)

Purchase a PDF Download
- Inexpensive
- Ad-free
- Formated and Print-friendly
More Fun Amigurumi Patterns
- No-Sew Crochet Amigurumi Chicken
- No-Sew Crochet Whale Pattern
- No-Sew Crochet Amigurumi Cat
- No-Sew Amigurumi Bunny
- No-Sew Amigurumi Bee
- No-Sew Crochet Gingerbread Man
- Amigurumi Tumbler Squishy Cup
- Amigurumi Pope Pattern

Crochet Eyeball Pattern
What You’ll Need:
- 4.00 mm (G) crochet hook – I used one of my favorites, an ETIMO Tullip hook.
- Super Bulky (6) Chenille Yarn (more on the yarn below).
- Medium-weight (4) yarn leftovers – I used black for embroidering the iris and facial features, and red for the blood vessels.
- A pair of 30 mm safety eyes with washers – I used these glitter eyes.
- 12G/2mm armature wire to insert in the optical nerve to make it bendable (optional).
- Stuffing fiber, like Poly-Fil.
- Stitch markers, tapestry needle, and scissors.
Yarn Specifics:
I used Sweet Snuggles Lite by Loops & Threads in black, blue-bird, white, and red. Here is the approximate amount needed:
- For the pupil (black): 4 yards (4.5 m).
- For the iris (blue): 18 yards (26 m).
- For the eyeball (white): 84 yards (77 m).
- For the optic nerve: 60 yards (55 m).
Finished Project Size:
The finished Amigurumi eyeball plushie will have a circumference of about 24.5 inches (63 cm), and the optical nerve will be approximately 11 inches (28 cm) long. Use a thinner yarn if you want a smaller size.
Stitch tension:
Gauge doesn’t matter much for this crochet eyeball pattern. For reference, the first three rounds of the pattern measure about 2.75 inches (7 cm) with a 4.00 mm/G hook and super bulky (6) chenille yarn.
Pattern Notes:
- This crochet eyeball Amigurumi pattern uses US Crochet Terminology.
- Level of difficulty: Advanced beginner.
- This eyeball is crocheted from the top (iris) down in continuous rounds (no joining), of single crochet stitches.
- This plushie is not intended for use as a toy. If you’re making it for a child, please avoid using parts that could come loose and pose a choking hazard, such as safety eyes and wires.
- Use stitch markers to indicate the start of each round, moving them up as you go.
- Stuff the plushie firmly but avoid overstuffing.
Helpful Resources:
Here are some links that you may find helpful to crochet this eyeball:
- How to Create a Magic Circle
- How to Create a Perfect Circle in Crochet
- How to do an Invisible Decrease
- Materials Needed to Make Amigurumi
About Exclusive Content: When you create a Grow.me account, you can bookmark your favorite content in one place. With one FREE account, you can have not only mine, but many other creators’ content saved in one place.
When you come to my blog and see the button “Unlock Exclusive Content”, go ahead and create an account or simply click the login button and sign in with an existing Grow account. It’s a secure, free feature, and you can unsubscribe at any time. Everything you bookmark with the “heart” on a page that uses Grow.me will show up under “Grow Bookmarks” in your account.
Disclosure: Please note that Grow.me is a third-party app for Exclusive Content, and I have no control over their user policies. Neither will I be able to assist with account creation and/or password resetting. For information on how to troubleshoot login and password resetting, go to “Resources” on the Grow.me website’s top menu.
Crochet Eyeball Instructions
Before you begin, check my Crochet Abbreviations Guide. You can request a free printable PDF and I’ll send it to your email.

Step 1: Pupil and iris (black and blue)
Rnd 1: Ch 2, sc 7 into the 2nd ch from the hook.
Rnd 2: (inc) x 7. [14]
Rnd 3: (inc, sc) x 7. [21]
FO. Cut the yarn and switch to blue.
Rnd 4: (inc, sc 2) in blo x 7. [28]
Rnd 5: (inc, sc 3) x 7. [35]
Rnd 6: (inc, sc 4) x 7. [42]
Rnd 7: (inc, sc 5) x 7. [49]
FO. Cut the yarn and switch to white.

Step 2: Eyeball (White)
Rnd 8: (inc, sc 6) in blo x 7. [56]
Rnd 9: (inc, sc 7) x 7. [63]
Rnd 10: (inc, sc 8) x 7. [70]
Rnd 11: (inc, sc 9) x 7. [77]
Rnd 12: (inc, sc 10) x 7. [84]
Tip: This is a good time to embroider the iris if you’d like (I used leftover black yarn). Just thread the needle with a strand of yarn and embroider straight-up bars of different heights in every other stitch in round 3.
Rnd 13-17: sc around. [84]
Rnd 18: (dec, sc 10) x 7. [77]
Rnd 19: (dec, sc 9) x 7. [70]
Rnd 20: (dec, sc 8) x 7. [63]
Rnd 21: (dec, sc 7) x 7. [56]
Attach the safety eyes between rounds 15 and 16, sixteen stitches apart.
Rnd 22: (dec, sc 6) x 7. [49]
Rnd 23: (dec, sc 5) x 7. [42]
Rnd 24: (dec, sc 4) x 7. [35]
Rnd 25: (dec, sc 3) x 7. [28]
Rnd 26: (dec, sc 2) x 7. [21]
Rnd 27: (dec, sc) in blo x 7, we’ll use the front loops to crochet round 1 of the optic nerve. [14]
Rnd 28: (dec) x 7. [7]
FO. Cut the yarn and weave in the end.

Step 3: Optic Nerve (red)
Tip: Before you start crocheting the optical nerve, create a hook by bending one end of the armature wire. Then, insert it into the bottom center of the crochet eyeball and use pliers to bend the tip inward to prevent it from coming loose and damaging the yarn. Attach the red yarn to one of the stitches in round 27 and crochet around the wire, stuffing it slightly as you go.
Rnd 1: Attach the yarn to any stitch in round 27, then sc around [14]
Rnd 2-23: sc around [14]
Rnd 24: sc in flo around [14]
Rnd 25: dec 7x in blo of round 23 around [7]
FO. Cut the yarn and weave in the ends.

Step 4: Crochet Eyeball Finishing Details
Blood Vessels (red):
- Thread a tapestry needle with a long strand of red yarn (medium-weight, standard yarn works best here).
- Then, insert the needle at the bottom of the optical nerve and, using the embroidery back stitch, create three vessel branches: one on each side of the face and one on the back.
- There is no specific method to create this step. Create a main branch, then add smaller vessel branches connected to it (use the photo below for reference).
- Fasten off and weave in the ends.


Facial Features (black)
Thread the needle with a strand of medium-weight (4) dark yarn to embroider the eyebrows and a smile: one strand is enough to keep it simple (use the photo below for reference).
Crochet Eyeball FAQ
Can I make the eyeball with regular yarn instead of chenille?
Yes! The pattern works with any yarn type; chenille makes it large and extra plush. Cotton yarn is a good option if you’re making it for decoration.
Is this crochet eyeball pattern beginner-friendly?
Yes, it uses basic Amigurumi stitches, including single crochet in continuous rounds, as well as single crochet increases and decreases. Some embroidery is needed for the veins and facial features.
Can I sell the finished eyeballs I make from this pattern?
Absolutely, but please use your own photos and consider crediting Zamiguz Handmade Creations as the designer when promoting your finished items.
Can I omit the safety eyes and facial features?
Yes, the safety eyes and embroidered facial features are completely optional. I added them to mine because I wanted a cute, huggable plush to use as a pillow on the couch.
Final Thoughts
This Amigurumi crochet eyeball pattern is a quick, fun, and slightly spooky project that’s perfect for Halloween or any time you want to gift someone with something out of the ordinary. Whether you’re making the oversized plushie version (like I did) or a whole set of small eyeballs, I hope you enjoy the pattern.
Pin, Share, and Comment
- Comment on this post: I always read comments and reply to all questions posted on the blog, and I love it when you take the time to stop by and say hello.
- Have you made this? Share your project if you make this or any of my other patterns, tag me on Instagram or Facebook, or use the hashtag #zamiguzmakers. I love seeing what you make.
- Pin it now: Are you not ready to make it yet? You can use the above image to pin it to your crochet boards or follow me on Pinterest for more.
- Join The Makers community: Join my community group on Facebook and be the first to know about pattern releases and other crochet-related content.
Would you rather bookmark this blog post for later? You can create a free Grow.me account and use the “heart” on the left-hand side of your screen to save it. It’s easy to have your internet favorites in one place.