Crochet Face Scrubbie + Mesh Bag Pattern
This beginner-friendly, free crochet face scrubbie pattern will be your next favorite project for gifting!
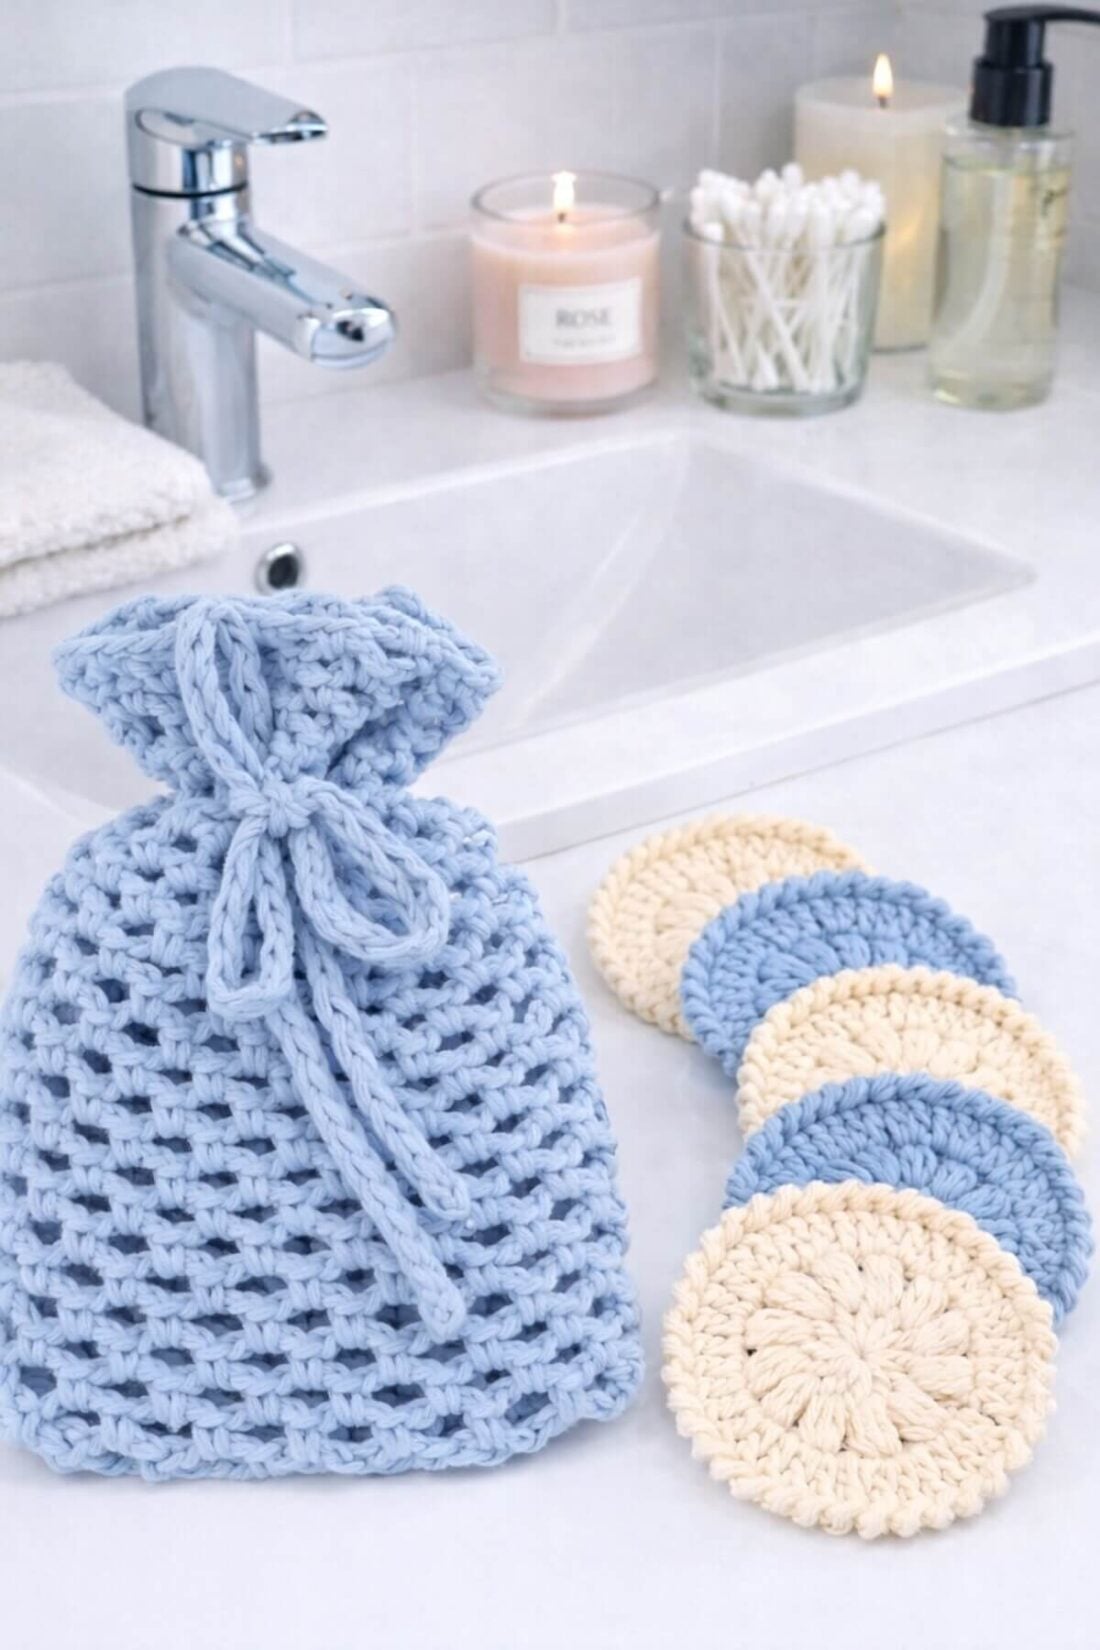
Face scrubbies are great, eco-friendly, and reusable facial pads. Whether you call them scrubbies or crochet facial rounds, they can mainly be used to clean your facial makeup or simply as cleansing cloths.
You will make a set like the one pictured here in just about less than an hour and a half.
This website is reader-supported and contains affiliate links. As an Amazon Associate, I earn from qualifying purchases. Find my affiliate disclosure here.
The Benefits of Reusable Face Scrubbies
The benefits of using a crochet face scrubbie are not limited to its convenience. Here are other reasons why you should use them:
- They are reusable, which makes them an ideal addition for a zero-waste lifestyle.
- Easy to clean and care for. Simply toss them in the washing machine with your regular laundry.
- More skin-friendly than the store-bought pads, when made with 100% cotton yarn.
- Cost efficiency is another benefit because yarn is cheap. It takes a very small amount to make them.
- They are quick and easy to make. The whole set pictured in this article takes only about an hour and a half.

What do You Use Crochet Face Scrubbies For?
You can use these to scrub your face with water or a cleanser. Making them with cotton or cotton blend will make the cleansing process more effective. I’ve shared more about the ideal yarn below. They also get softer with every wash, so they are gentle enough to clean all skin types.
How to Wash Crochet Cotton Face Rounds?
Cotton is a durable fiber, so these scrubbies can be safely washed in the washing machine. Simply place them in a mesh laundry bag (or the crochet bag from this pattern), wash with light-colored clothes in warm water using a gentle detergent, and then lay them flat to dry or tumble dry while still inside the bag.
What Yarn Works Best for These Crochet Pads?
Non-mercerized cotton is the best yarn choice for crochet face scrubbies because it’s soft on the skin, highly absorbent, and durable. Acrylic yarn, on the other hand, tends to be rough and doesn’t absorb moisture well. Some cotton blends can also work nicely, as long as cotton is the main fiber in the yarn.
Can I use Mercerized Cotton?
While you can, there are better options. Mercerized cotton goes through a chemical treatment with sodium hydroxide during the dyeing process. Although the process itself is safe, it tends to make the yarn a bit rougher and less absorbent than non-mercerized cotton. For face scrubbies, non-mercerized cotton is usually a better choice because it feels softer and more gentle on the skin.
Explore More Patterns


Materials
- Worsted Weight (#4)/Aran Cotton yarn. Approximately 0.22 oz (6.2 g), 14 yds (13 m) for each scrubbie and 0.28 oz (8 gr), 13.5 yds (12 m) for the bag.
- 4.00 mm (US G) hook
- Scissors
- Daning Needle
Recommended Yarns:
| Yarn name | Brand | Fiber Content |
|---|---|---|
| Crème cotton | Loops & Threads | Cotton-blend |
| Sugar n’ Cream | Yarnspirations | 100% Cotton |
| I Love This Cotton | Hobby Lobby | 100% Cotton |
| Capri Eco Cotton | Loops & Threads | Cotton-blend |
Crochet Face Scrubbie Pattern
- This pattern was written using US terminology.
- Level of difficulty: advanced beginner.
- You will work the face scrubbies on the round, joining the rounds where indicated.
- For the bag, you will crochet continuous rounds in a spiral. What this means is there is no joining for the rounds.
- Gauge is not crucial for this pattern. Use the indicated yarn weight and hook size if you wish to achieve the measurement above.
Finished Project Size:
Approximately 3″ to 3 3/4″ (7.6 to 8.2 cm) in circumference is a perfect size for a face scrubby. They need to be small enough to make handling and cleaning easy.
Abbreviations:
- ch(s): chain(s)
- dc: double crochet
- FO: Fasten Off
- ps: puff stitch
- sc: single crochet
- sk: skip
- sl st: slip stitch
- sp: space
- st(s): stitch(s)
- yo: yarn over

Special Stitches:
- How to crochet a puff stitch in this pattern: Yo, insert the hook in the next space between ch 3 and next dc in previous rnd, yo, pull up a loop, (yo, insert the hook in the same space again, yo, pull up another loop) 2 more times. You now have 7 loops in the hook. Yo, pull through all loops, ch 1. For more information and a photo tutorial on how to crochet a puff stitch, check this blog post out.
- How to crochet the crab stitch / reverse sc: *insert the hook in the previous st, yo, pull through, yo, pull through two, repeat from * for every stitch around.

Purchase a PDF download
- Inexpensive (costs less than a coffee)
- Ad Free
- Print-friendly
About Exclusive Content: When you create a Grow.me account, you can bookmark your favorite content in one place. With one free account, you can save not only mine, but also the content of many other creators, all in one place.
When you visit my blog and see the “Unlock Exclusive Content” button, please create an account or click the login button and sign in with an existing Grow account. It’s a secure, free feature, and you can unsubscribe at any time. Everything you bookmark with the “heart” ona page that uses Grow.me will show up under “Grow Bookmarks” in your account.
Disclosure: Please note that Grow.me is a third-party app for Exclusive Content, and I have no control over their user policies. Neither will I be able to assist with account creation and/or password resetting. For information on how to troubleshoot login and password resetting, go to “Resources” on the Grow.me website’s top menu.
Makeup Remover Pad Instructions


This easy crochet face scrubbie pattern creates a set of eco-friendly, reusable facial pads you can make for yourself—and they also make a thoughtful handmade gift for friends and family.
Before you begin, you may find these free resources helpful: Crochet Abbreviations and Terms (with free PDF), How to Crochet a Slip Knot, How to Create a Magic Circle, Common Crochet Mistakes and How to Avoid Them, and How to Create an Invisible Finish in Crochet.
Total Time: 1 hour and 30 minutes
Step 1: Create a magic circle

First, crochet a magic circle, ch 3 (ch 3 doesn’t count as a st here). Learn how to crochet a magic circle with this tutorial. As an alternative, you can crochet 4 chains and do round 1 in forth chain from hook.
Step 2: Crochet the first round inside the mc

Rnd1: 12 dc in the mc, join with a sl st to first dc st. At this point you can pull the tail of the yarn to close the magic circle tight.
Step 3: Crochet puff stitches in 2nd round

Next, you will crochet 1 ps in each space between the dc sts, not on top of the st. To start this round, pull the last loop you have on the hook to extend it as tall as the ps.
Rnd2: ps in first space between ch 3 and dc, ch 1, (ps in sp between next two dc, ch 1) across, join with a sl st to first ps in the beginning of round [12 ps and 12 ch 1 spaces]
Step 4: Crochet next round with dc sts

Rnd3: ch 3 (counts as a dc st), dc 2 in same st as ch 3, (dc, dc 2) across, join to initial ch 3 with sl st, ch 1. [36 dc]
Doing 2 dc in the same stitch in the beginning of round 3 will avoid a gap and will give you the exact number of stitches you need for the round. You won’t have an extra stitch because you didn’t chain to start round 2.
Step 5: Crochet last round with the crab stitch

Rnd4: Crab st in each sc across. The step-by-step instructions for the crab stitch are above, in the notes section. But if you never did it before, a crab stitch is basically a single crochet going backwards, hence the name.
FO. Cut the yarn. Weave in the ends. Make sure you secure the tail left from the magic circle with a knot and weave in the end.
Estimated Cost: 5 USD
Supply:
- Yarn recommendation under material list above
Tools:
- 4.00 mm (US G) hook
Materials: Scissors, Darning needle for weaving in the ends
How to Make the Bag for these Crochet Face Pads
The bag will make a beautiful gift package and will be good to place the crochet scrubbies inside to wash in the washing machine. Start with 32 chains, or any other multiple of 4 (watch the video tutorial below).
Rnd1: sc in top loop only of 4th ch from hook, *ch 3, sk 3 chs, sc in top loop only of next ch*, repeat instructions between the asterisks to last ch, ch 3, sc in same ch st, now repeat the process between the asterisks one more time, on the opposite side to last chain.
Rnd2-26: *ch 3, sc in next ch 3 sp, repeat from * continuously, without joining, until you reach last round.

Finish it with a sl st. FO. Cut the yarn. Weave in the ends.
Tip: This bag can be crocheted in any size. All you have to do is chain any multiples of 4. Then follow the steps above.
Watch the Video Tutorial
Making the string
- Chain as many stitches as needed to create a string 3 times the width of the bag, plus about 5 inches (13 cm). I chained 80, which makes a string about 17 in (43 cm) long.
- To make a sturdier string, go back and sl st in the third loop (back bump) of the 2nd ch from the hook and in the third loop of each chain across.
- FO. Cut the yarn. Weave in the ends.
- Your string is done

How to insert the string in the bag
- Lay the bag flat and count 7 rounds from top down
- Pick a chain space in the center of that round and insert one end of the string in it
- Weave in that end, in and out, in every other chain space around the bag
- The end of the string should come out in the space right before the one you inserted it the first time.

Note: There is not a super perfect and exact way to insert the string. And since this bag was crocheted in a spiral, you will need to go down one round somewhere along the way. The reason for that is so you don’t end up one round higher when you bring the end of the string out.
Also, at the end of the stringing process, you will need to go without skipping one of the chain spaces. By doing that, you will bring the string out at exactly one chain space before the one you started.
It may sound a bit confusing, but you will know exactly what I mean when you do it.
Congratulations! Your Face Scrubbie Set is done.
The Bottom Line
Whether you are making it to treat yourself to an amazing spa session or as small gift sets for friends or loved ones, I hope you enjoy making this beautiful crochet face scrubbie pattern set.
Pin, Share, and Comment
- Comment on this post: I always read comments and reply to all questions posted on the blog, and I love it when you take the time to stop by and say hello.
- Have you made this? Share your project if you make this or any of my other patterns, tag me on Instagram or Facebook, or use the hashtag #zamiguzmakers. I love seeing what you make.
- Pin it now: Are you not ready to make it yet? You can use the above image to pin it to your crochet boards or follow me on Pinterest for more.
- Join The Makers community: Join my community group on Facebook and be the first to know about pattern releases and other crochet-related content.
Would you rather bookmark this blog post for later? You can create a free Grow.me account and use the “heart” on the left-hand side of your screen to save it. It’s easy to have your internet favorites in one place.


This is the best and easiest bag pattern! I love it, Thank you so much!
Hi Katherine! It’s so great to know you liked the bag pattern. Thank you so much for checking my blog and for taking the time to write me a comment.
Maggie
How did you get the pattern? Unless I go on Ravelry and buy it, Pinterest will not allow me to see the pattern.
Hi Janice, this pattern is exclusive content for email subscribers. When a pop-up shows up saying “unlock this exclusive content”, you may create a Grow account. You only need to provide your email address.
Maggie
What a fun to make pattern! It’s as easy to read as it is clearly explained Thank you for sharing this and working on the war against waste.
You’re so welcome, Jessica! Thank you so much for your feedback. It makes me so happy to know you liked this pattern and that you found it useful.
Maggie
This is lovely pattern, I love how you explain all your work. It’s detail and easy to understand. Thank you very much.
Awww, thank you so much for your kind feedback. I am so glad you liked the pattern. Please let me know if you have questions.
Maggie
What a fabulous tutorial! Instructions are precise & pictures are wonderful. Thank you so much for sharing! I made the bag & 3 scrubbies from a linen I had laying around & the other 3 scrubbies in cotton; linen for scrubbing & the softer cotton for makeup removal. I made them for my 16 year old daughter. She LOVES it!!!!
Hi Lynette!
I appreciate your time to write me this feedback. I am so glad you liked the scrubbies and bag tutorial. And that your daughter loved her new make up removal pads. Thank you 🥰
I would love to do this pattern but I feel like I’m missing something. The only indication on what hook to use I’ve seen is where you state to use the “indicated” yarn and hook. Does that mean the indicated hook size on the yarn label?
Hi Nicole! Thank you for your question. The hook size is under “Tools”. For this pattern, I used a 4.00 mm (US G) hook. Please let me know if you need anything else.
Maggie
Such a cute pattern, very excited to try it!
Thank you so much, Kristin. I am so glad you liked it. I would love to see the final result of your scrubbies, if you are on instagram or Facebook please tag me @zamiguz if you share it 🙂
Maggie
Thank you very much for this pattern. it’s a good idea for a christma’s gift for my gran daughters.
Hi Marie,
You’re so welcome. Thank you so much for the kind feedback. I am so glad you like the pattern, I’m sure your granddaughters will love the scrubby + bag set, it sure is a great gift idea.
Maggie
Loved the scrubbies pattern, the bag is way to confusing to try to read and I’ve read much more advanced patterns. Where is the join to begin crocheting in the round? It says other side but looks flat in all the pictures, when does it become spiral?
Hi Michele. Thank you for the feedback. You start the bag by the bottom, first you chain 32, then you crochet round 1 around it (see instructions for round 1). “Other side” means you crochet second half of round 1 on the other side of the chains. The spiral starts as soon as you start round 2, so there is no join. I’ve had multiple 5 star feedbacks for this pattern on Etsy, some of them mentioning how clear the pattern it, but it’s my pleasure to help with any difficulties you may still have. Please let me know if there is anything else I can help with.
Maggie
Thank you for the clarification. I needed that also. Makes sense now. Love the scrubbies. Wonderful little gifts.
You’re welcome, Susan. I’m glad it’s clear now and that you love the scrubbies.
Maggie
Hi Maggie, I too am having a real difficulty in understanding the instructions for the bag. I think I get the first row but can you help me understand how you start crocheting in the round. I appreciate you’ve just done that in the previous comment, but I still don’t understand it. Can you help by a step by step from row 1 to 2. Once Ive started Im sure it will all click into place. Thanks
Hi Amanda. Sorry to hear you couldn’t get a hang of the bag pattern. No worries at all, I thought I could help by adding an arrow to the first photo under the bag pattern instructions. Please take a look at the photo and let me know if it makes sense now. Basically, when you finish round one, you will chain 3 and instead of joining with a slip stitch, you will sc in that first ch 3 space in round one, to start round 2. Please reach out if you have any additional questions.
Maggie
I wish you had a video. It’s so much easier for me than understanding directions. I love this pattern.
Hi Karla, thank you so much for your comment, I’m so glad you like the scrubby and bag pattern. Sorry I don’t have a video available for this pattern, I have in my plans to start recording them, but right now I don’t have the time. Hopefully soon.
Maggie