17 Common Crochet Mistakes and How to Fix Them
Hi crochet community! I’ve compiled a list of the most common crochet mistakes we are likely to make at some point (and how to fix them).
Let’s be real – no matter how long you’ve been crocheting, there’s a good chance you’ve picked up some bad habits along the way. Whether you’re a complete beginner still figuring out how to hold your hook or you have a yarn stash as tall as a small mountain, we’ve all committed at least a few of these errors. Yes, even the seasoned pros.
And guess what? That’s not a bad thing! Crochet is a journey, not a race. There’s always something new to learn. Whether it’s an intricate stitch, a new technique, or simply a better way to weave in those annoying yarn ends.
Speaking of yarn ends…
… want to hear how I learned that lesson the hard way? Picture this: I had thoughtfully gifted a baby blanket to a new mom friend (cue the warm fuzzies), only to find out later that—uh oh—some of the ends had come loose. My friend casually mentioned later, “A few bits are unraveling… do you think you could fix it?” (yikes!). Continue reading to learn how to correct that mistake.
Of course, as you can see, some of these crochet problems I’ve stuck with myself, even after years of believing I knew everything. However, I’ve also scoured the internet, including Reddit and Facebook groups, and I’ve confirmed that these are the most common crochet mistakes we all make.
Common Crochet Mistakes
Without further ado, let’s explore the most common mistakes beginners make and the solutions for them.
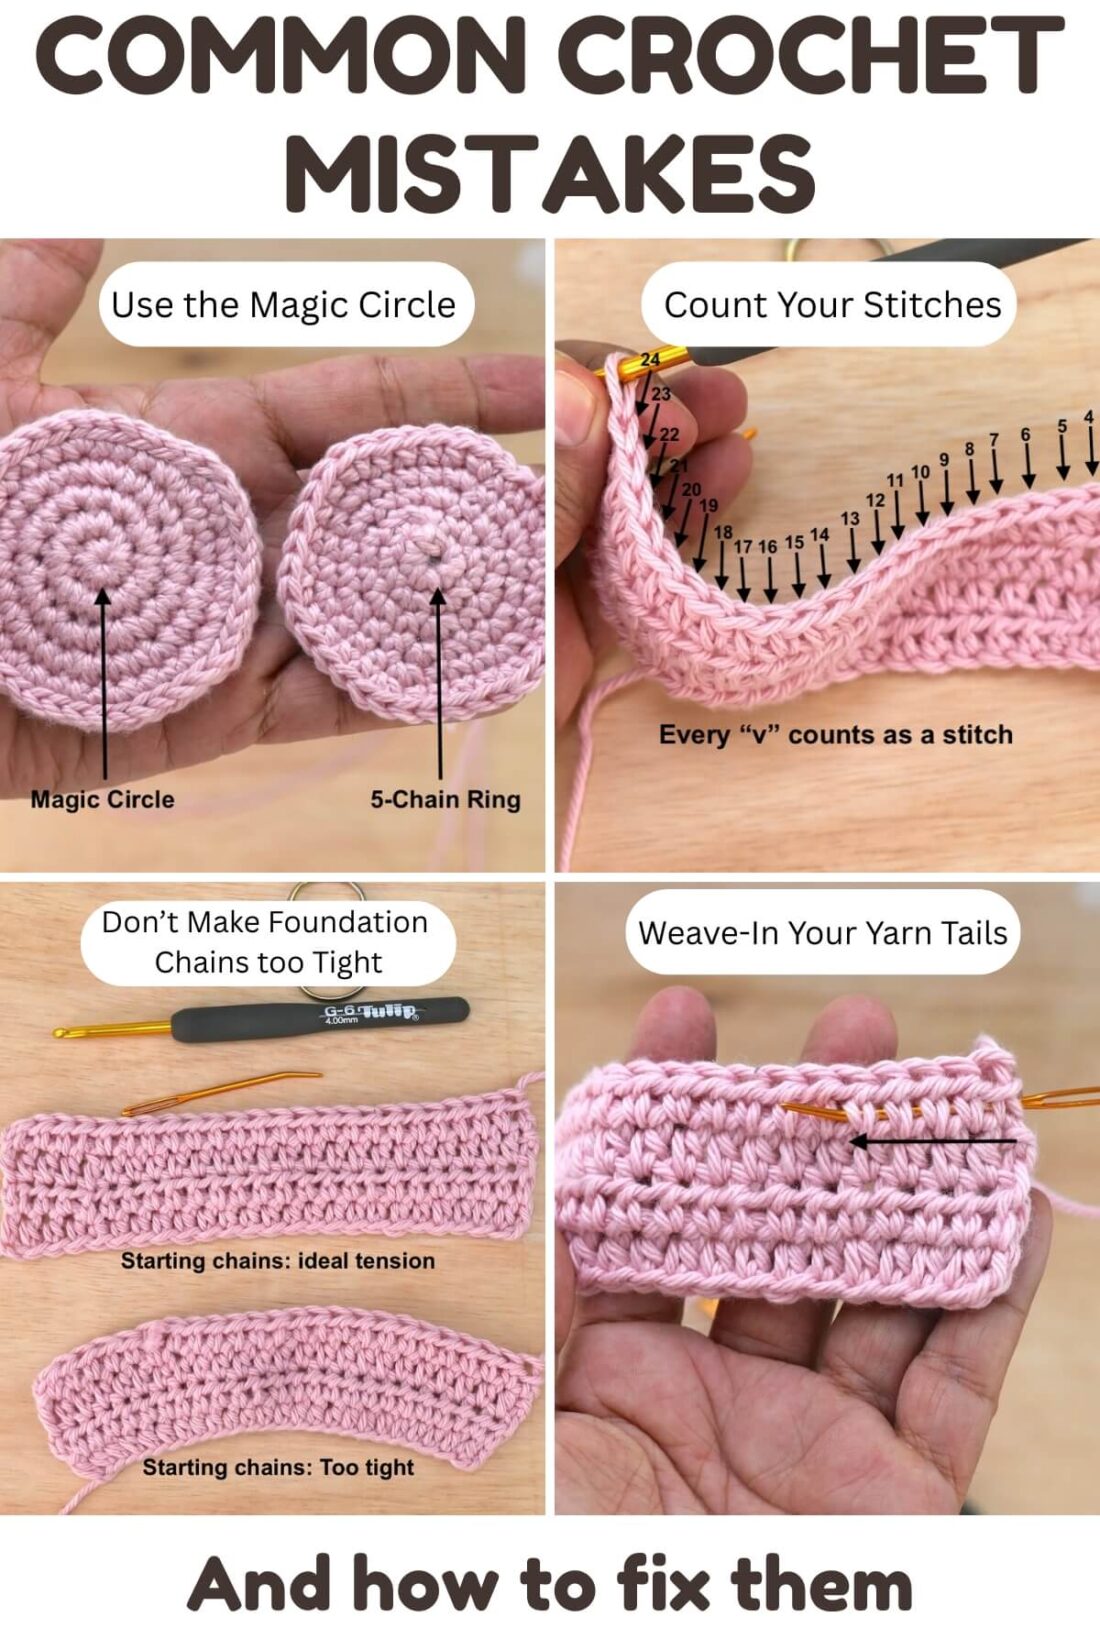
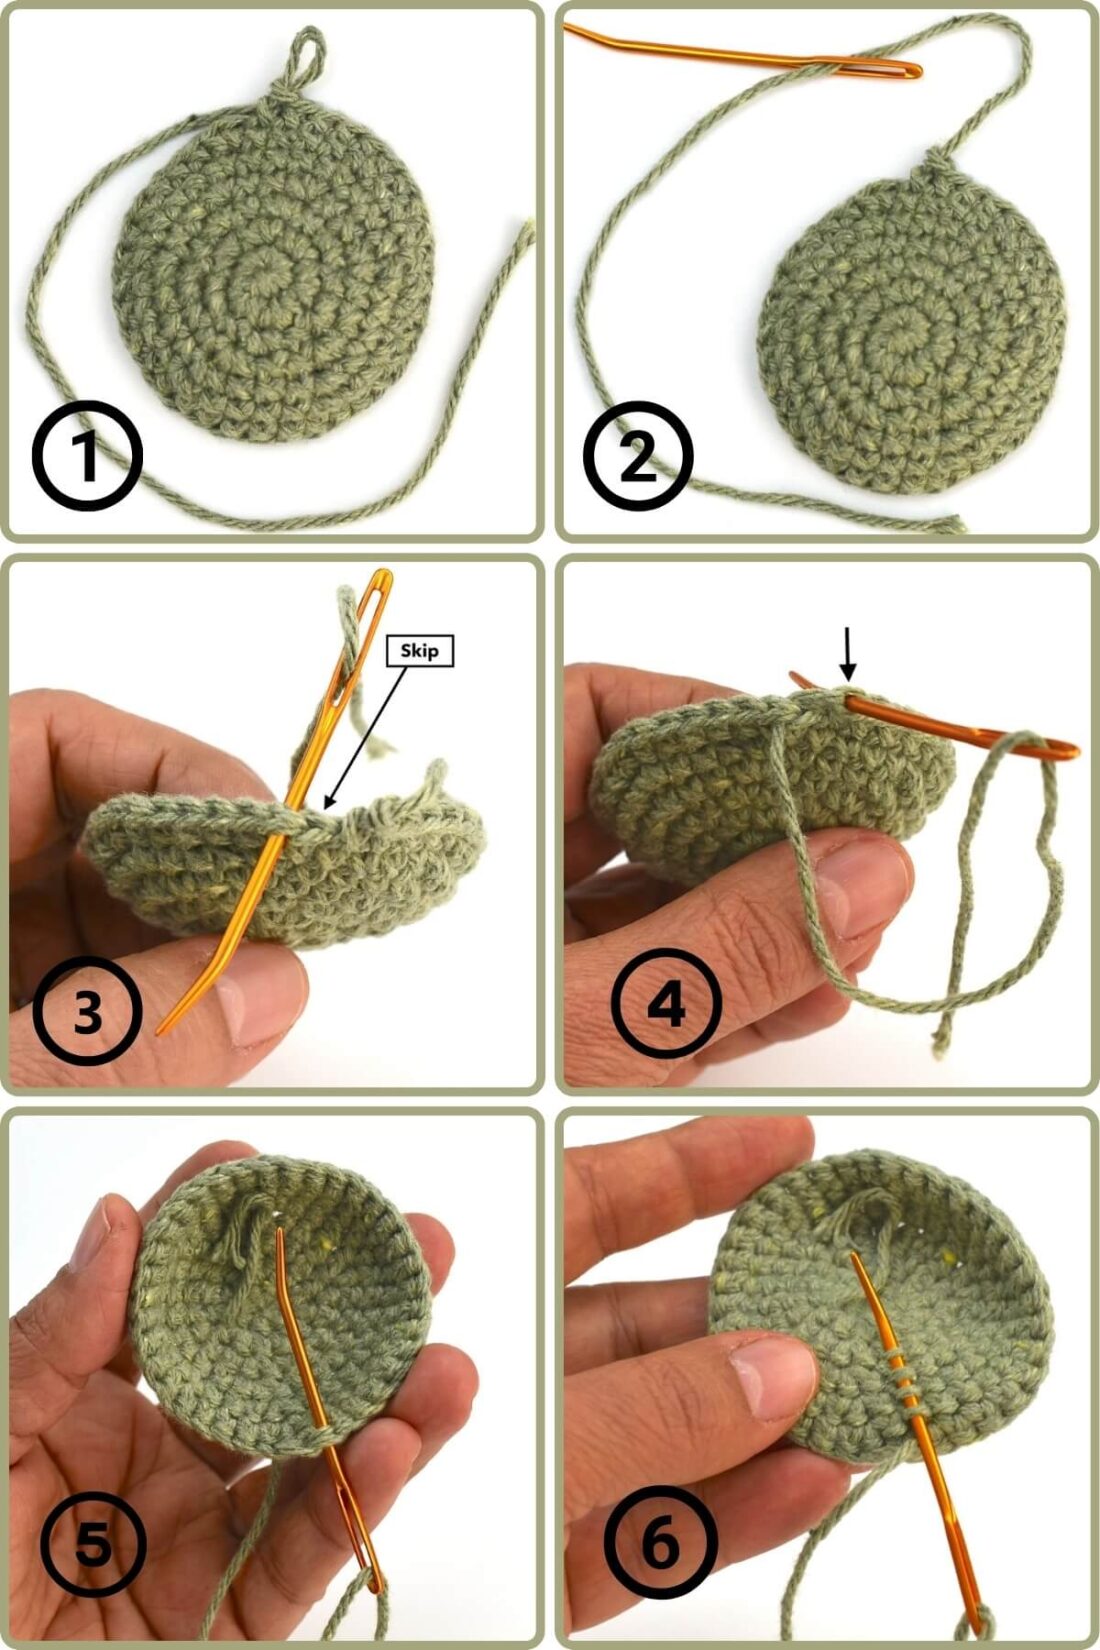
Mistake #1: Crocheting Over Yarn Ends
This is one of those crochet slip-ups that seem harmless but can unravel (literally) later on. It might seem like a time-saver, but in addition to making your finished project look unprofessional, crocheting over the yarn tails will eventually make them come loose.
The Solution:
Thread a tapestry needle with every tail, one at a time, and carefully weave them in. Preferably, back and forth a few times. It can be tedious and time-consuming (I know!), but it’s worth every minute spent.
Pro Tip:
Weave in at least 2–3 inches of yarn in various directions for a secure hold.


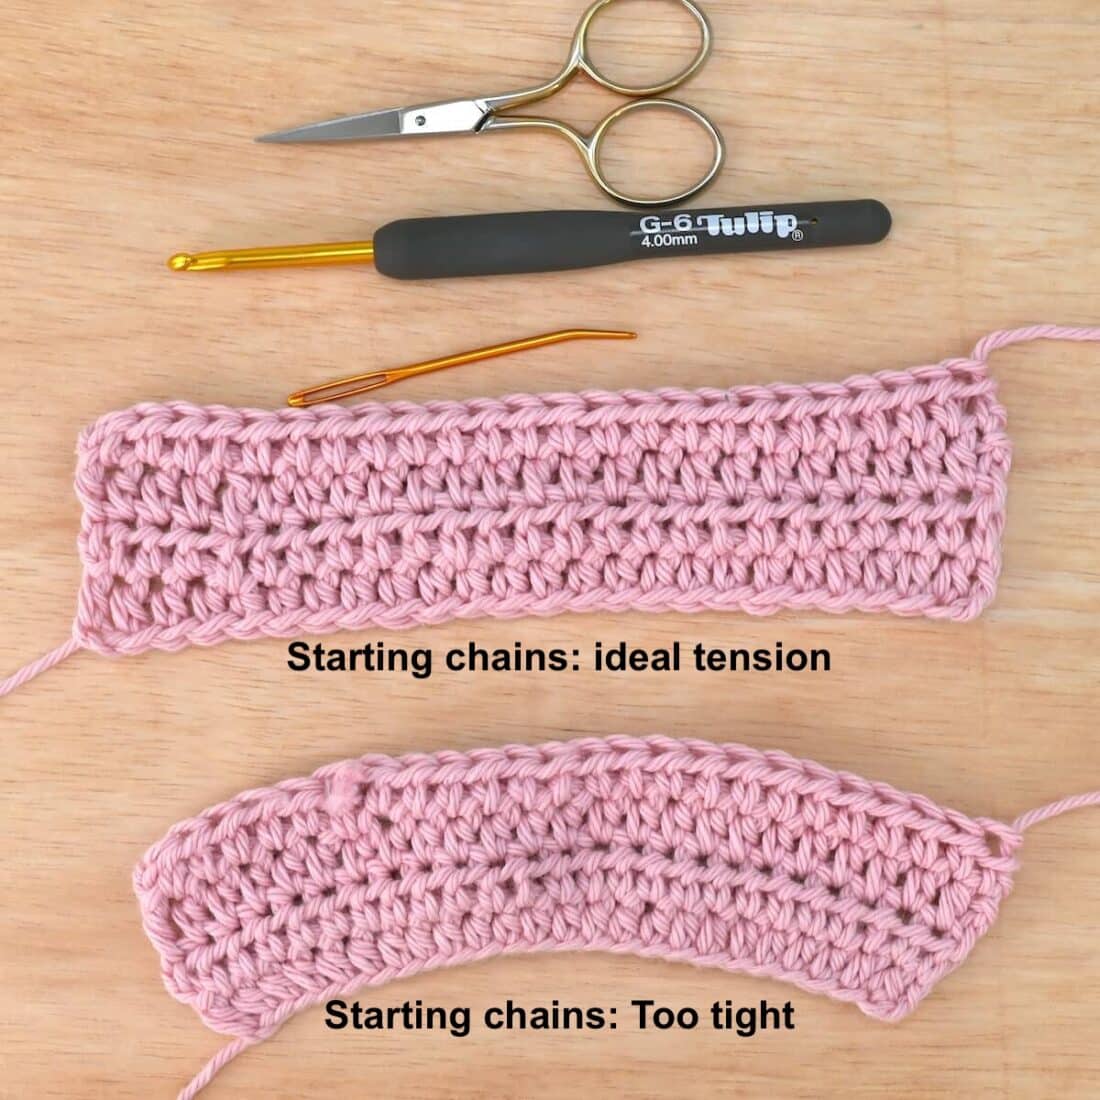
Mistake #2: Crocheting the Foundation Chains Too Tightly
Tension-related crochet errors can affect the overall shape of your project, causing it to curl or warp (see photo below). This is especially important for blankets or other projects that use chains in their foundation.
The Solution:
Use a larger hook solely for the foundation chain, then revert to the recommended size for the pattern. In my experience, a hook two sizes larger works well.
Pro Tip:
Practice loosening how you hold your hook when chaining to improve muscle memory.
Mistake #3: Not Counting Stitches
It might seem like a small detail, but forgetting to count your stitches can quickly lead to wonky, uneven projects, especially in patterns with increasing or decreasing rows (and lots of frustrations, too!).
The Solution:
Count your stitches at the end of each row or round, especially in patterns that increase or decrease. Every little “v” on top of your last row counts as one stitch.
Pro Tip:
Use stitch markers every 10 or 20 stitches to track your progress as you work. This is especially useful for large projects or long chains.

Mistake #4: Not Knowing the Difference Between US and UK Terms
The same abbreviation can refer to entirely different stitches, depending on the region. For example, a double crochet stitch (dc) in the UK IS the equivalent to a single crochet (sc) in the US.
The Solution:
Always check if your pattern uses US or UK terminology before you start.
Pro Tip:
Print or bookmark a US vs UK stitch conversion chart. I have a comprehensive guide to Crochet Abbreviations guide right here on the blog.
Mistake #5: Neglecting the Importance of Written Patterns
Not learning how to read patterns prevents you from having the opportunity to explore the wide world of printed patterns. Whether it’s PDF files, books, or magazines, numerous designers publish their patterns in written format.
The Solution:
Begin by familiarizing yourself with a simple crochet pattern to get used to basic terms. A basic granny square is a great way to start.
Pro Tip:
The Craft Yarn Council serves as an excellent resource for learning how to read patterns.
Mistake #6: Failing to Learn How to Interpret Charts and Schematics
Visual patterns may seem intimidating, but they are incredibly useful once you learn the basics. A well-designed pattern alone might not always make a project fully understandable, so designers often add visuals to help better interpret the project.
The Solution:
Practice with simple crochet diagrams and watch video tutorials to become comfortable reading charts.
Pro Tip:
Combine chart reading with written instructions to strengthen your understanding.
Mistake #7: Not Buying Enough Yarn for a Project
Yarns are dyed in lots, often in limited quantities, which means colors can vary from one lot to another and may take a while to restock. Running out of yarn mid-project is one of the common crochet mistakes that can cause dye lot mismatches or force you to start over.
The Solution:
Always buy at least one extra skein than what the pattern recommends.
Pro Tip:
Save your yarn labels and write down the dye lot for easy restocking.
Mistake #8: Not Crocheting a Gauge Swatch
Who hasn’t found a cute hat pattern and immediately grabbed the hook and yarn without checking the gauge? Guilty here! Skipping the gauge swatch can result in a project that’s either too small or too large.
The Solution:
Crochet a gauge swatch using the stitch and yarn from your pattern and measure it before starting the full project.
Pro Tip:
Adjust your hook size if your swatch is too small or too large. If it’s too large, you need to switch to a smaller hook or the other way around.
Mistake #9: Not Practicing Your Stitch Tension
This one goes along with mistake #8. Technically, everyone has their own stitch tension, but if you don’t practice enough to make it consistent, it can become an issue. This is especially true when crocheting garments or other wearable items, such as hats.
The Solution:
Practice holding your yarn and hook consistently and relax your grip. I recommend finding a way to hold the yarn that works best for you and sticking with it.
Pro Tip:
Crochet several small squares with different yarn weights to improve your tension control. And rememder… it takes time!
Mistake #10: Using the Wrong Yarn as a Beginner
This is a common crochet error that can lead to frustration for beginners. Some yarns are tricky to work with, which can lead to crochet issues, like not being able to see the stitches. Fuzzy yarns, like chenille, should be avoided at all costs if you’re just starting out.
The Solution:
Start with light-colored, medium-weight (4) cotton or acrylic, tightly spun yarns that don’t split easily.
Pro Tip:
Avoid fuzzy, too thick, dark, or textured yarns until you feel confident with basic stitches.

Mistake #11: Ignoring Pattern Notes
Those tiny notes at the top of a pattern often include stitch counts, repeats, and helpful details. Skipping the pattern notes or only glancing at them can lead to confusion or crochet mistakes halfway through.
The Solution:
Always read the pattern notes first — they set the stage for the whole project, including essential details about the yarn.
Pro Tip:
Highlight or underline anything that seems important before you start.
Mistake #12: Starting Projects That Are Too Complex
Jumping into advanced patterns before you’re ready is a crochet mistake that can lead to frustration. Even as an experienced crocheter, I’ve found myself in this situation before, especially with stitches that I hadn’t tried before.
The Solution:
Start with beginner-friendly projects that use simple stitches and minimal shaping. If you’re a confident beginner, this adorable Amigurumi Whale is a great project to try.
Pro Tip:
Save more complex patterns to your favorites (here on the blog, click the Grow Heart at the bottom of the post).
Mistake #13: Using the Wrong Hook Size
Everyone crochets differently—that’s a fact. Often, you might need to change hook sizes in a pattern. Why? Because using a hook that’s too big or too small can affect your tension and stitch definition.
The Solution:
Check both your yarn label and pattern notes for the recommended hook size and adjust as needed.
Pro Tip:
Always test with a gauge swatch before starting your project (again… gauge is super important!).
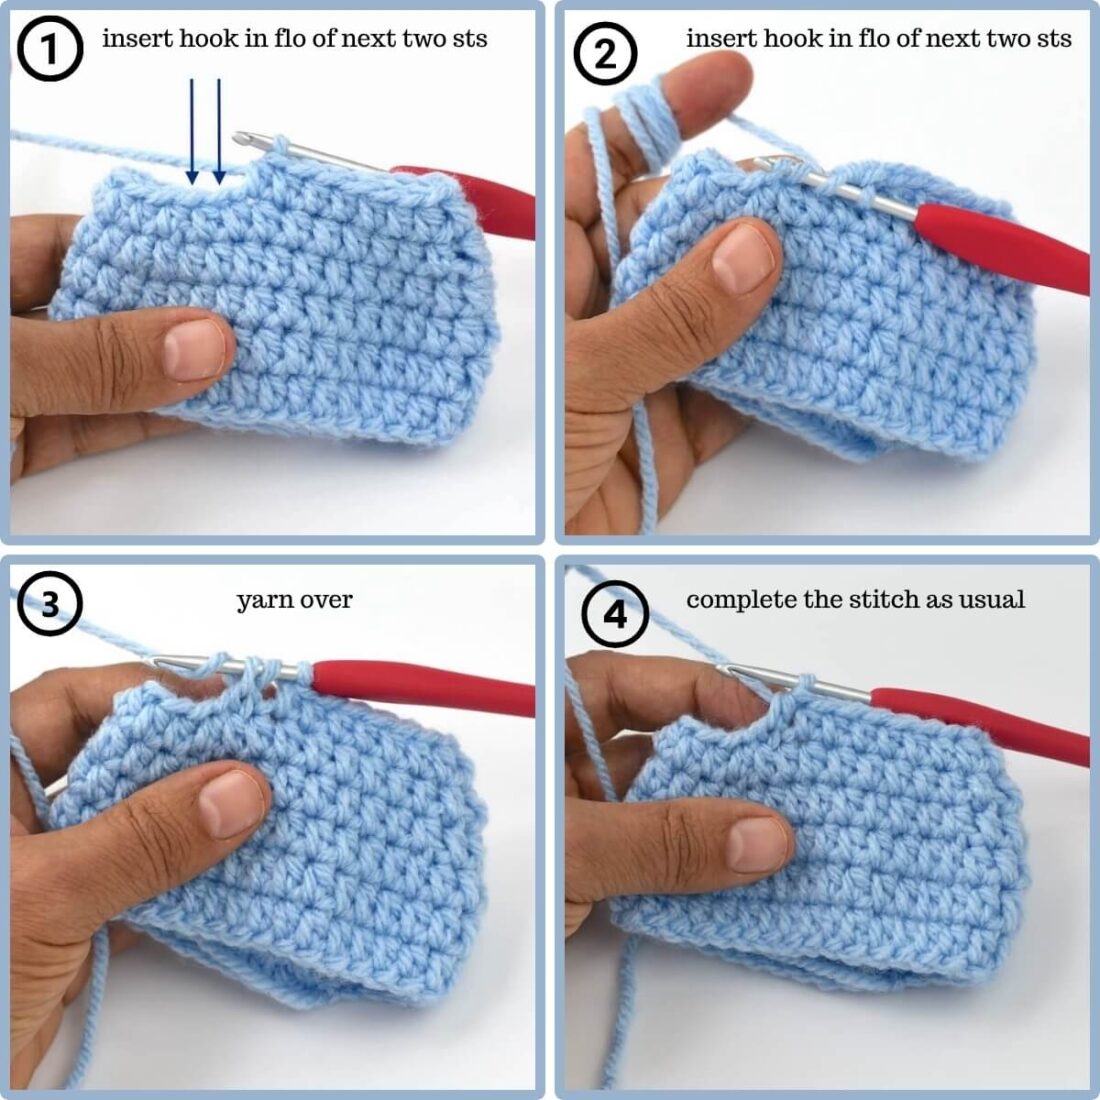
Mistake #14: Ignoring the Invisible Decrease
Did you know there’s a way to create an invisible decrease for dc, hdc, and sc stitches? Regular decreases aren’t “the end of the world” kind of crochet mistakes, but they can cause bumps or holes, especially in stuffed crochet animals and toys.
The Solution:
Learn the invisible decrease (typically using front loops only) to create smooth, seamless shaping. Check my blog post on how to do invisible decreases to learn more.
Pro Tip:
Use tighter tension when working with Amigurumi to decrease for a cleaner look.
Mistake #15: Failing to Check Yarn Label Information
This is one of those crochet mistakes that may not seem like a big deal. But yarn labels include essential info like fiber content, care instructions, gauge, and more.
The Solution:
Always read the yarn label before buying or using it. It indicates whether it’s suitable for your project.
Pro Tip:
Take a photo of your label or keep a yarn journal for future reference.

Mistake #16: Not Learning the Magic Circle
The crochet magic circle, also called the magic ring, is a game changer, especially for Amigurumi. A chain ring also works, but it creates a hole, which can look unappealing and, for stuffed animals, reveal the fiber through.
The Solution:
Learn how to crochet the magic circle with my tutorial here on the blog and start replacing your chain rings with it.
Pro Tip:
Start the magic circle like you would usually start a chain (but without the slip knot), by wrapping the yarn around the hook and pulling up a loop.

Mistake #17: Ignoring the Clean Finish Method
Last but not least… Finishing matters! Uneven edges or sloppy finishes can ruin a great project. Learning how to finish your crochet properly is just as important as knowing how to start it.
The Solution:
Learn techniques like invisible joins, neat border edges, and proper fastening off. I have a helpful tutorial on how to do the crochet invisible finish that you may like to check.
Pro Tip:
Use a yarn needle to weave in ends smoothly and finish every project like a pro.
Troubleshooting Tips for Crochet Issues
If you’re having trouble with wavy edges, crooked shapes, or uneven stitches, you’re not alone! Most of these crochet issues come from a few fixable habits. Pay attention to your tension, count your stitches regularly, and follow the pattern notes carefully.
Here are a few extra tips to help you avoid beginner crochet slip-ups:
- Use stitch markers from the beginning
- Don’t ignore pattern notes
- Begin with simple steps before attempting complex patterns
- Always pick the right yarn and hook combo
- Most importantly… have fun and enjoy every learning step!
Final Thought
Making mistakes is part of how we grow as crocheters, so don’t get discouraged. The key is recognizing what to look for, learning from the slip-ups, and refining your techniques. Keep these tips in mind to achieve cleaner, more confident crochet projects in no time!
Want to keep this crochet mistakes guide handy? Bookmark it or share it with a fellow crocheter who’s just starting out!
Pin, Share, and Comment:
- Comment on this post: I always read comments and reply to all questions posted on the blog, and I love it when you stop by to say hello.
- Share your project: if you make this or any of my other patterns, tag me on Instagram or Facebook, or use the hashtag #zamiguzmakers. I love seeing what you make.
- Pin it now: Are you not ready to make it yet? You can use the above image to Pin it to your crochet boards or follow me on Pinterest for more.
- Join The Makers community: Join my community group on Facebook and be the first to know about pattern releases and other crochet-related content.


From a beginner, great post! Thank you!
Thank you so much, Laura. I’m glad you found it helpful!
Maggie