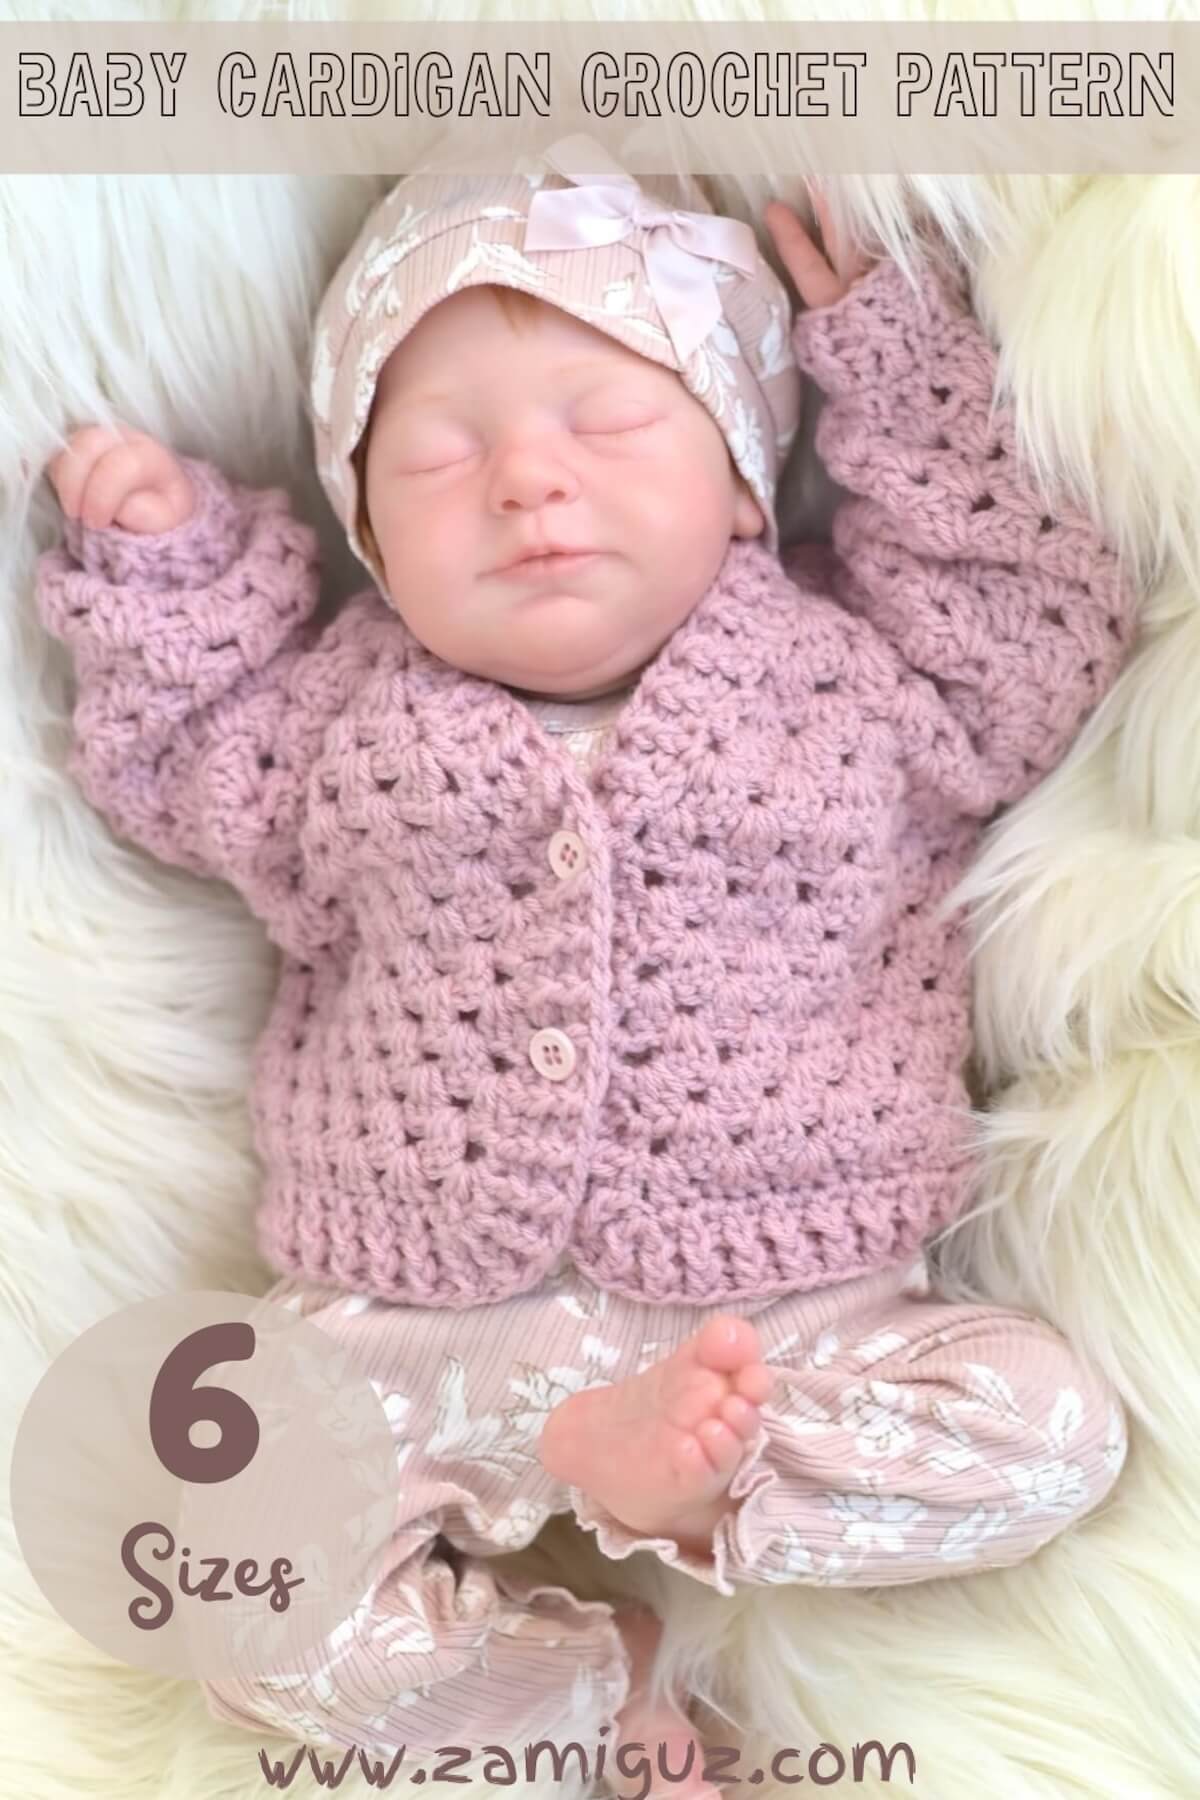
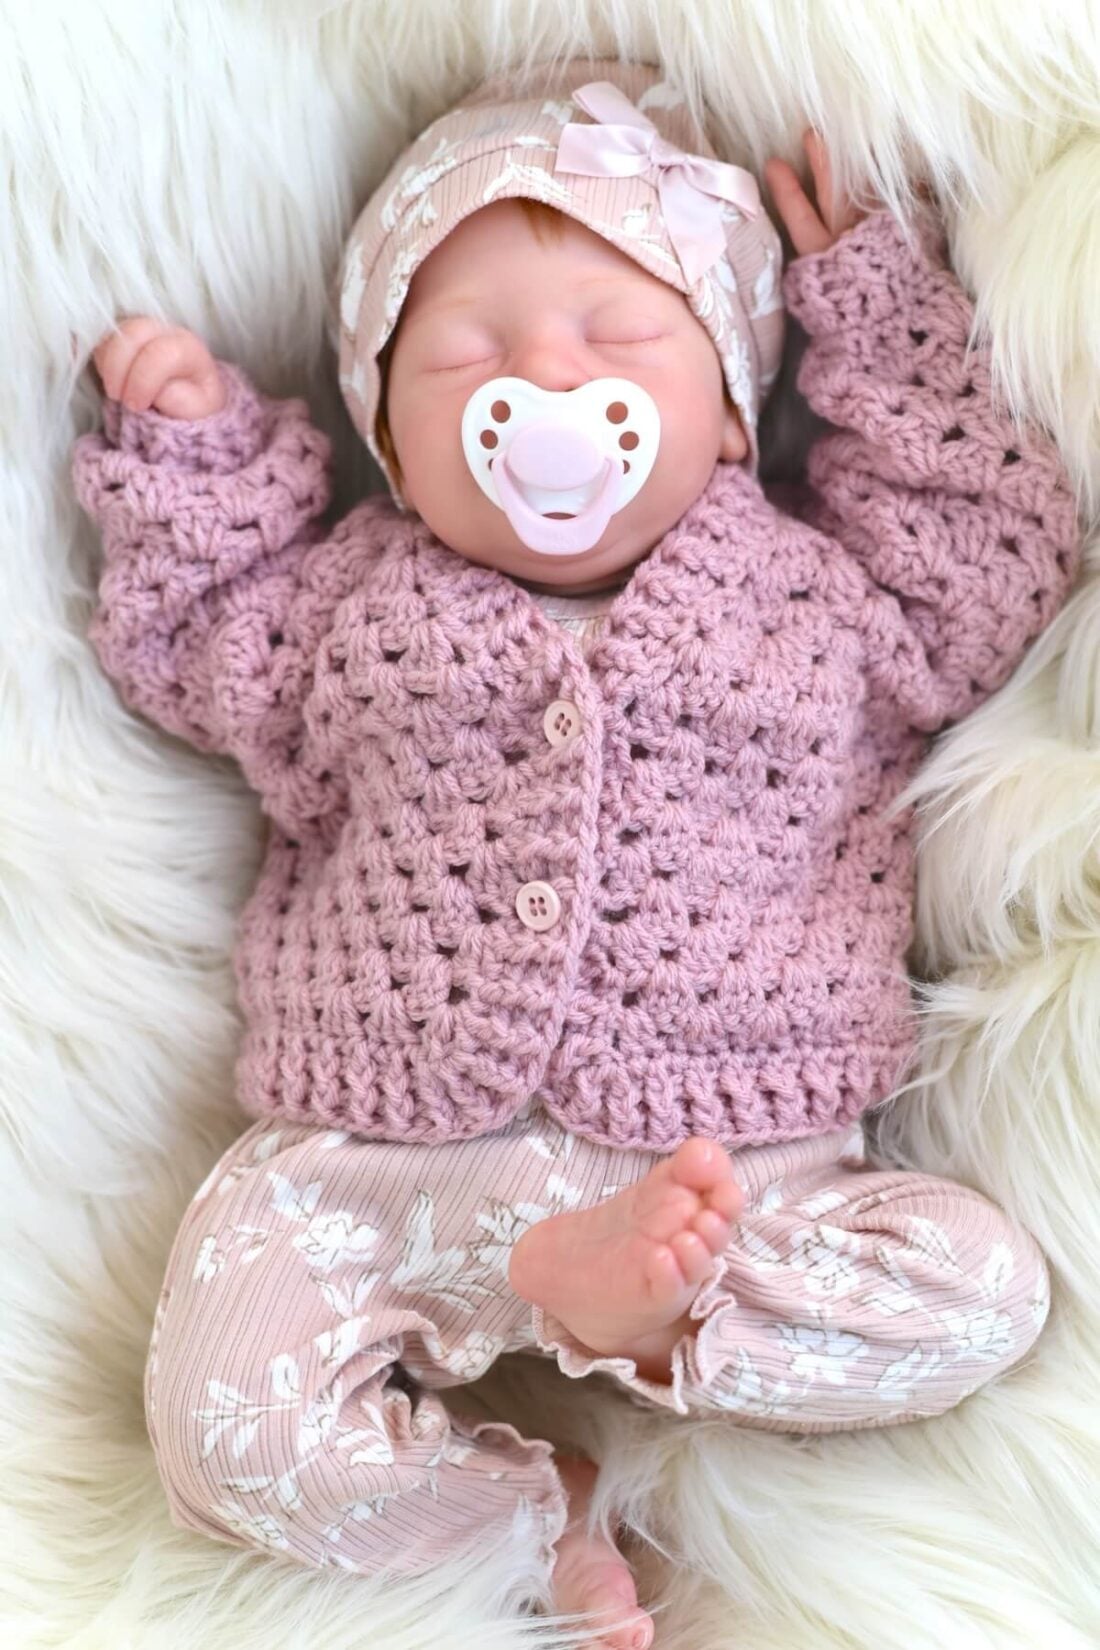
I’m so excited to share one of my easiest and cutest baby makes yet—a granny stitch baby cardigan with absolutely zero sewing required!
This website is reader-supported and contains affiliate links. As an Amazon Associate, I earn from qualifying purchases. Find my affiliate disclosure here.
If you love quick, seamless projects, this little crochet baby jacket is going to land on your list of favorite baby patterns. It works up fast, looks adorable on any little one, and makes the perfect last-minute handmade gift for new parents.
I love designing for babies – these tiny projects give me a sense of accomplishment because they require the same skills as designing for adults, but in a much smaller size and shorter time.
And everything about babies is just so adorable (Sigh!).
Top-Down Baby Cardigan Pattern
This crochet baby cardigan pattern is beginner-friendly, available in six sizes from newborn through 24 months, and uses the classic granny stitch we all know and love. But what really sets it apart is the unique increase technique in the front yoke, which creates a charming shape that can be finished with buttons or a sweet tie-string bow.
You’ll start by crocheting the yoke top-down while increasing to create the split corner for the armholes. Then continue to the body and ribbed edging all in one piece—no seams, no fuss. After that, you’ll simply reattach your yarn to work the sleeves and ribbed cuffs.
While I no longer have little ones at home, I do have the sweetest life-size reborn baby doll modeling the cardigan for the photos in this blog post — and she looks absolutely precious in it, doesn’t she?

Before you scroll down…
…. you might also want to check out these other patterns for babies and kids here on the blog: Adorable Crochet Baby Booties, a Lacy Diamond Stitch Baby Blanket perfect for heirloom gifts, a C2C Granny Stitch Baby Blanket, a Baby Bow Headband Pattern for little princess in your life, and this Cute Daisy Girl Summer Dress.
Materials
- Light Worsted / DK yarn (3) – more on the yarn below.
- 3.50 mm (E) hook or hook size needed to meet gauge – I used one of my favorites: Clover Amour crochet hook
- Two to four 12 mm buttons
- Scissors, tapestry needle, sewing needle, matching sewing thread, and stitch markers.
Yarn Specifics and Substitutions:
You’ll need approximately 235 yards (215 m) to 440 yards (402 m), depending on size. The brand I used was Premier Basix DK. My experience with this 100% acrylic yarn was that it felt soft and snuggly after washing – oh, and it comes in many, many gorgeous shades.
One 3.5 oz (100 g) skein was sufficient to crochet the two smaller sizes I made. For the four larger sizes, you’ll need one skein and part of a second one. However, if you’re using a different brand, be sure to check the label for the specific amount.
If you want to go with yarns made specifically for babies, these are great substitutes: Bernat Baby Softee Cotton and Lion Brand Baby Soft.
Abbreviations (US Terms)
- ch(s): chain(s)
- dc: double crochet
- Granny cluster: three double crochet stitches in the same stitch
- FO: Fasten Off
- fphdc: front post half double crochet stitch
- bphdc: back post half double crochet stitch
- hdc: half double crochet stitch
- Rnd: Round
- rep: repeat
- RS: right side
- sk: skip
- sl st: slip stitch
- sp: space
- st(s): stitch(es)
- WS: wrong side
- { }: the numbers between braces pertain to different baby sizes in this sequence {newborn, 3mo, 6/9mo, 12mo, 18mo, 24mo}
- ( ): The instructions between parentheses are for stitches that need to be worked in a certain sequence or in the same stitch.
Baby Crochet Cardigan Size
- This baby sweater pattern contains instructions for six baby sizes and was written in the following format and sequence: {Newborn, 3mo, 6/9mo, 12mo, 18mo, 24mo}.
- When/if only one number is given, it applies to all sizes. For example, “Repeat the previous two rows to rows {14, 16, 16, 18, 18, 19}”, whereas 14 is for newborn, 16 is for 3mo and 6/9mo, 18 is for 12mo and 18 mo, and 19 is for 24mo.
- When a number is repeated, it means the same number applies to multiple sizes.

Size Chart

Stitch Tension
My baby cardigan sample gauge was 4 inches (10 cm) square for 5 granny clusters in 9 rows. Be sure to crochet a swatch with the pattern below and measure it before starting. Skipping this step could result in a cardigan that is too small or too large.
Gauge swatch pattern:
Foundation: ch 22, then granny cluster in the fifth ch from the hook, (sk 2 chs, granny cluster in the next ch) until 3 chs remain, sk two chs, dc in the last ch, ch 3 (counts as a dc here and throughout the pattern) and turn.
Row 2: 2 dc in the space between the first dc and the next granny cluster, granny cluster in every space between the following granny clusters to last, ch 3 and turn.
Row 3: skip the first granny cluster, granny cluster in every space between the following granny clusters until one granny cluster left, dc in the last st, ch 3, and turn.
Row 4-12: repeat the instructions in rows 2 and 3.

Pattern Notes
- This granny stitch baby cardigan pattern uses US crochet terms.
- Skill Level: Garment expert.
- Although this pattern uses basic stitches that are generally suitable for advanced beginners, you’ll need knowledge in reading written patterns and interpreting charts and schematics for crochet garments.
- Turning chains 2, 3, and 4 count as stitches throughout the pattern, unless otherwise noted.
- For transparency, the model shown in the pictures is a reborn baby doll in standard newborn size, wearing a size 3mo cardigan (see more about sizes above).
- The sleeves have their own, separate round count.
About Exclusive Content: When you create a Grow.me account, you can bookmark your favorite content in one place. With one free account, you can save not only mine, but also the content of many other creators, all in one place.
When you visit my blog and see the “Unlock Exclusive Content” button, please create an account or click the login button and sign in with an existing Grow account. It’s a secure, free feature, and you can unsubscribe at any time. Everything you bookmark with the “heart” on a page that uses Grow.me will show up under “Grow Bookmarks” in your account.
Disclosure: Please note that Grow.me is a third-party app for Exclusive Content, and I have no control over their user policies. Neither will I be able to assist with account creation and/or password resetting. For information on how to troubleshoot login and password resetting, go to “Resources” on the Grow.me website’s top menu.

Purchase a PDF Download
- Inexpensive
- Ad-free
- Formated and Print-friendly
Crochet Baby Cardigan Instructions

Before you begin your baby sweater, you may benefit from these free, helpful resources: How to Create a Slip Knot, How to Do the Invisible Finishing in Crochet, A Free Guide to Abbreviations & Terms (PDF download), and How to Do Invisible Decrease in Crochet.
Total Time: 3 hours
-
Yoke

Start with {24, 24, 26, 28, 28, 34} chs.
Row 1: sc in the back bump of the 2nd ch from the hook and in the back bump of every ch across. {23, 23, 25, 27, 27, 33} sc sts.
Row 2: (ch 4, dc 3, ch 1, dc 3) in the first st, *sk one st, granny cluster in the next st*,
do instructions between the asterisks {2, 2, 2, 2, 2, 3} times, sk one st, (dc 3, ch 1, dc 3) in the next st, crochet according to the instructions between the asterisks {4, 4, 5, 6, 6, 7} times. Then, sk one st, (dc 3, ch 1, dc 3) in the next st, do instructions between the asterisks {2, 2, 2, 2, 2, 3} times, sk one st again, (dc 3, ch 1, dc 3, ch 1, dc) in the last st, ch 4, turn.
Row 3: granny cluster in the first ch 1 sp, *(dc 3, ch 1, dc 3) in the next ch 1 sp, aka split corner. Granny cluster in each sp between the following granny clusters to the next split corner, rep from the asterisk two more times, (dc 3, ch 1, dc 3) in the next ch 1 sp, (dc 3, ch 1, dc) in the last ch 1 sp, ch 4, turn.
Row 4 to {6, 7, 7, 7, 8, 9}: granny cluster in the first ch 1 sp, *granny cluster in each sp between the following granny clusters to the next split corner, (dc 3, ch 1, dc 3) in the next ch 1 sp. Repeat from the asterisk three more times, granny cluster in each sp between the following granny clusters to last, (dc 3, ch 1, dc) in the last ch 1 sp, ch 4, turn. -
Cardigan Body Split

We stop increasing now and will split the cardigan’s bodice and armholes. First, we crochet the bodice, then we cut the yarn and go back and crochet the sleeves, one at a time.
Row {7, 8, 8, 8, 9, 10}: Ch 3 instead of 4 to turn, dc 2 in the first ch 1 sp, *granny cluster in each sp between the following granny clusters to the next split corner. Now, align both underarm corners, then yarn over and insert the hook into both corners ch-1 sps at the same time, then dc 3 to join and create the armhole. Repeat from the asterisk one more time, granny cluster in each sp between the following granny clusters to last, dc 3 in the last ch 1 sp, ch 3, turn.
Note on armhole joining: No worries if you notice the joining corners are slightly overlapped at this point. We’ll fix it when we crochet the sleeves. -
Body and Ribbed Edge
Continue from where you left off in the previous step without cutting the yarn.
Row {8, 9, 9, 9, 10, 11}: granny cluster in each sp between the following granny clusters to last, dc in the last st, ch 3, turn.
Row {9, 10, 10, 11, 12}: dc 2 in the sp between the first dc and the next granny cluster, granny cluster in each sp between the following granny clusters to last, ch 3, turn.
Repeat the previous two rows to rows {14, 16, 16, 18, 18, 19}
Do not cut the yarn.
Maggie’s pro tip: You can adjust the length here by adding or removing rows at the bottom of the body.
This step is completed in one piece, in rounds (no turning) around the cardigan’s edge to create the ribbing, so this will be the right side of the cardigan. We are continuing counterclockwise, towards the yoke, from where we left off on the last bottom row of the body.
Round 1 (RS): ch 2 and hdc up the front and around the yoke edge, then down again and around the back. In the front, do 2 hdc sts for each side post. In each of the two front corners hdc 4, sl st to join.
Round {2-3, 2-3, 2-3, 2-3, 2-4, 2-4} (RS): ch 2, (fphdc, bphdc) around. -
Sleeve

Crochet the sleeves, one at a time, following the instructions below.
Still on the right side of the cardigan, attach the yarn to one of the sps between two granny clusters around the armhole edge. Then, chain 3 (doesn’t count as a st).
Rnd 1: granny cluster in next sp between the following granny clusters and in each sp to last. At the bottom of the armhole, crochet three separate dc sts instead of a granny cluster: one in each split corner ch-1 sp and 1 in the middle-joining sl st, granny cluster in the same sp as the initial ch 3, sl st to ch 3 to join.
Rnd 2 to {10, 11, 12, 13, 14, 16}: chain 3 (doesn’t count as a st), granny cluster in next sp between the following granny clusters and in each sp to last, granny cluster in the same sp as the initial ch 3, sl st to ch 3 to join. Do not cut the yarn. -
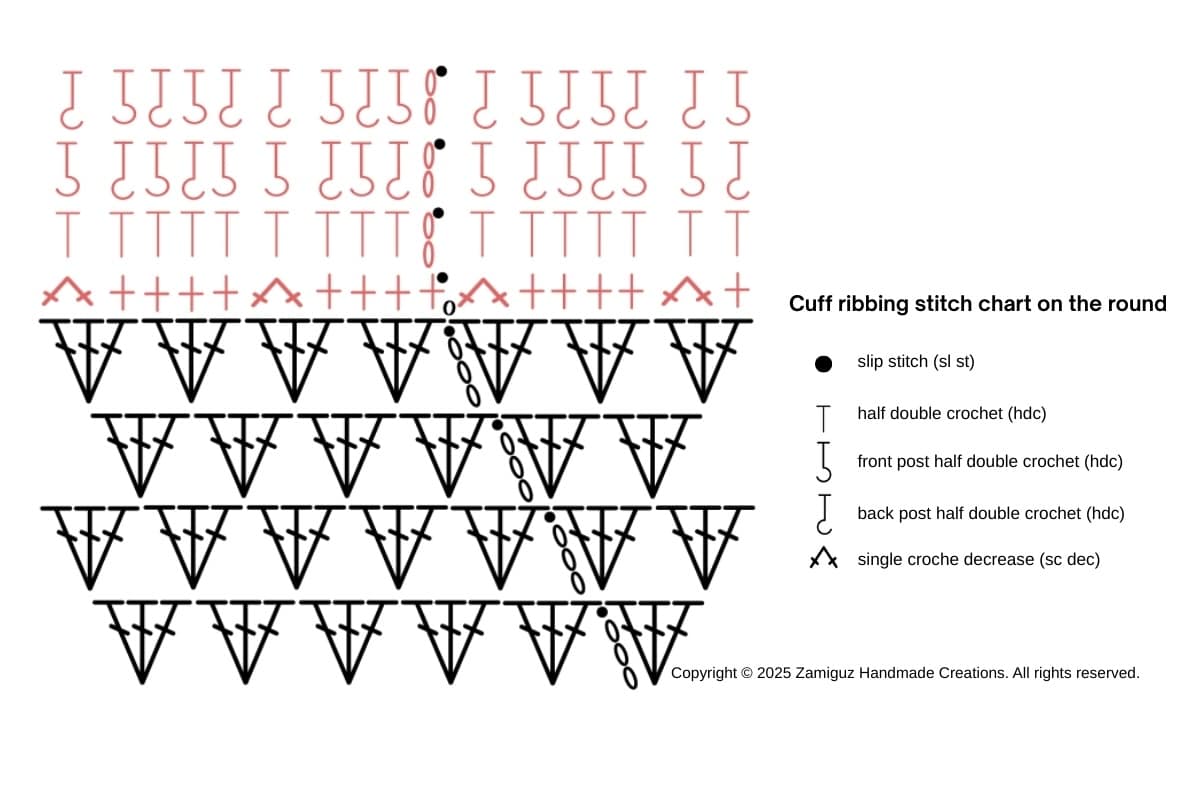
Cuff

We are continuing to crochet the cuff from where we left off in the previous step. The first round of the cuff is a single crochet round with decreases to tighten it around the wrist.
Maggie’s Pro Tip: You can create fewer scatter decreases in the first round if you think the cuff is too tight. Stitch count isn’t crucial here, so the decreases can be randomly staggered around the first round if you prefer to have slightly fewer decreases than my instructions specify.
Size Newborn:
Rnd 1: (sc 3, sc dec) x 5, sl st to join.
Rnd 2: ch 2, hdc around, sl st to join.
Rnd 3: ch 2, (fphdc, bphdc) around, sl st to join.
Size 3 months:
Rnd 1: (sc 2, sc dec) x 6, sc 3, sl st to join.
Rnd 2: ch 2, hdc around, sl st to join.
Rnd 3: ch 2, (fphdc, bphdc) around, sl st to join.
Size 6-9 months:
Rnd 1: (sc 2, sc dec) x 6, sc 3, sl st to join.
Rnd 2: ch 2, hdc around, sl st to join.
Rnd 3: ch 2, (fphdc, bphdc) around, sl st to join.
Size 12 months:
Rnd 1: (sc 2, sc dec) x 6, sc 3, sl st to join.
Rnd 2: ch 2, hdc around, sl st to join.
Rnd 3-4: ch 2, (fphdc, bphdc) around, sl st to join.
Size 18 months:
Rnd 1: (sc 3, sc dec) x 6, sl st to join.
Rnd 2: ch 2, hdc around, sl st to join.
Rnd 3-4: ch 2, (fphdc, bphdc) around, sl st to join.
Size 24 months
Rnd 1: (sc 3, sc dec) x 6, sc 3, sl st to join.
Rnd 2: ch 2, hdc around, sl st to join.
Rnd 3-4: ch 2, (fphdc, bphdc) around, sl st to join. -
Finishing the cardigan

Finish your granny-stitch baby cardigan by weaving in all the ends. Although optional, you can add buttons to the front if you like, and the stitch holes along the front edge can be used as buttonholes.


Estimated Cost: 10.00 USD
Supply:
- Light Worsted/DK yarn
Tools:
- 3.50 mm (E) crochet hook
Materials: Scissors, yarn needle, 12 mm buttons, sewing thread and stitch markers
FAQ – Granny Stitch Baby Cardigan Pattern
What skill level is this pattern?
This baby cardigan uses simple stitches that suits advanced beginners. However, some skills on how to crochet garments are also needed, such as interpretation of written instructions, schematics and charts.
Do I need to sew any pieces together?
Not at all! The cardigan is worked top-down in one piece, and the sleeves are crocheted directly onto the armhole, making it a completely seamless project.
What sizes are included in the pattern?
The pattern includes six sizes: newborn, 3 months, 6 months, 12 months, 18 months, and 24 months. This allows you to make the perfect fit for babies from birth through toddlerhood.
Can I adjust the size of this baby cardigan?
Absolutely! Because the cardigan is made top-down, you can easily add or subtract rows to customize the body length or sleeve length. Try-on as you go (or measure against a ready-made baby garment) for the perfect fit.
What yarn works best for this cardigan?
A soft #3 DK/lightweight baby yarn works great because it gives the cardigan the ideal drape without being too heavy. However, you can also use a light worsted (#4) yarn for a slightly thicker, cozier version—just be sure to check your stitch tension.
I hope you loved making this granny stitch baby cardigan. I love seeing what you make using my patterns. Keep scrolling to see ways to contact me and show me your finished projects.
Happy Crocheting!
Pin, Share, and Comment
- Comment on this post: I always read comments and reply to all questions posted on the blog, and I love it when you take the time to stop by and say hello.
- Have you made this? Share your project if you make this or any of my other patterns, tag me on Instagram or Facebook, or use the hashtag #zamiguzmakers. I love seeing what you make.
- Pin it now: Are you not ready to make it yet? You can use the above image to pin it to your crochet boards or follow me on Pinterest for more.
- Join The Makers community: Join my community group on Facebook and be the first to know about pattern releases and other crochet-related content.
Would you rather bookmark this blog post for later? You can create a free Grow.me account and use the “heart” on the left-hand side of your screen to save it. It’s easy to have your internet favorites in one place.